Creating a Simple BLE Scanner on iPhone


Here are steps to create a simple BLE (Bluetooth Low Energy) scanner app for iPhone (for my own learning purpose). The goal is to enable below features.

  • Scan for all advertising devices around.
  • Print the device name, RSSI (signal strength), and advertising data [1] for each discovered device in the debug console output [2].

* It doesn’t filter any specific UUID, doesn’t connect to any peripheral device, and doesn’t show anything on app screen.


Prerequisites (parentheses indicate my environment)

  • Xcode (10.0) ruining on Mac (10.14)
  • iPhone (iPhone 8 with iOS 12.0.1)
    * An actual iOS device is required since Bluetooth is not supported in Xcode simulator.


Steps
1. Launch Xcode and create a Single View App.

2. Open ViewController.swift file and import CoreBluetooth framework.

import CoreBluetooth

3. In order to scan, iPhone need to be BLE central. So, add CBCentralManagerDelegate protocol to ViewController class.

class ViewController: UIViewController, CBCentralManagerDelegate {

4. Then, Xcode will prompt an error. Click on “Fix” button and it will create  centralManagerDidUpdateState method which will be called when the central manager’s state is changed. At startup, this method is called after instantiating CBCentralManager.

5. Declare a variable for CBCentralManager in ViewController class.

private var centralManager : CBCentralManager!

6. Instantiate CBCentralManager in viewDidLoad method.

centralManager = CBCentralManager(delegate: self, queue: nil, options: nil)

7. In centralManagerDidUpdateState method, start scanning when the state is poweredOn.

if central.state == .poweredOn {
    print("Bluetooth is On")
    centralManager.scanForPeripherals(withServices: nil, options: nil)
} else {
    print("Bluetooth is not active")
}

8. Define centralManager didDiscover method in ViewController class. It will be called when any advertising device is discovered. Inside the method, it prints the device name, RSSI, and advertising data.

public func centralManager(_ central: CBCentralManager, didDiscover peripheral: CBPeripheral, advertisementData: [String : Any], rssi RSSI: NSNumber) {
    print("\nName   : \(peripheral.name ?? "(No name)")")
    print("RSSI   : \(RSSI)")
    for ad in advertisementData {
        print("AD Data: \(ad)")
    }
}


Test
1. Connect iPhone to Mac.

2. Make sure Bluetooth setting is ON on the connected iPhone.

3. Build and run the program, and check the console output on Xcode. Below is an example of the output.

Bluetooth is On

Name   : Flex
RSSI   : -55
AD Data: (key: "kCBAdvDataIsConnectable", value: 1)
AD Data: (key: "kCBAdvDataLocalName", value: Flex)
AD Data: (key: "kCBAdvDataServiceUUIDs", value: <__NSArrayM 0x282a0c600>(
ADAB3BF6-6E7D-4601-BDA2-BFFAA68956BA
)
)
AD Data: (key: "kCBAdvDataTxPowerLevel", value: -6)
AD Data: (key: "kCBAdvDataServiceData", value: {
    "Device Information" = <0704>;
})

Name   : Apple TV
RSSI   : -89
AD Data: (key: "kCBAdvDataIsConnectable", value: 1)

Name   : (No name)
RSSI   : -71
AD Data: (key: "kCBAdvDataManufacturerData", value: <06000109 210ab8f3 61ae6190 4445534b 544f502d 4e424c54 533655>)
AD Data: (key: "kCBAdvDataIsConnectable", value: 0)

Name   : (No name)
RSSI   : -96
AD Data: (key: "kCBAdvDataIsConnectable", value: 1)

In the example above, it detected my Fitbit Flex (Line 3-14) and some other devices. All possible advertising data type on CoreBluetooth are listed here.


References
[1] Advertising Data Type – Bluetooth SIG
[2] Console output in Xcode – Apple Developer


Setting Up Bluetooth OOB Pairing with NFC on Raspberry Pi

This post shows steps to setup Bluetooth Out-Of-Band (OOB) pairing using NFC [1] on Raspberry Pi using nfcpy [2]. The goal is to pair a phone and Raspberry Pi by just touching each other.


Prerequisites (parentheses indicate my environment)


Steps
1. Installation
1-1. Install nfcpy.

pip install -U nfcpy

1-2. Verify installation by running the module.

python -m nfc

The output should be like this:

$ python -m nfc
No handlers could be found for logger "nfc.llcp.sec"
This is the 0.13.5 version of nfcpy run in Python 2.7.13
on Linux-4.14.50-v7+-armv7l-with-debian-9.4
I'm now searching your system for contactless devices
** found usb:04e6:5591 at usb:001:004 but access is denied
-- the device is owned by 'root' but you are 'pi'
-- also members of the 'root' group would be permitted
-- you could use 'sudo' but this is not recommended
-- better assign the device to the 'plugdev' group
sudo sh -c 'echo SUBSYSTEM==\"usb\", ACTION==\"add\", ATTRS{idVendor}==\"04e6\", ATTRS{idProduct}==\"5591\", GROUP=\"plugdev\" >> /etc/udev/rules.d/nfcdev.rules'
sudo udevadm control -R # then re-attach device
I'm not trying serial devices because you haven't told me
-- add the option '--search-tty' to have me looking
-- but beware that this may break other serial devs
Sorry, but I couldn't find any contactless device

1-3. As the output suggests, copy line 11 above and execute it.

sudo sh -c 'echo SUBSYSTEM==\"usb\", ACTION==\"add\", ATTRS{idVendor}==\"04e6\", ATTRS{idProduct}==\"5591\", GROUP=\"plugdev\" >> /etc/udev/rules.d/nfcdev.rules'

1-4. Reboot the system.

sudo reboot

1-5. After reboot, run the module again.

python -m nfc

This time, the output should be like this:

$ python -m nfc
No handlers could be found for logger "nfc.llcp.sec"
This is the 0.13.5 version of nfcpy run in Python 2.7.13
on Linux-4.14.50-v7+-armv7l-with-debian-9.4
I'm now searching your system for contactless devices
** found SCM Micro SCL3711-NFC&RW PN533v2.7 at usb:001:004
I'm not trying serial devices because you haven't told me
-- add the option '--search-tty' to have me looking
-- but beware that this may break other serial devs


2. Setting up Bluetooth OOB Pairing
2-1. Download example code [3].

git clone https://github.com/nfcpy/nfcpy.git

2-2. Create NDEF data [4] for Bluetooth OOB pairing [5].

./nfcpy/examples/ndeftool.py make btcfg -o bt_oob_conf XX:XX:XX:XX:XX:XX

Note: Replace “XX:XX:XX:XX:XX:XX” with your Raspberry Pi’s Bluetooth device address.

2-3. Write NDEF data to NFC adapter [6].

./nfcpy/examples/tagtool.py emulate -l bt_oob_conf tt3

2-4. Open another terminal and launch Bluetooth command line interface.

bluetoothctl

2-5. Enable the pairing agent.

agent NoInputNoOutput

2-6. Set the agent as default agent.

default agent

2-7. Enable discoverable mode.

discoverable on


3. Test
3-1. Enable NFC on the phone.

3-2. Move the phone close to the NFC adapter.

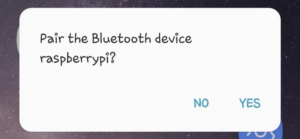
3-3. Allow the pairing request on the phone.

3-4. Allow the service authorization on Raspberry Pi if requested.

Authorize service
[agent] Authorize service 0000111E-0000-1000-8000-00805F9B34FB (yes/no): yes
Authorize service
[agent] Authorize service 0000110d-0000-1000-8000-00805f9b34fb (yes/no): yes


References
[1] Bluetooth Secure Simple Pairing Using NFC – NFC Forum
[2] Python module for near field communication – nfcpy
[3] nfcpy – GitHub
[4] NFC Data Exchange Format – nfcpy
[5] make btcfg – nfcpy
[6] emulate – nfcpy


Setting Up Wi-Fi Simple Configuration with NFC on Raspberry Pi

This post shows steps to setup Wi-Fi Simple Configuration with NFC adapter on Raspberry Pi using nfcpy[1]. The goal is to enable “tap-to-connect” a NFC enabled phone with a Wi-Fi access point [2].


Prerequisites (parentheses indicate my environment)


Steps
1. Installation
1-1. Install nfcpy.

pip install -U nfcpy

1-2. Verify installation by running the module.

python -m nfc

The output should be like this:

$ python -m nfc
No handlers could be found for logger "nfc.llcp.sec"
This is the 0.13.5 version of nfcpy run in Python 2.7.13
on Linux-4.14.50-v7+-armv7l-with-debian-9.4
I'm now searching your system for contactless devices
** found usb:04e6:5591 at usb:001:004 but access is denied
-- the device is owned by 'root' but you are 'pi'
-- also members of the 'root' group would be permitted
-- you could use 'sudo' but this is not recommended
-- better assign the device to the 'plugdev' group
sudo sh -c 'echo SUBSYSTEM==\"usb\", ACTION==\"add\", ATTRS{idVendor}==\"04e6\", ATTRS{idProduct}==\"5591\", GROUP=\"plugdev\" >> /etc/udev/rules.d/nfcdev.rules'
sudo udevadm control -R # then re-attach device
I'm not trying serial devices because you haven't told me
-- add the option '--search-tty' to have me looking
-- but beware that this may break other serial devs
Sorry, but I couldn't find any contactless device

1-3. As the output suggests, copy line 11 above and execute it.

sudo sh -c 'echo SUBSYSTEM==\"usb\", ACTION==\"add\", ATTRS{idVendor}==\"04e6\", ATTRS{idProduct}==\"5591\", GROUP=\"plugdev\" >> /etc/udev/rules.d/nfcdev.rules'

1-4. Reboot the system.

sudo reboot

1-5. After reboot, run the module again.

python -m nfc

This time, the output should be like this:

$ python -m nfc
No handlers could be found for logger "nfc.llcp.sec"
This is the 0.13.5 version of nfcpy run in Python 2.7.13
on Linux-4.14.50-v7+-armv7l-with-debian-9.4
I'm now searching your system for contactless devices
** found SCM Micro SCL3711-NFC&RW PN533v2.7 at usb:001:004
I'm not trying serial devices because you haven't told me
-- add the option '--search-tty' to have me looking
-- but beware that this may break other serial devs


2. Setting up Wi-Fi Simple Configuration
2-1. Download example code [3].

git clone https://github.com/nfcpy/nfcpy.git

2-2. Create NDEF data [4] for Configuration token [5].

./nfcpy/examples/ndeftool.py make wificfg NETWORK_NAME --key PASSWORD -o cfg_token

Note: Replace “NETWORK_NAME” and “PASSWORD” based on your environment.

2-3. Write NDEF data to NFC adapter [6].

./nfcpy/examples/tagtool.py emulate -l cfg_token tt3


3. Test
3-1. Enable NFC on the phone.

3-2. Move the phone close to the NFC adapter.

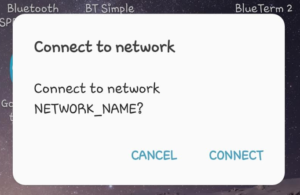
3-3. Allow to connect if the phone asks for permission.


References
[1] Python module for near field communication – nfcpy
[2] WPS adds NFC “tap-to-connect” for simple set up – Wi-Fi Alliance
[3] nfcpy – GitHub
[4] NFC Data Exchange Format – nfcpy
[5] make wificfg – nfcpy
[6] emulate – nfcpy


Changing a Bluetooth Device Address on Raspberry Pi

This post shows how to change Bluetooth device address on Raspberry Pi.

Bluetooth device address (aka BD_ADDR, Bluetooth MAC address) is a 48-bit identifier assigned to each Bluetooth chip. Whether it can be changed is depends on each chip. Fortunately, Raspberry Pi’s on-board Bluetooth chip (Cypress/Broadcom) allows device address change.


Assumptions
Raspberry Pi board with on-board Bluetooth chip (e.g. Raspberry Pi3 B+Raspberry Pi Zero W)


Steps
1. Prep
1-1.Install prerequisite package.

sudo apt-get install libbluetooth-dev

1-2. Download the archived file of bdaddr tool. [1][2]

wget -U firefox http://www.petrilopia.net/wordpress/wp-content/uploads/bdaddrtar.bz2

1-3. Extract the archive file.

bzip2 -d bdaddrtar.bz2 && tar xf bdaddrtar

1-4. Make.

cd bdaddr && make


2. Bluetooth Address Change
2-1. Check the original Bluetooth address..

$ ./bdaddr -i hci0
Manufacturer:   Broadcom Corporation (15)
Device address: B8:27:EB:89:DA:DA

2-2. Change Bluetooth device address.

sudo ./bdaddr -i hci0 -r 00:11:22:33:44:55

The result should be like this:

$ sudo ./bdaddr -i hci0 -r 00:11:22:33:44:55
Manufacturer:   Broadcom Corporation (15)
Device address: B8:27:EB:89:DA:DA
New BD address: 00:11:22:33:44:55

Address changed - Device reset successully

2-3. Reset hci device.

sudo hciconfig hci0 reset

2-4. Also, restart bluetooth service.

sudo systemctl restart bluetooth.service


3. Verify
3-1. Check the change with bdaddr tool.

$ ./bdaddr -i hci0
Manufacturer:   Broadcom Corporation (15)
Device address: 00:11:22:33:44:55

3-2. Check the change with bluetoothctl.

$ bluetoothctl
[bluetooth]# list
Controller 00:11:22:33:44:55 raspberrypi [default]


References
[1] Change your bluetooth device mac-address
[2] Wget: Error 403- Can I get around this?


Qt Creator Cross Compiling Environment for Raspbian Stretch using QtRpi


This post shows how to create Qt Creator cross development environment on Ubuntu PC for Raspbian Stretch by using QtRpi. Although QtRpi does not officially support Raspbian Stretch [1], additional few steps make it possible to create the cross development environment for Stretch. (For Raspbian Jessie, please see this post.)


Contents
– Assumptions
– Steps
1. Host Preparation (Ubuntu)
2. QtRpi Installation
3. Deploy to Raspberry Pi
4. Raspberry Pi Configuration
5. Qt Creator Configuration
6. Verify Cross Compiling Environment
– Reference


Assumptions
Here are some assumptions for the steps below.

  • Ubuntu Linux running on host PC
  • Raspbian Stretch running on target Raspberry Pi
  • Qt Creator running on host PC
  • SSH access from host PC to target Raspberry Pi

In this post, the versions I use are below:

  • Ubuntu 18.04 (host)
  • Qt Creator 4.6.1 (host)
  • Raspbian Stretch April 2018 version running on Raspberry Pi 3 B+ (target)
  • Qt 5.7.0 (target)


Steps
1. Host Preparation (Ubuntu)
1-1. Install dependencies.

sudo apt-get update
sudo apt-get install curl g++ gdb-multiarch git unzip zip -y

1-2. Configure environment variable for Qt version. As of writing this, QtRpi supports only 5.6.2 and 5.7.0. [2]

export QTRPI_QT_VERSION='5.7.0'

1-3. Configure environment variable for Raspberry Pi model. For different models, check the official site.

export QTRPI_TARGET_DEVICE='linux-rpi3-g++'

1-4. Configure environment variable for target IP address.

export QTRPI_TARGET_HOST='pi@192.168.0.5'

1-5. Generate SSH key. Just press enter when you asked about pass phrase.

ssh-keygen

1-6. Copy the key to the target so that you can log in without requiring a password afterwards.

ssh-copy-id $QTRPI_TARGET_HOST


2. QtRpi Installation
2-1. On host, download QtRpi from GitHub.

git clone https://github.com/neuronalmotion/qtrpi.git && cd qtrpi

2-2. Then run “init-qtrpi-minimal.sh” script. This will take a while.

./init-qtrpi-minimal.sh


3. Deploy to Raspberry Pi
Before start the deployment script, one modification is required since a name of a package has been changed. [3]

3-1. Open the deployment script file.

nano deploy-qtrpi.sh

3-2. Look for the line below and replace “libinput5” with “libinput10”.

ssh $TARGET_HOST 'sudo apt-get install -y libts-0.0-0 libinput5 fontconfig'

After the change, the line should be this:

ssh $TARGET_HOST 'sudo apt-get install -y libts-0.0-0 libinput10 fontconfig'

3-3. Then, run the deployment script.

./deploy-qtrpi.sh --prepare-rpi


4. Raspberry Pi Configuration
4-1. Login to Raspberry Pi.

ssh $QTRPI_TARGET_HOST

4-2. Create symbolic links since some libraries has changed names in Stretch. [4] [5] [6]

sudo ln -s /opt/vc/lib/libbrcmEGL.so /usr/lib/arm-linux-gnueabihf/libEGL.so
sudo ln -s /opt/vc/lib/libbrcmGLESv2.so /usr/lib/arm-linux-gnueabihf/libGLESv2.so

4-3. Copy font files.

cp -r /usr/share/fonts/truetype/dejavu /usr/local/qt5pi/lib/fonts

Note: This step is a workaround for font display. (see troubleshoot in the previous post for detail.)


5. Qt Creator Configuration
5-1. Device Configuration
5-1-1. Launch Qt Creator on host.
5-1-2. Navigate to “Tools” > “Options…”
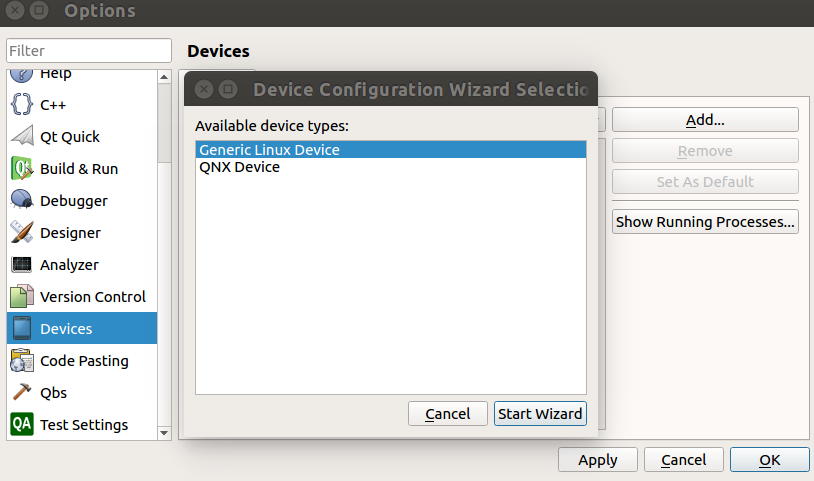
5-1-3. In Options window, select “Devices” from left side bar.
5-1-4. Select “Add…”
5-1-5. Double click on “Generic Linux Device”

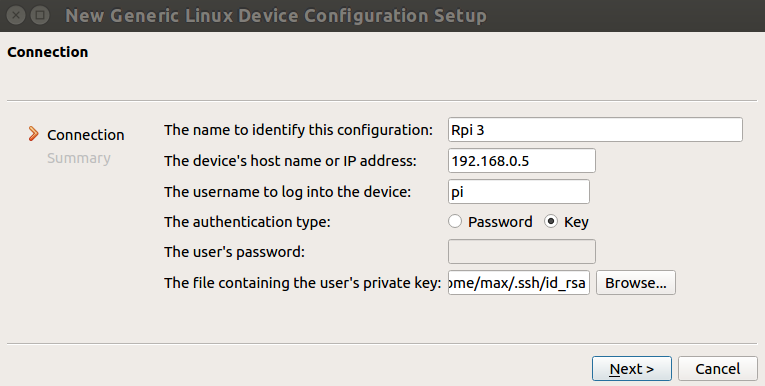
5-1-6. Enter information below into “New Generic Linux Device Configuration Setup” window.
Configuration name:

Rpi 3

IP address:  (your RPi’s IP address)

192.168.0.5

Username:

pi

Authentication type:

Key

5-1-7. Click on “Next”, Then “Finish”. Then, it will automatically start “Device Test”.
5-1-8. Click “Close” to close “Device Test” window.

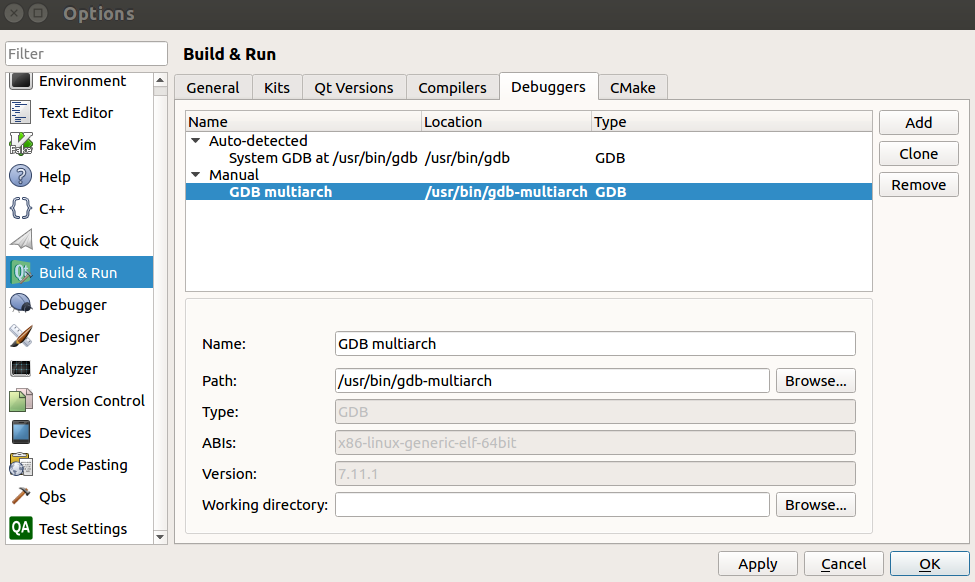
5-2. Debuggers
5-2-1. In Options window, select “Build & Run” from left side bar.
5-2-2. Click on “Debuggers” tab
5-2-3. Click on “Add” button
5-2-4. Put information below:
Name:

GDB multiarch

Path:

/usr/bin/gdb-multiarch


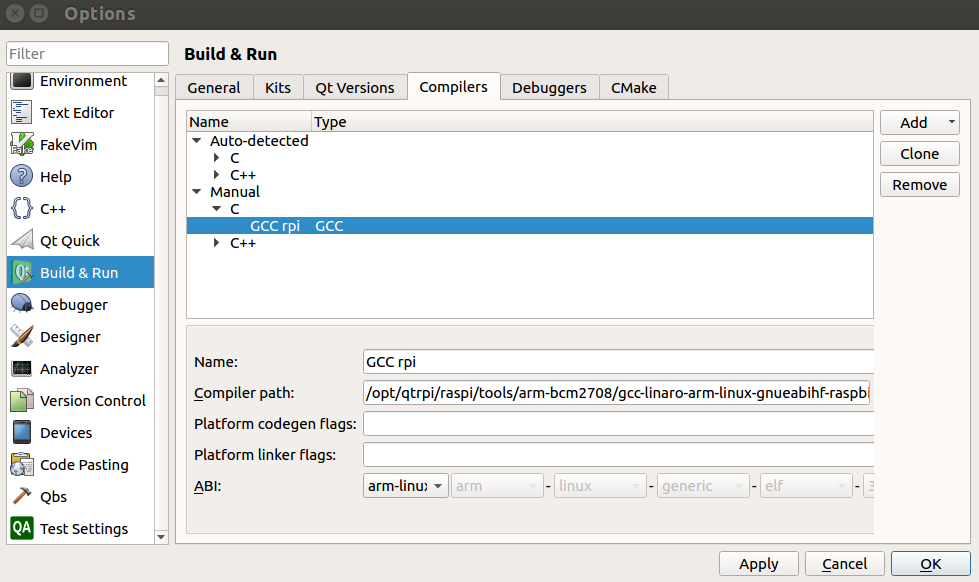
5-3. Compilers
5-3-1. Click on “Compilers” tab
5-3-2. Navigate to “Add” > “GCC” > “C”
5-3-3. Enter information below:
Name:

GCC rpi

Compiler Path:

/opt/qtrpi/raspi/tools/arm-bcm2708/gcc-linaro-arm-linux-gnueabihf-raspbian-x64/arm-linux-gnueabihf/bin/gcc

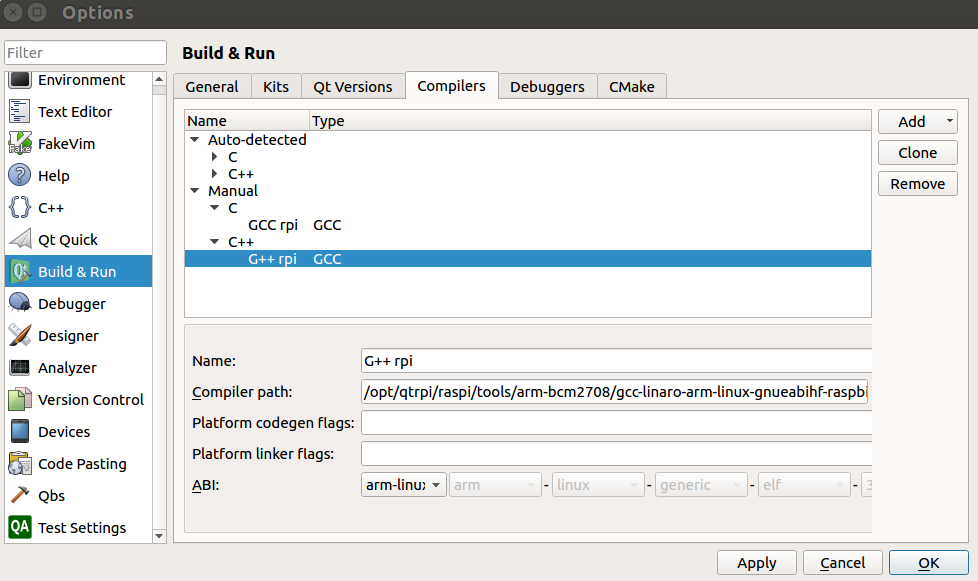
5-3-4. Navigate to “Add” > “GCC” > “C++”
5-3-5. Enter information below:
Name:

G++ rpi

Compiler Path:

/opt/qtrpi/raspi/tools/arm-bcm2708/gcc-linaro-arm-linux-gnueabihf-raspbian-x64/arm-linux-gnueabihf/bin/g++


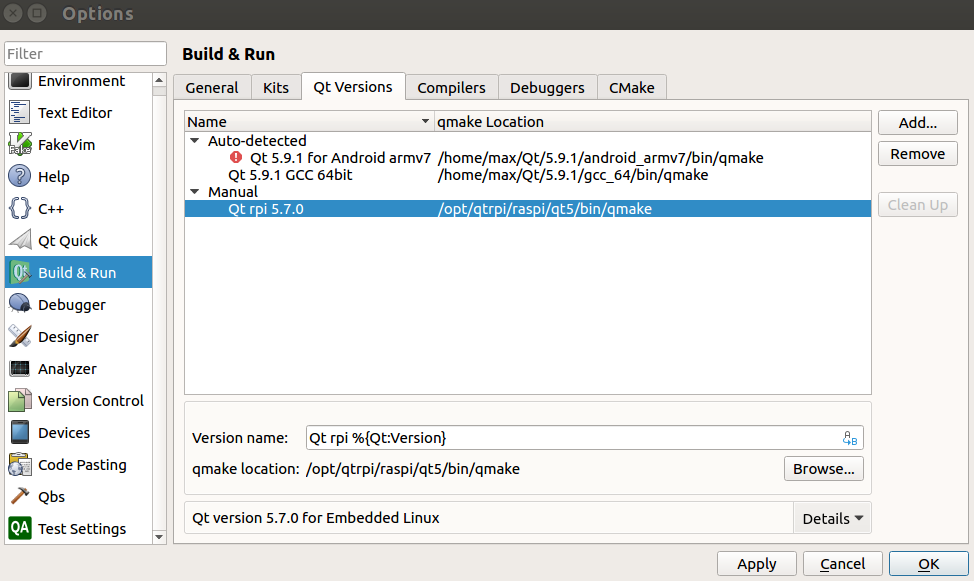
5-4. Qt Versions
5-4-1. Click on “Qt Versions” tab
5-4-2. Click on “Add…”
5-4-3. Navigate the qmake path:

/opt/qtrpi/raspi/qt5/bin/qmake

5-4-4. Enter below as “Version name”.

Qt rpi %{Qt:Version}

5-4-5. Click on “Apply” button

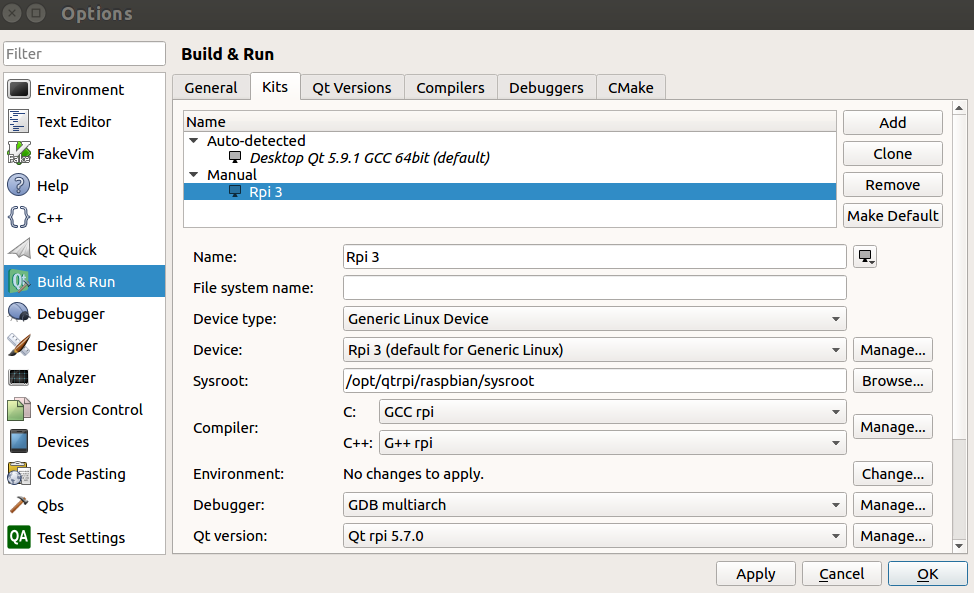
5-5. Kits
5-5-1. Click on “Kits” tab and then “Add” button
5-5-2. Enter (or select) information below:
Name :

Rpi 3

Device Type:

Generic Linux Device

Sysroot :

/opt/qtrpi/raspbian/sysroot

Compiler: C:

GCC rpi

Compiler: C++:

G++ rpi

Debugger :

GDB multiarch

Qt Version :

Qt rpi 5.7.0

5-5-3. Click on “Apply” button, then “OK”.


6. Verify Cross Compiling Environment
Let’s check if everything is OK by building a sample project on host and executing it on RPi.

6-1. “File” > “New File or Project”
6-2. “Application” > “Qt Qucick Application”, then click on “Choose…” button.
6-3. Enter project name and click on “Next”.
6-4. Click on “Next” on “Define Build System”.
6-5. Select “Qt 5.7” and click “Next” on “Define Project Details”.
6-6. Check on “Rpi 3” and click “Next” on “Kit Selection”.
6-7. Click on “Finish” button on “Project Management”.
6-8. Open .pro file from the project tree.
6-9. Replace “Default rules for deployment” portion with the two lines below.

target.path = /home/pi/
INSTALLS += target

6-10. Select “Projects” icon on left side bar.
6-11. Click on “Rpi 3” under “Build & Run”.
6-12. Click on “Run” icon on the left side bar.


References
[1] QtRpi Requirements – GitHub
[2] What versions of Qt is available? – QtRpi FAQ
[3] deploy-qtrpi.sh “unable to locate libinput5” #69 – qtrpi – GitHub
[4] Games that uses libGLESv2.so doen’t work in raspbian stretch – raspberrypi.org
[5] ArchLinux Qt eglfs – raspberrypi.org
[6] Linking the Application to the Static Version of Qt – Qt Documentation