Enabling Equalizer on Handsfree Sending Audio with ALSA equal plugin


This post shows steps to enable equalizer on Bluetooth handsfree (HFP) sending audio by using ALSA equal plugin.


Contents
– Prerequisites
– Steps
1. Equalizer Plugin Installation
2. ALSA Configuration
3. PulseAudio Configuration
4. Connect your phone and make a call
5. Adjust equalizer
– Reference


Prerequisites
Bluetooth Handsfree profile needs to be enabled first. If it’s not done yet, please refer this post.


Steps
1. Equalizer Plugin Installation

sudo apt-get install libasound2-plugin-equal -y


2. ALSA Configuration
2-1. Load the kernel module of ALSA loopback device.

sudo modprobe snd-aloop

The following command enables the module at boot time,

echo "snd-aloop" | sudo tee -a /etc/modules

2-2. Create .asoundrc.

nano ~/.asoundrc

2-3. Add the lines below, save and close the file.

ctl.equal {
  type equal
}

pcm.plugequal {
  type equal
  slave.pcm "plughw:Loopback,0,0"
}

pcm.equal {
  type plug
  slave.pcm plugequal
}

1-4. Reload .asoundrc by entering the command below:

alsactl kill rescan


3. PulseAudio Configuration
3-1. Launch PulseAudio if it’s not running yet.

pulseaudio --start

3-2. Add modules and set default source as below:

pactl load-module module-alsa-sink device=equal
pactl load-module module-loopback sink=alsa_output.equal
pactl load-module module-alsa-source device=plughw:Loopback,1,0
pactl set-default-source alsa_input.plughw_Loopback_1_0


4. Connect your phone and make a call
4-1. Connect your phone via bluetooth by using bluetoothctl.

4-2. Make a call by using your phone, or oFono.


5. Adjust equalizer
Now adjust the equalizer by using alsamixer command and listen the audio on the far-end.

alsamixer -D equal


Reference
– Redirect an audio stream with aloop
https://blog.getreu.net/projects/snd-aloop-device/body.html


Accessing SD Card from Linux VirtualBox Guest on Windows Host

This post shows steps to enable SD card access from Linux VirtualBox guest on Windows host. In this post, I use Windows 10 as the host and Ubuntu 18.04 as the guest.


Steps
1. Check Device ID for SD Card
1-1. Open Command Prompt (or Windows PowerShell) as administrator (e.g. “Windows” key + “x” and select “Command prompt (admin)”).

1-2. List disc drives using wmic command before inserting SD card to PC.

wmic diskdrive list brief

The output should be like this:

Caption                     DeviceID            Model                       Partitions  Size
SAMSUNG MZFLV256HCHP-000MV  \\.\PHYSICALDRIVE0  SAMSUNG MZFLV256HCHP-000MV  3           256052966400

1-3. Insert an SD card to the PC and run the same command. You should be able to find an additional line, and that shows DeviceID for the SD card. In this example, it’s “\\.\PHYSICALDRIVE1“.

Caption                               DeviceID            Model                                 Partitions  Size
Generic- USB3.0 CRW   -SD USB Device  \\.\PHYSICALDRIVE1  Generic- USB3.0 CRW   -SD USB Device  2           31914086400
SAMSUNG MZFLV256HCHP-000MV            \\.\PHYSICALDRIVE0  SAMSUNG MZFLV256HCHP-000MV            3           256052966400


2. Create Virtual Machine Disk file (VMDK) for SD Card
2-1. Move folder to VirtualBox installation folder. In this example, it’s “C:\Program Files\Oracle\VirtualBox\”.

cd "C:\Program Files\Oracle\VirtualBox\"

2-2. Create VMDK file for the SD card device with “VBoxManage.exe”. The last argument is the DeviceID for SD card. (See Step 1-3).

.\VBoxManage.exe internalcommands createrawvmdk -filename C:\sdcard.vmdk -rawdisk \\.\PHYSICALDRIVE1

If everything is fine, the output will be like this, and “sdcard.vmdk” will be created in root folder of C drive.

RAW host disk access VMDK file C:\sdcard.vmdk created successfully.


3. Attach SD card VMDK to VM
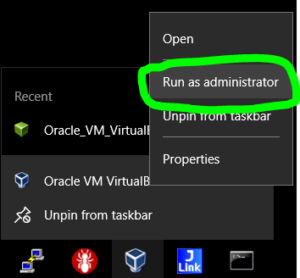
3-1. Launch VirtualBox as administrator.

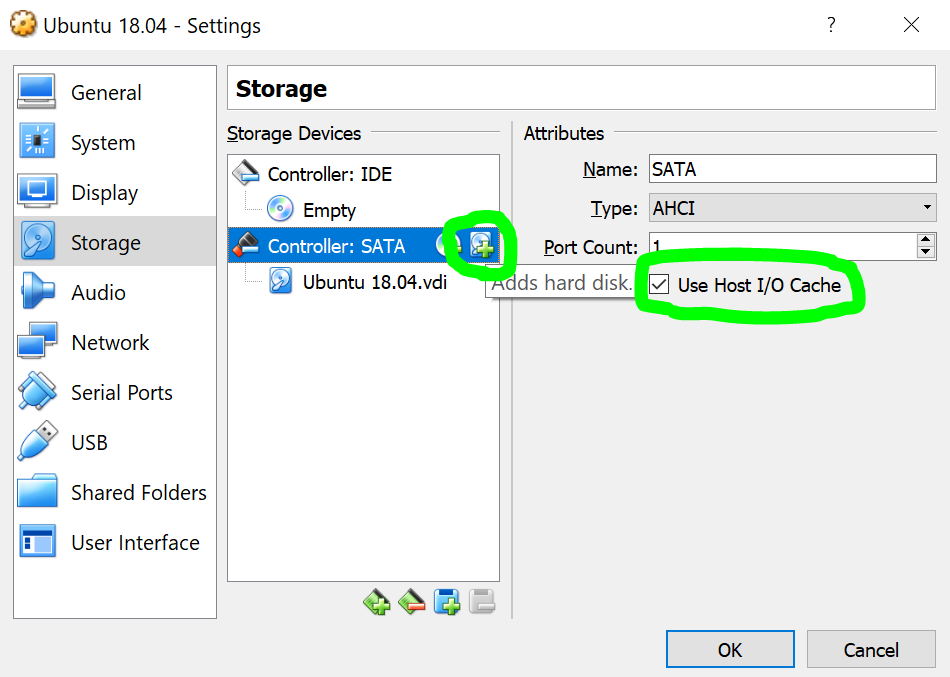
3-2. Navigate to “Settint” > “Strage”.

3-3. Click on “Controller: SATA”.

3-4. Check “Use Host I/O Cache” check box.

3-5. Then, click on “Adds hard disk” icon.

3-6. Select “Choose Existing Disk”.

3-7. Navigate to C drive and select “sdcard.vmdk” file which is created in Step 2-2.


4. Verify
4-1. Launch the VM and verify. In my case it appeared as “/dev/sdb” as below (Raspbian OS image in 32GB SD card).

$ sudo fdisk -l /dev/sdb
Disk /dev/sdb: 29.8 GiB, 32010928128 bytes, 62521344 sectors
Units: sectors of 1 * 512 = 512 bytes
Sector size (logical/physical): 512 bytes / 512 bytes
I/O size (minimum/optimal): 512 bytes / 512 bytes
Disklabel type: dos
Disk identifier: 0xb1d773dc

Device     Boot Start      End  Sectors  Size Id Type
/dev/sdb1        8192    96453    88262 43.1M  c W95 FAT32 (LBA)
/dev/sdb2       98304 31116287 31017984 14.8G 83 Linux


Troubleshoot
I encountered several errors while trying to use SD card. Here are some troubleshooting.

Troubleshoot A
Error : I/O cache encountered an error while updating data in medium “ahci-0-1” (rc=VERR_ACCESS_DENIED)

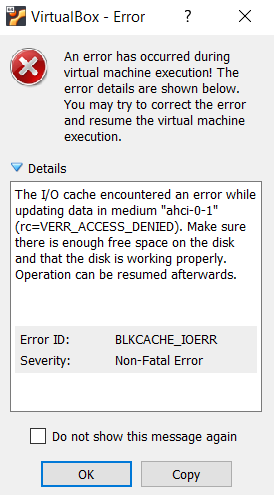
A-1. If you got the error above during/after you made changes on the SD card, please go back to Step 2 and make sure “Use Host I/O Cache” check box is checked.


Troubleshoot B
Error: UUID of the medium does not match the value stored in the media registry.
[1]

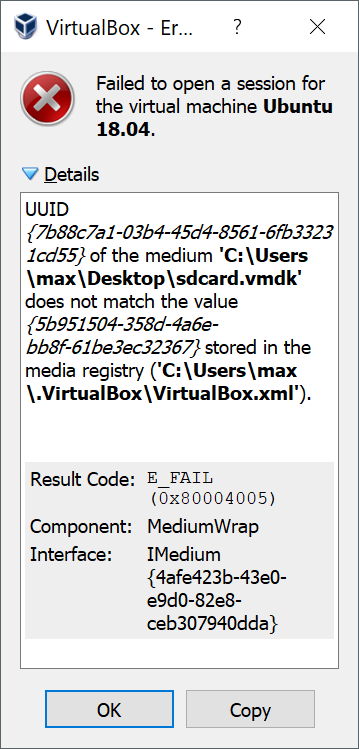
B-1. Make sure you are in VirtualBox installation folder and run the command below.

.\VBoxManage.exe list hdds

You will be able to find the UUID in the error details.

UUID:           5b951504-358d-4a6e-bb8f-61be3ec32367
Parent UUID:    base
State:          inaccessible
Type:           normal (base)
Location:       C:\Users\max\Desktop\sdcard.vmdk
Storage format: VMDK
Capacity:       0 MBytes
Encryption:     disabled

B-2. Remove the disk with command below by specifying the UUID.

.\VBoxManage.exe closemedium disk 5b951504-358d-4a6e-bb8f-61be3ec32367


References
[1] Virtual Box UUID {07c3…} does not match the value {2c1b…} stored in the media registry – stack overflow


Using Your Phone as Touch Screen Display for Raspberry Pi

Got a Raspberry Pi but don’t have a display, keyboard, or mouse? You can go with headless setup, or use your phone as a touch screen display (with onscreen keyboard).

This post shows steps to connect Raspberry Pi with your phone wirelessly and use it as a touch screen display by using Remote Desktop Protocol [1].

Here is the list of contents of this post.

Contents
– Assumptions
– Steps
1. Remote Desktop Server Setup on Raspberry Pi
2. Remote Desktop Client Setup on Your Phone
– Reference


Assumptions
Here are some assumptions before start. In parentheses, it shows my environment for reference.

  • Raspbian Desktop runs on Raspberry Pi (Raspbian 2018 March on Raspberry Pi 3+)
  • iOS or Android device (Android 7.0)
  • Raspberry Pi and phone is connected to same network (private Wi-Fi network: 192.168.0.0/24)
  • SSH enabled on Raspberry Pi


Steps
1. Remote Desktop Server Setup on Raspberry Pi
xrdp [2] is a remote desktop server which is capable of accepting connections from Microsoft Remote Desktop.

1-1. Update the package list.

sudo apt-get update

1-2. Install xrdp.

sudo apt-get install xrdp -y


2. Remote Desktop Client Setup on Your Phone
For client side, we’ll use Microsoft Remote Desktop app which is available for both iPhone and Android. I used Android for below example but the steps are very similar for iPhone.

2-1. Install Microsoft Remote Desktop from the app store.

2-2. Launch the app, then read and accept the terms of the agreements.

2-3. Touch “+” button, then select “Desktop”.

(* I changed the display orientation to portrait mode.)

2-4. Enter Raspberry Pi’s IP address, user name and password.

IP address can be found by using ip command on Raspberry Pi.

ip address show wlan0

The result should look like this:

$ ip address show wlan0
...
inet 192.168.0.1/24 brd 192.168.0.255 scope global wlan0
...


2-5. Tap on newly created Desktop.


2-6. If everything is fine, Raspberry Pi’s desktop will be displayed on your phone!


Microsoft Remote Desktop app provides an onscreen keyboard.


Also, you can select “Touch” or “Mouse Pointer” in setting menu.


References
[1] Remote Desktop Protocol – Wikipedia
[2] xrdp: Open Source Remote Desktop Protocol Server
[3] How to Use an Android Tablet as a Screen for Raspberry Pi


Mapping Caps-Lock Key to Control Key

I used to use Happy Hacking Keyboard. Its control key is located where usual keyboard has caps-lock key. (see below picture). So, for me it’s natural that control key is there, below the tab key and above the shift key.

This post shows steps to reassign the caps-lock key to control key on ordinary keyboard, on Windows, Mac OS X, and Linux.


Contents
1. Windows
2. Mac OS X
3. Linux
4. Reference


1. Windows
I tested with Windows 10 laptop. According to [1], this also works for Windows 7, 8 and Vista.

1-1. Download and install SharpKeys from here.

1-2. Launch SharpKeys and click on “Add” button.

1-3. In “Edit Key Mapping” window, select “Caps Lock” as “From key”, and “Left Ctrl” as “To key”, then click on “OK”.

1-4. Click on “Write to Registry”.

1-5. Restart PC for the changes to take effect.


2. Mac OS X
2-1. Open “System Preferences”.

2-2. Select “Keyboard”.

2-3. Click on “Modifier Keys…” button.

2-4. Select “Control” from pull-down menu for Caps Lock Key, then click on “OK”.


3. Linux
I tested this with Ubuntu 16.04.

3-1. Open keyboard config file.

sudo nano /etc/default/keyboard

3-2. Search a line starts with “XKBOPTIONS” and edit as below:

XKBOPTIONS=ctrl:nocaps

3-3. Restart PC for the changes to take effect.

sudo reboot


4. References
[1] Map Any Key to Any Key on Windows 10, 8, 7, or Vista – How-To Geek
[2] macOS Sierra: Change modifier keys – Apple Support
[3] Change caps-lock to control in virtual console on Ubuntu 17 – ask ubuntu


Creating AltBeacon with Raspberry Pi using BlueZ Example Code


Update (Jul 9, 2019):
Step 1 is no longer required since Raspbian Buster (2019-06-20). Please check the updated steps in here.


A previous post showed the steps to make an iBeacon transmitter with Raspberry Pi using BlueZ example code (i.e. “example-advertisement). This post shows the steps for AltBeacon [1] in the same manner.


Here are the contents of this post.

Contents
– Prerequisites
– Steps
1. Enable experimental flag
2. Download BlueZ
3. Modify BLE Advertisement Example Code
4. Test
– Summary
– Reference


Prerequisites
Here are some prerequisites before start.

  • Raspberry Pi 3 B+ or Raspberry Pi Zero W
    Or any other model with Bluetooth adapter (e.g. Plugable BLE Adapter, Panda Bluetooth 4.0 Adapter)
  • Raspbian Stretch (March 2018)
    I would suggest to use Desktop version of Stretch because I got “DBus.Error.AccessDenied” for some reason when I ran “example-advertisement” on Raspbian Lite. It seems it’s similar to this but couldn’t figure out the cause/workaround.
  • Internet access
    It’s required to download BlueZ example code. Here is a Wi-Fi Setup steps. If you already have the code, you can work offline.


Steps
1. Enable experimental flag
Skip to Step 2 if you are using BlueZ 5.48 or higher. (update BlueZ to 5.48)

$ bluetoothd -v
5.48

If not, follow the steps below.

Bluetooth service needs to be executed with experimental flag since ‘LEAdvertisingManager1’ interface is an experimental feature until BlueZ 5.48 release.

1-1. Open the configuration file for Bluetooth service.

sudo nano /lib/systemd/system/bluetooth.service

1-2. Find a line starting with “ExecStart” and add “–experimental” at the end of the line. After modification, the line should look like this:

ExecStart=/usr/libexec/bluetooth/bluetoothd --experimental

1-3. Reload the configuration file and restart Bluetooth service.

sudo systemctl daemon-reload 
sudo systemctl restart bluetooth.service

1-4. Check the status of Bluetooth service. [Optional]

systemctl status bluetooth.service

You should see the experimental flag. (Line 9 in the example below)

pi@raspberrypi:~ $ systemctl status bluetooth.service 
● bluetooth.service - Bluetooth service
   Loaded: loaded (/lib/systemd/system/bluetooth.service; enabled; vendor preset: enabled)
   Active: active (running) since Wed 2018-02-21 14:31:19 UTC; 4s ago
     Docs: man:bluetoothd(8)
 Main PID: 1122 (bluetoothd)
   Status: "Running"
   CGroup: /system.slice/bluetooth.service
           └─1122 /usr/lib/bluetooth/bluetoothd --experimental


2. Download BlueZ
2-1. Download BlueZ source code.

wget www.kernel.org/pub/linux/bluetooth/bluez-5.43.tar.xz

2-2. Extract the archive file.

tar xvf bluez-5.43.tar.xz

2-3. Run the sample code and make sure that it works. [Optional]

./bluez-5.43/test/example-advertisement

Output should be like this:

$ ./bluez-5.43/test/example-advertisement
GetAll
returning props
Advertisement registered

* Press Ctrl + C to stop the script.


3. Modify BLE Advertisement Example Code
3-1. Copy the example code.

cp ./bluez-5.43/test/example-advertisement ./example-altbeacon

3-2. Open the file and look for TestAdvertisement class.

3-3. Replace ‘__init__’ method:

    def __init__(self, bus, index):
        Advertisement.__init__(self, bus, index, 'peripheral')
        self.add_service_uuid('180D')
        self.add_service_uuid('180F')
        self.add_manufacturer_data(0xffff, [0x00, 0x01, 0x02, 0x03, 0x04])
        self.add_service_data('9999', [0x00, 0x01, 0x02, 0x03, 0x04])
        self.include_tx_power = True

with:

    def __init__(self, bus, index):
        company_id =  0x0118
        type =       [0xBE, 0xAC]
        id1 =        [0x01, 0x02, 0x03, 0x04, 0x05, 0x06, 0x07, 0x08,
                      0x09, 0x10, 0x11, 0x12, 0x13, 0x14, 0x15, 0x16]
        id2 =        [0x11, 0x22]
        id3 =        [0x33, 0x44]
        rssi_at_1m = [0xB3]
        feature  =   [0x00]
        Advertisement.__init__(self, bus, index, 'peripheral')
        self.add_manufacturer_data(company_id, type + id1 + id2 + id3 + rssi_at_1m + feature)


4. Test
4-1. Run the code. The console output should be same as Step 2-3.

./example-altbeacon

4-2. Find your Raspberry Pi using a beacon scanner app. If everything goes well, the Raspberry Pi should be broadcasting AltBeacon message and it can be detected by app. Below are examples of apps.

‘nRF Connect’ for Android


‘Locate Beacon’ for iPhone


Summary
AltBeacon is an open source version of Apple’s iBeacon. It has the same functionality as iBeacon, and the two have similar data structure as below.

*2 : Bluetooth 4.0 Core Specification, Volume 3, Part C, Appendix C, 18.1 Flags
*4 Manufacture dependent value
*5 Application dependent value
*6 Device dependent value


References
[1] AltBeacon