Deploying existing Django App to Heroku


Heroku’s free plan is great for experimenting/prototyping cloud applications. This post shows the steps to deploy existing Django project to Heroku cloud platform using Windows host. As an example, I’ll use this django app from GitHub and deploy it to Heroku.

Here is the list of contents of this post.

Contents
– Steps
1. Setup Python Environment on Windows
2. Install Heroku CLI and Git
3. Setup Local Environment (App & Django)
4. Verify Local Environment
5. Setup Heroku
6. Deploy your application to Heroku
7. Verify
– Summary
– Reference


Steps
Note: If you already have working Python/Django environment with pipenv on your Windows PC, skip Step 1, 3 and 4.

1. Setup Python Environment on Windows
1-1. Download Python installer from here. In this post, I use Windows x86-64 executable installer for Python 3.6.4 which is the latest at the moment.


1-2. Launch the installer.


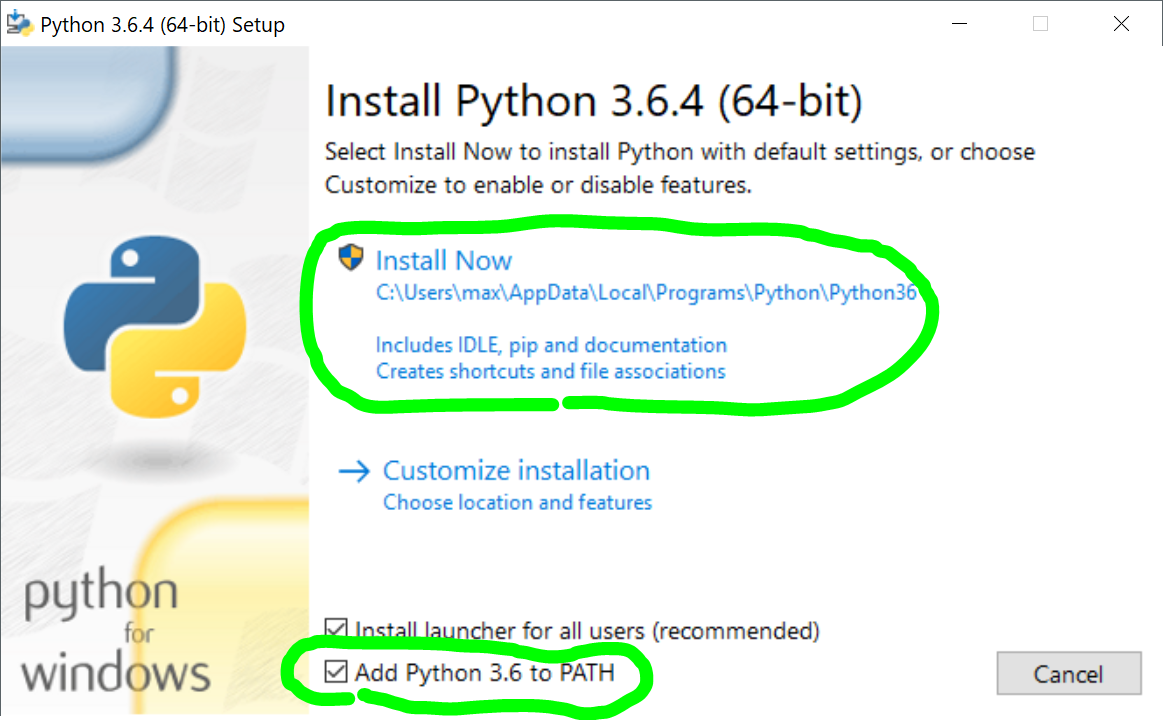
1-3. Check on “Add Python 3.6 to PATH” option, then click on “Install Now”.
 

1-4. After Python is successfully installed, open “Command Prompt” (Press Win + x, then select “Command Prompt”.)


1-5. Install pipenv by running the following command:

pip install pipenv


2. Install Heroku CLI and Git
Since Heroku CLI (Command Line Interface) tool installer also installs Git which will be used in the next step, let’s install both here. Heroku CLI will be required later, in Step 5.

2-1. Download the installer from here and launch it.


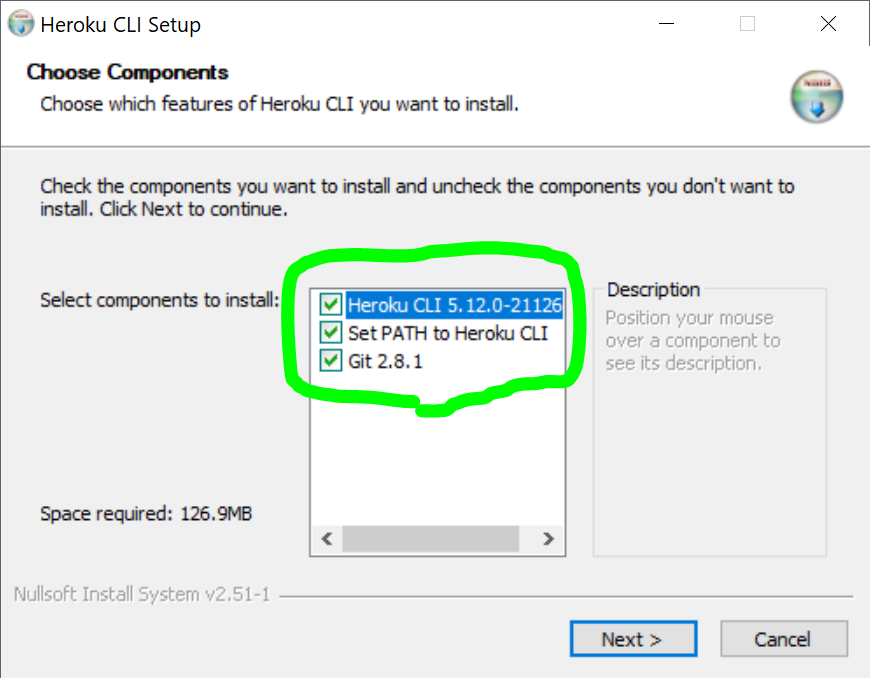
2-2. When choosing components, make sure “Set Path to Heroku CLI” and “Git” is selected.
 

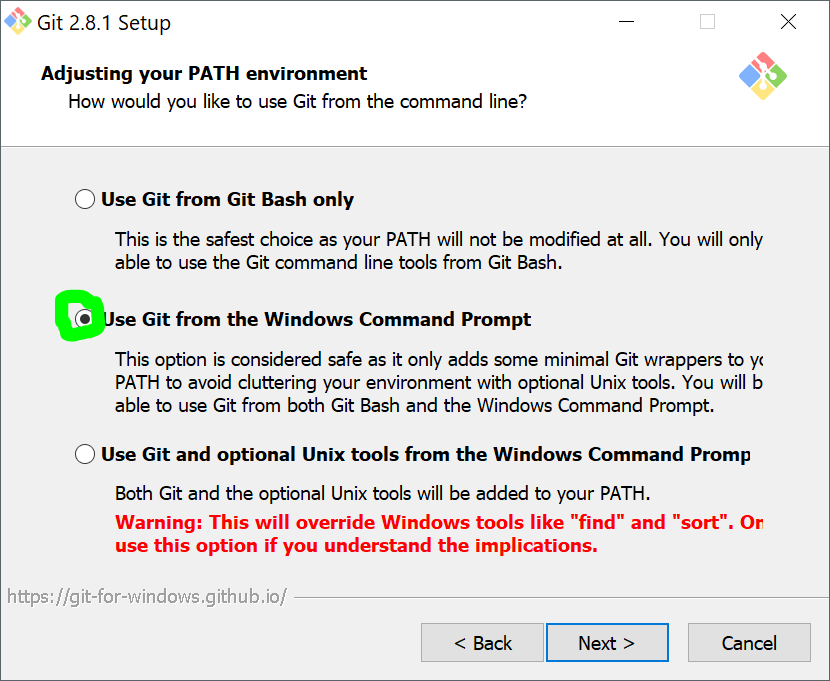
2-3. When setting up PATH environment for Git, make sure “Use Git from the Windows Command Prompt” is selected.
 

3. Setup Local Environment (App & Django)
Note: In this post, I use this simple-django-login as an example of existing Django app.

3-1. Re-launch “Command Prompt” to load the updated PATH environment variable for Git (and heroku CLI).


3-2. Clone an existing Django app.

git clone https://github.com/sibtc/simple-django-login.git && cd simple-django-login


3-3. Create a python virtual environment with pipenv.

pipenv --three


3-4. Spawns a shell within the virtualenv.

pipenv shell


3-5. Install “django”.

pipenv install django


4. Verify Local Environment
Before applying any changes for heroku, let’s verify if the app works in the local environment.

4-1. Run the app by typing the following command:

python manage.py runserver

The output should be like this:

C:\work\simple-django-login>python manage.py runserver
Performing system checks...

System check identified no issues (0 silenced).

You have 12 unapplied migration(s). Your project may not work properly until you apply the migrations for app(s): auth, contenttypes, sessions.
Run 'python manage.py migrate' to apply them.
February 09, 2018 - 12:21:56
Django version 2.0.2, using settings 'login.settings'
Starting development server at http://127.0.0.1:8000/
Quit the server with CTRL-BREAK.


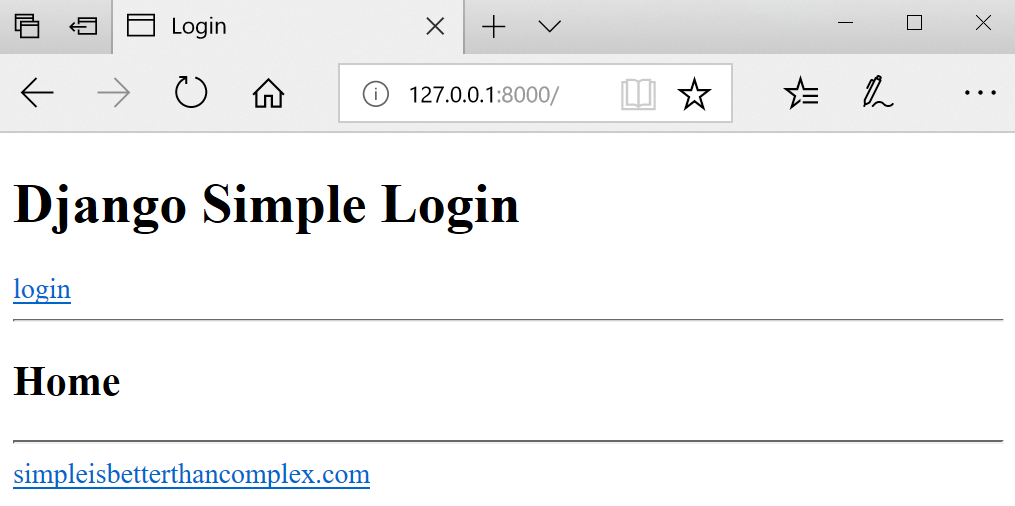
4-2. Then access “http://127.0.0.1:8000/” with a browser. If everything is fine, you should see “Django Simple Login” page.
 

5. Setup Heroku
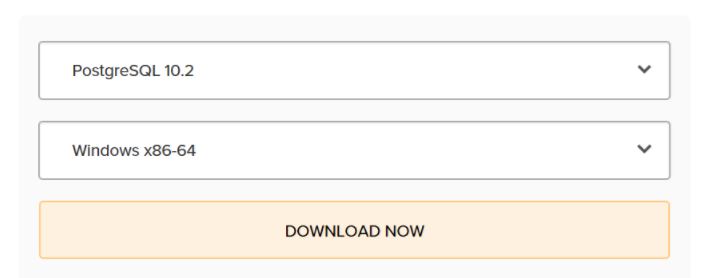
5-1. Download PostgreSQL installer from here and install it.
 

5-2. Install “django-heroku”. This module configures Django app for deployment on Heroku. [4]

pipenv install django-heroku


5-3. Add lines below at the bottom of “settings.py” in “login” app.

# Configure Django App for Heroku.
import django_heroku
django_heroku.settings(locals())


5-4. In “simple-django-login” folder, create a file named “Procfile.windows” with the content below.

web: python manage.py runserver localhost:8000


5-5. Verify local heroku environment by typing below:

heroku local web -f Procfile.windows

Then access “http://127.0.0.1:8000/” with browser. You should see “Django Simple Login” page same as Step 4-2. Now, the app is working with heroku local environment.


6. Deploy your application to Heroku [5]
6-1. Install gunicorn.

pipenv install gunicorn

Note: gunicorn is not required on Windows local environment but this step adds it’s package dependency to Pipfile, which will be used on heroku remote.


6-2. In “simple-django-login” folder, create a file named “Procfile” with the content below:

web: gunicorn login.wsgi --log-file -


6-3. Create a Heroku account from here if you don’t have it already.


6-4. Login heroku account by using “Heroku Command Line Interface”.

heroku login

You’ll be asked for your credentials.

C:\work\simple-django-login>heroku login
Enter your Heroku credentials:
Email: xxx@xxxxx.com
Password: ****************
Logged in as xxx@xxxxx.com


6-5. Create heroku application. It automatically creates the git remote too.

heroku create simple-django-login

The output should be like this:

C:\work\simple-django-login>heroku create simple-django-login
Creating ⬢ simple-django-login... done
https://simple-django-login.herokuapp.com/ | https://git.heroku.com/simple-django-login.git


6-6. Add files to git repo.

git add .


6-7. Commit it.

git commit -m "Initial commit"


6-8. Upload to Heroku remote.

git push heroku master


6-9. Migrate database.

heroku run python manage.py migrate


7. Verify
7-1. Open the app by typing the command below:

heroku open

The command automatically open “https://simple-django-login.herokuapp.com/”.
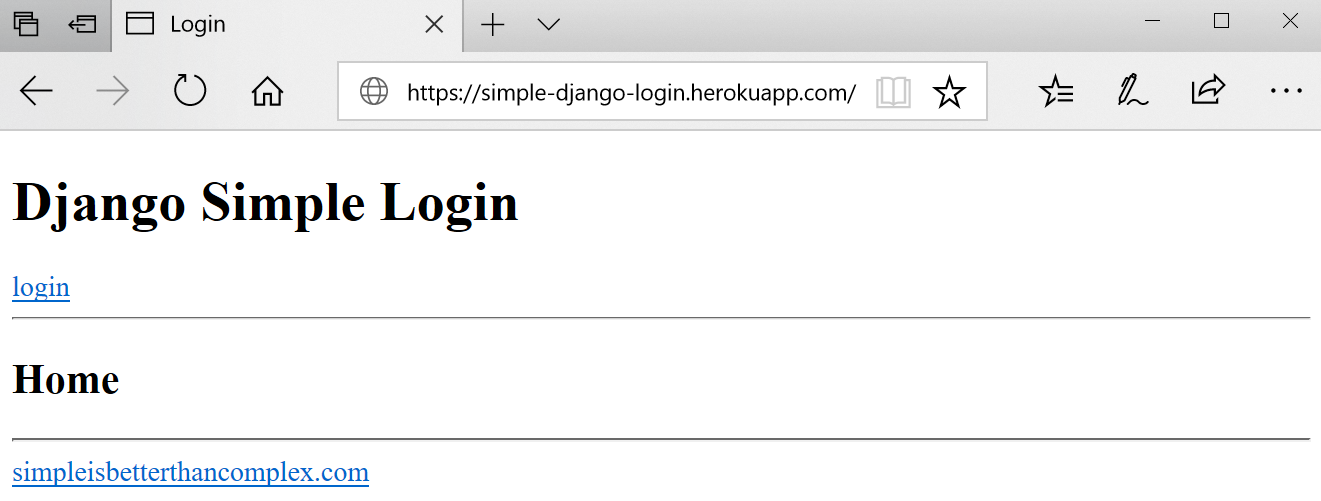


Summary

Now, your django app is up and running on Heroku cloud and you can access from anywhere.


References
[1] Migrating an existing Django project
[2] Heroku Django Starter Template
[3] How to Deploy Django Applications on Heroku
[4] Django-Heroku (Python Library)
[5] Deploy your application to Heroku



Changing Screen Resolution of Mac OS VirtualBox Guest

The default screen resolution for Mac OS X VirtualBox Guest is 1024×768.
Below shows how to change the screen resolution of Mac OS VirtualBox guest running on Windows 10.


Steps
1. Open “Command Prompt”. (press Win + x and select “Command Prompt”)

2. Navigate to VirtualBox folder in which “VBoxManage.exe” resides.
e.g.)

cd C:\Program Files\Oracle\VirtualBox

3. Set resolution by typing the command below.

VBoxManage setextradata "High Sierra" VBoxInternal2/EfiGraphicsResolution 1920x1080

The third parameter (i.e. “High Sierra”) should be your VM name.

4. Start the VM


References
[1] Fix VirtualBox macOS High Sierra Screen Resolution (1920×1080 – 4K – 5K)


Setting Path Environment Variable on Windows 10


The steps below shows how to set a file/folder path to the ‘Path’ System Environment variable on Windows 10.


Steps

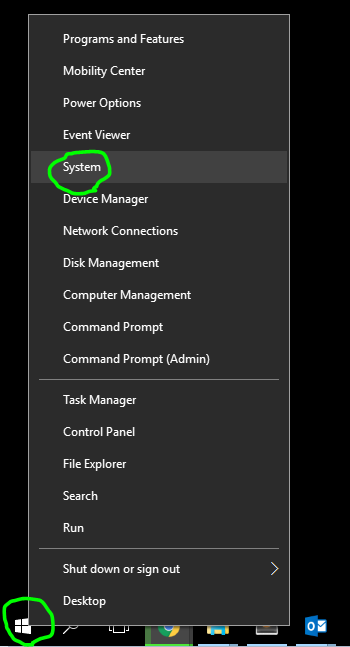
1. Right-click on Windows start menu icon at the bottom-left corner of the desktop (or Ctrl-x), then select “System”


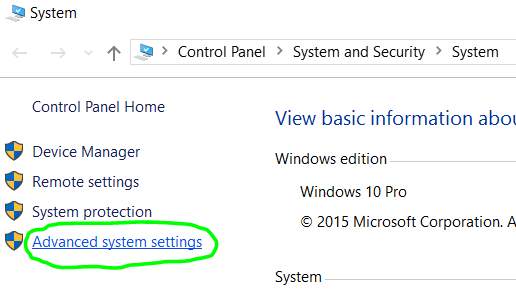
2. Click on “Advanced system settings” on left side of the “System” window.

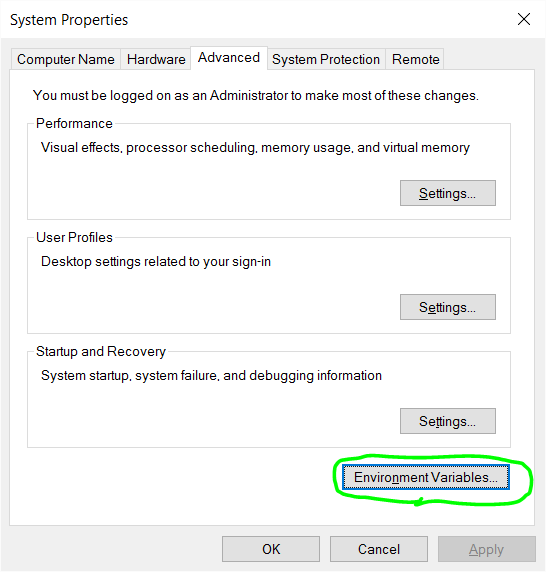
3. Click on “Environment Variables…” button on “System Properties” window.


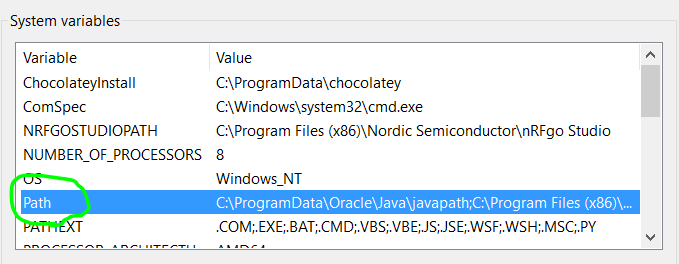
4. Double-click on “Path” in “System variables”.

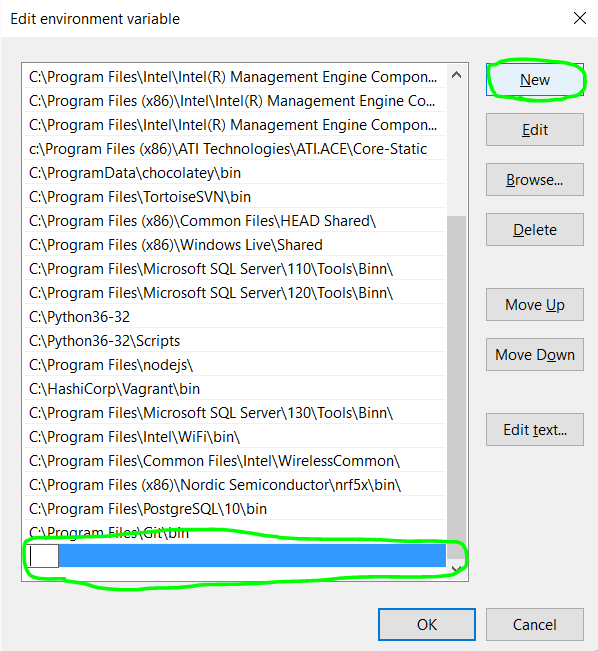
5. Click on “New” button, then type a path you want to add.


Enabling Webcam in VirtualBox Guest OS on Windows Host

This post shows steps to enable webcams in a VirtualBox guest OS on Windows host. OS/software and the version I used are below. I tested it with Microsoft Surface Pro 4 and Dell Precision 3510.

Host: Windows 10 running VirtualBox 5.2.6.
Guest: Ubuntu Linux 16.04.03 / Mac OS X High Sierra


Here is the steps.

Steps
1. Install ‘Oracle VM VirtualBox Extension Pack’
VirtualBox Extension Pack is required in order to use webcams in VirtualBox guest OS. [1]

1-1. From the VirtualBox Download page, download the extension pack which has the save version as your VirtualBox. In my case, my VirtualBox is v5.2.6 so I downloaded this:
http://download.virtualbox.org/virtualbox/5.2.6/Oracle_VM_VirtualBox_Extension_Pack-5.2.6.vbox-extpack

1-2. Launch “Oracle VirtualBox Manager” and navigate to “File” -> “Preferences”.

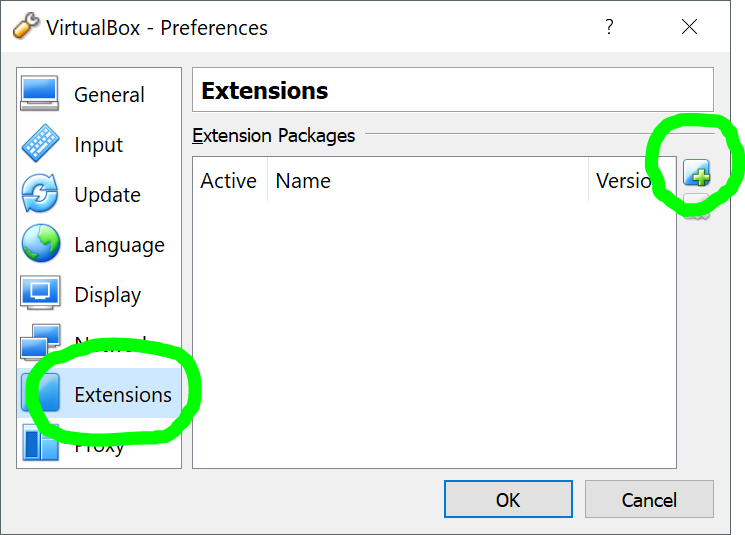
1-3. In ‘Preferences’ window, select ‘Extensions’.

1-4. Press ‘Add new package’ icon.

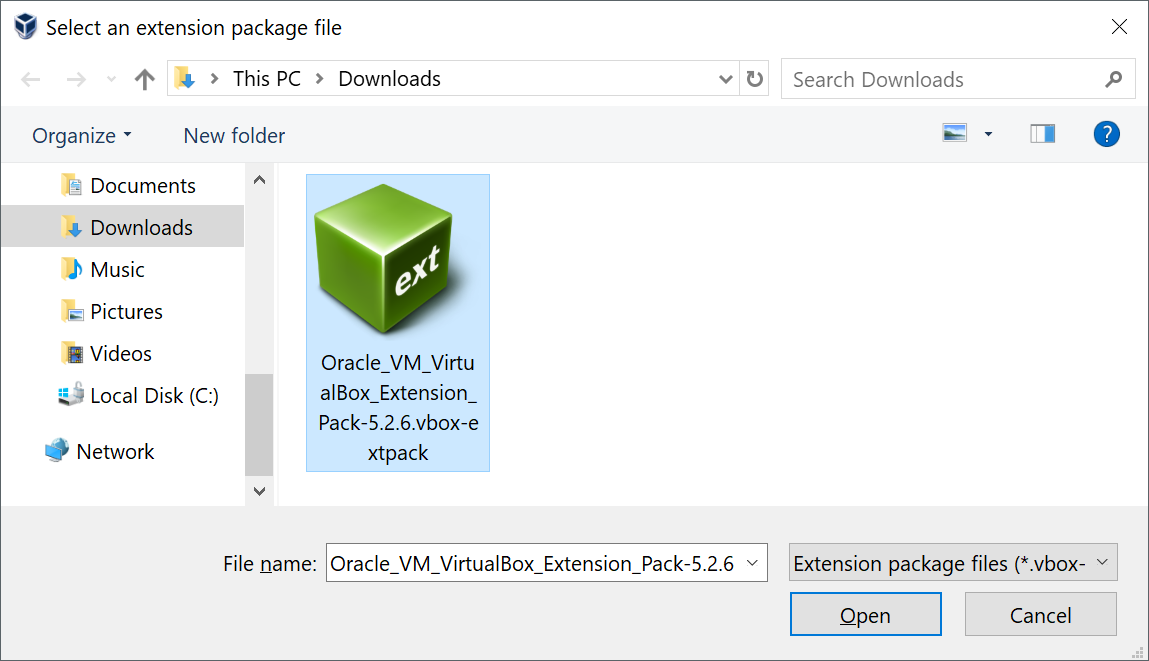
1-5. Select the extension pack and install it.


2. Attaching webcam to guest OS
2-1. Launch the guest OS.

2-2. Launch “Command Prompt” on Windows (Press the Win + R keys, then, type ‘cmd’ and enter) and go to VirtualBox folder.

cd c:\Program Files\Oracle\VirtualBox

2-3. List available cameras.

VBoxManage list webcams

The result should be like below. In case of Surface Pro 4, it has 2 cameras (front and rear).

c:\Program Files\Oracle\VirtualBox>VBoxManage list webcams
Video Input Devices: 2
.1 "Microsoft Camera Rear"
\\?\display#int3470#4&3b1d693f&0&uid13424#{65e8773d-8f56-11d0-a3b9-00a0c922319...
.2 "Microsoft Camera Front"
\\?\display#int3470#4&3b1d693f&0&uid13424#{65e8773d-8f56-11d0-a3b9-00a0c922319...

2-4. Attach webcam(s) you want to use. The number at the end of the line specifies the camera. In this example, if you want to attach the front camera, type like this:

VboxManage controlvm "Ubuntu 16.04.3" webcam attach .2

* Replace “Ubuntu 16.04.3” with your guest OS name.
* You can attach multiple cameras if you want.


3. Verify (Ubuntu Guest)
In case of Linux, cheese is handy to test webcam functionality.

3-1. Install it if it’s not already.

sudo apt-get install cheese

3-2. Then, just type ‘cheese’ to launch. You should be able to see a video stream in newly opened ‘Cheese’ window.

cheese


4. Verify (Mac OS Guest)
In Mac OS X, I used ‘Photo Booth’ application to verify.

4-1. Launch ‘Spotlight Search’ by clicking the magnifying glass icon in the upper right corner of the screen.

4-2. Type ‘Photo Booth’ and enter to launch. You should be able to see a video stream in ‘Photo Booth’ window.


References
[1] Oracle VM VirtualBox User Manual 9.7. Webcam passthrough
[2] VirtualBox Download page
[3] Install VirtualBox Extension Pack on Linux and Windows
[4] Connecting a webcam to a VirtualBox guest OS


Creating Wireless Router using Raspberry Pi Zero W


This post shows steps to set up Raspberry Pi Zero W as a wireless router.
I tested it with Raspbian Buster Lite (September 2019 version) on Raspberry Pi Zero W and this USB WiFi adapter. [Updated on 11.25.2019]

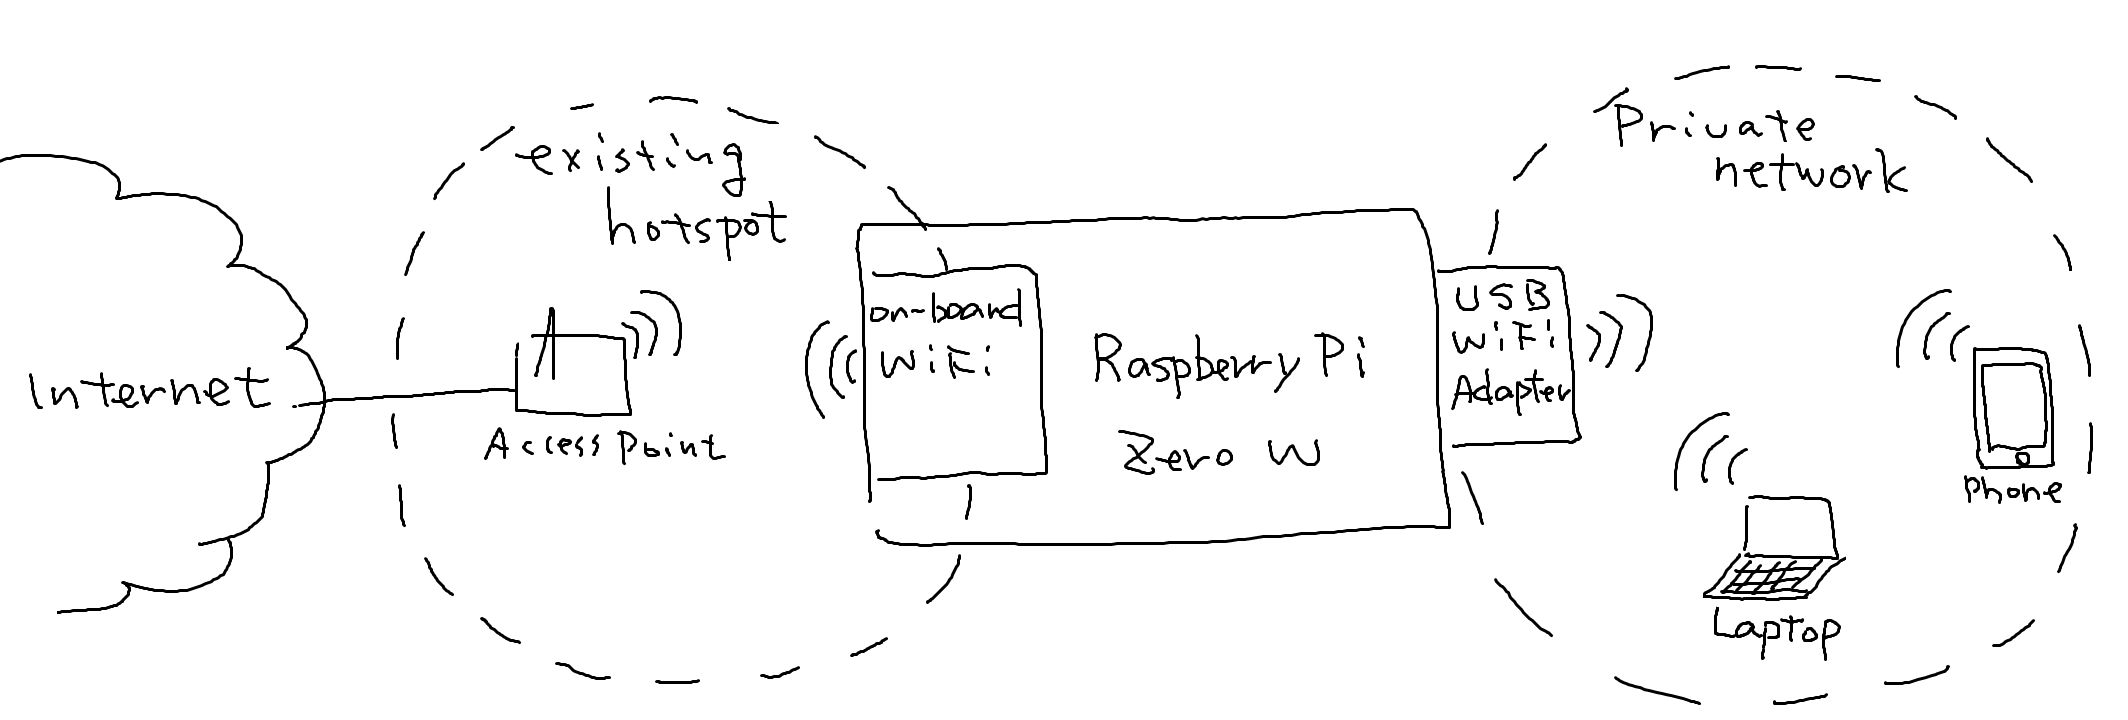
The figure above shows overview of the idea. Here are some assumptions:

  • Raspberry Pi Zero W (the router) connects to an existing WiFi network (i.e. hotspot/access point) for Internet access via the on-board WiFi adapter.
  • The router creates a private WiFi network (192.168.3.0/24) using a USB WiFi adapter.
  • The IP address of the interface for the private network is set to 192.168.3.254.
  • The IP address range for the private network is from 192.168.3.1 to 192.168.3.20.
  • A device connected to the private network can access the Internet through the router.

Here is the list of contents of this post.

Contents
– Prerequisites
– Steps
1. Package installation
2. Wireless interface names
3. Assigning a static IP address for USB WiFi adapter (wlan1)
4. DHCP server setting
5. Access point setting
6. Enabling traffic forwarding
7. Forwarding rule configuration
8. Connecting to existing WiFi network (If it’s not connected yet)
9. Test
– Reference


Prerequisites


Steps
1. Package installation

1-1. As always, update the package list and upgrade the installed software first.

sudo apt-get update && sudo apt-get upgrade -y

1-2. Install ‘hostapd’ and ‘dnsmasq’.

sudo apt-get install hostapd dnsmasq -y


2. Wireless interface names
Before starting work on the configurations, check the interface names for the on-board WiFi and WiFi adapter. Those names will be used later.

2-1. Run ‘ifconfig’ command without connecting the WiFi adapter.

ifconfig

You should be able to see “wlan0”. It’s the interface name for the on-board WiFi adapter.

2-2. Then, connect the WiFi adapter and run the same command. This time you’ll notice that “wlan1” is added. It’s the name for newly connected USB WiFi adapter.  So, now we know the interface names:

wlan0 : on-board WiFi
wlan1 : WiFi adapter


3. Assigning a static IP address for USB WiFi adapter (wlan1)
3-1. Open /etc/dhcpcd.conf

sudo nano /etc/dhcpcd.conf

3-2. Copy below at the end of the file. [6]

interface wlan1
static ip_address=192.168.3.254/24
nohook wpa_supplicant   # don't call the wpa_supplicant hook
denyinterfaces wlan1    # don't send DHCP requests

after reboot, wlan1 should look like this:

pi@raspberrypi:~ $ ifconfig wlan1
wlan1: flags=4163<UP,BROADCAST,RUNNING,MULTICAST>  mtu 1500
        inet 192.168.3.254  netmask 255.255.255.0  broadcast 192.168.3.255
...


4. DHCP server setting
As suggested in [1], rename the original configuration file and create a new file from the scratch.

4-1. Rename the original file.

sudo mv /etc/dnsmasq.conf /etc/dnsmasq.conf.orig

4-2. Create a new file.

sudo nano /etc/dnsmasq.conf

4-3. Copy lines below, save and close the file.

interface=wlan1
dhcp-range=192.168.3.1,192.168.3.20,255.255.255.0,24h


5. Access point setting
5-1. Create the configuration file.

sudo nano /etc/hostapd/hostapd.conf

5-2. Copy the lines below, save and close the file. Replace <NETWORK_NAME> and <PASSWORD> with whatever you want for your private network.

interface=wlan1
hw_mode=g
channel=7
wmm_enabled=0
macaddr_acl=0
auth_algs=1
ignore_broadcast_ssid=0
wpa=2
wpa_key_mgmt=WPA-PSK
wpa_pairwise=TKIP
rsn_pairwise=CCMP
ssid=<NETWORK_NAME>
wpa_passphrase=<PASSWORD>

5-3. Specify the location of the configuration file. To do that, first open /etc/default/hostapd

sudo nano /etc/default/hostapd

5-4. Then, add the line below, save and close the file.

DAEMON_CONF="/etc/hostapd/hostapd.conf"

5-5. Enable hostapd by running the commands below [5]. (Thank you Dan for the info!)

sudo systemctl unmask hostapd.service
sudo systemctl enable hostapd.service


6. Enabling traffic forwarding
6-1. Open the configuration file.

sudo nano /etc/sysctl.conf

6-2. Look for the line below.

#net.ipv4.ip_forward=1

6-3. Uncomment the line. Now, it should be like:

net.ipv4.ip_forward=1


7. Forwarding rule configuration
7-1. Run these command:

sudo iptables -t nat -A POSTROUTING -o wlan0 -j MASQUERADE
sudo iptables -A FORWARD -m conntrack --ctstate RELATED,ESTABLISHED -j ACCEPT
sudo iptables -A FORWARD -i wlan1 -o wlan0 -j ACCEPT

7-2. Backup the configuration.

sudo sh -c "iptables-save > /etc/iptables.ipv4.nat"

7-3. In order to load the rules on boot, open /etc/rc.local,

sudo nano /etc/rc.local

7-4. Then add this line above “exit 0”.

iptables-restore < /etc/iptables.ipv4.nat


8. Connecting to existing WiFi network (If it’s not connected yet)
8-1. Open /etc/wpa_supplicant/wpa_supplicant.conf

sudo nano /etc/wpa_supplicant/wpa_supplicant.conf

8-2. Add lines below at the end of the file. Replace <NETWORK_NAME> and <PASSWORD> to appropriate strings for your WiFi network for Internet access.

network={
    ssid="<NETWORK_NAME>"
    psk="<PASSWORD>"
    key_mgmt=WPA-PSK
}


9. Test
9-1. Reboot the board.

sudo reboot

9-2. Search the WiFi network configured in step 5-2 from a WiFi enabled device (e.g. PC, phone) and connect to it. After connected, you should be able to access the Internet from the device.


References
[1] How to use your Raspberry Pi as a wireless access point
[2] Internet sharing – Arch Linux
[3] How-To: Turn a Raspberry Pi into a WiFi router
[4] What is the difference between -m conntrack –ctstate and -m state –state
[5] RPi Update broke Access Point setup #1093 – GitHub
[6] How do I configure dhcpcd to call wpa_supplicant for a specific interface? – StackExchange