Creating iBeacon with Raspberry Pi using BlueZ Example Code


Update (Jul 9, 2019):
Step 1 is no longer required since Raspbian Buster (2019-06-20). Please check the updated steps in here.


This post shows steps to create an iBeacon with Raspberry Pi, by modifying BlueZ BLE Advertisement example code (i.e. “example-advertisement).

Note:
Even though it uses Bluetooth Low Energy standard, iBeacon is Apple’s proprietary protocol and making/deploying iBeacon devices requires the license from Apple [1]. The scope of this post is limited to getting familiar with BlueZ advertising example code and iBeacon format for experimental purpose.

Here are the contents of this post.

Contents
– Prerequisites
– Steps
1. Enable experimental flag
2. Download BlueZ
3. Modify BLE Advertisement Example Code
4. Test
– Summary
– Reference


Prerequisites
Here are some prerequisites before start.

  • Raspberry Pi 3 B+ or Raspberry Pi Zero W
    Or any other model with Bluetooth adapter (e.g. Plugable BLE Adapter, Panda Bluetooth 4.0 Adapter)
  • Raspbian Stretch (Nov 2017)
    I would suggest to use Desktop because I got “DBus.Error.AccessDenied” for some reason when I ran “example-advertisement” on Raspbian Lite. It seems it’s similar to this but couldn’t figure out the cause/workaround.
  • Internet access
    It’s required to download BlueZ example code. Here is a Wi-Fi Setup steps. If you already have the code, you can work offline.


Steps
1. Enable experimental flag
Bluetooth service needs to be executed with experimental flag since ‘LEAdvertisingManager1’ interface, which is used in the example code, is experimental feature in BlueZ 5.43 (pre-installed in Stretch Nov 2017). In case you’ve updated BlueZ to 5.48 or higher, skip Step 1 since the interface have been marked as stable since 5.48. [2]

1-1. Open the configuration file for Bluetooth service.

sudo nano /lib/systemd/system/bluetooth.service

1-2. Find a line starting with “ExecStart” and add “–experimental” at the end of the line. After modification, the line should look like this:

ExecStart=/usr/libexec/bluetooth/bluetoothd --experimental

1-3. Reboot the board to restart Bluetooth service.

sudo reboot

1-4. Check the status of Bluetooth service. [Optional]

systemctl status bluetooth.service

You should see the experimental flag. (Line 9 in the example below)

pi@raspberrypi:~ $ systemctl status bluetooth.service 
● bluetooth.service - Bluetooth service
   Loaded: loaded (/lib/systemd/system/bluetooth.service; enabled; vendor preset: enabled)
   Active: active (running) since Wed 2018-02-21 14:31:19 UTC; 4s ago
     Docs: man:bluetoothd(8)
 Main PID: 1122 (bluetoothd)
   Status: "Running"
   CGroup: /system.slice/bluetooth.service
           └─1122 /usr/lib/bluetooth/bluetoothd --experimental


2. Download BlueZ
2-1. Download BlueZ source code.

wget www.kernel.org/pub/linux/bluetooth/bluez-5.43.tar.xz

2-2. Extract the archive file.

tar xvf bluez-5.43.tar.xz

2-3. Make sure that the sample code works. [Optional]

./bluez-5.43/test/example-advertisement

Output should be like this:

$ ./bluez-5.43/test/example-advertisement
GetAll
returning props
Advertisement registered


3. Modify BLE Advertisement Example Code
3-1. Copy the example code.

cp ./bluez-5.43/test/example-advertisement ./example-ibeacon

3-2. Open the file and look for TestAdvertisement class.

3-3. Replace ‘__init__’ method:

    def __init__(self, bus, index):
        Advertisement.__init__(self, bus, index, 'peripheral')
        self.add_service_uuid('180D')
        self.add_service_uuid('180F')
        self.add_manufacturer_data(0xffff, [0x00, 0x01, 0x02, 0x03, 0x04])
        self.add_service_data('9999', [0x00, 0x01, 0x02, 0x03, 0x04])
        self.include_tx_power = True

with:

    def __init__(self, bus, index):
        company_id =   0x004C
        beacon_type = [0x02, 0x15]
        uuid =        [0x01, 0x02, 0x03, 0x04, 0x05, 0x06, 0x07, 0x08, 
                       0x09, 0x10, 0x11, 0x12, 0x13, 0x14, 0x15, 0x16]
        major =       [0x11, 0x22]
        minor =       [0x33, 0x44]
        tx_power =    [0xB3]
        Advertisement.__init__(self, bus, index, 'peripheral')
        self.add_manufacturer_data(company_id, beacon_type + uuid + major + minor + tx_power)


4. Test
4-1. Run the code. The console output should be same as Step 2-3.

./example-ibeacon

4-2. Find your ibeacon running on Raspberry Pi using a beacon scanner app (e.g. nRF Connect).


Summary
If everything goes well, the Raspberry Pi should be broadcasting iBeacon message and you can find it with a scanner app. Some of the iBeacon data can be configured on Step 3-3 for your application. Here is a brief explanation of those data.

  • ‘company_id’
    Company Identifiers are defined by Bluetooth SIG [3]. For iBeacon, it must be Apple’s ID (i.e. 0x004C).
  • ‘beacon_type’
    It must be ‘0x0215’ which means Proximity Beacon.
  • ‘uuid’
    Proximity UUID is an application unique ID.
  • major‘ and ‘minor
    Major Number and Minor Number are application dependent values which can be used to identify more precise location, etc.
  • ‘tx_power’
    Tx Power is a device dependent value. It must be calibrated for each device when it’s deployed.


References
[1] iBeacon – Apple Developer
[2] BlueZ Release Notes
[3] Company Identifiers – Bluetooth SIG



Setting Up UART Serial Communication between Raspberry Pis


This post shows how to setup serial communication between two Raspberry Pi boards.

Here is the list of contents of this post.

Contents


Prerequisites


Steps
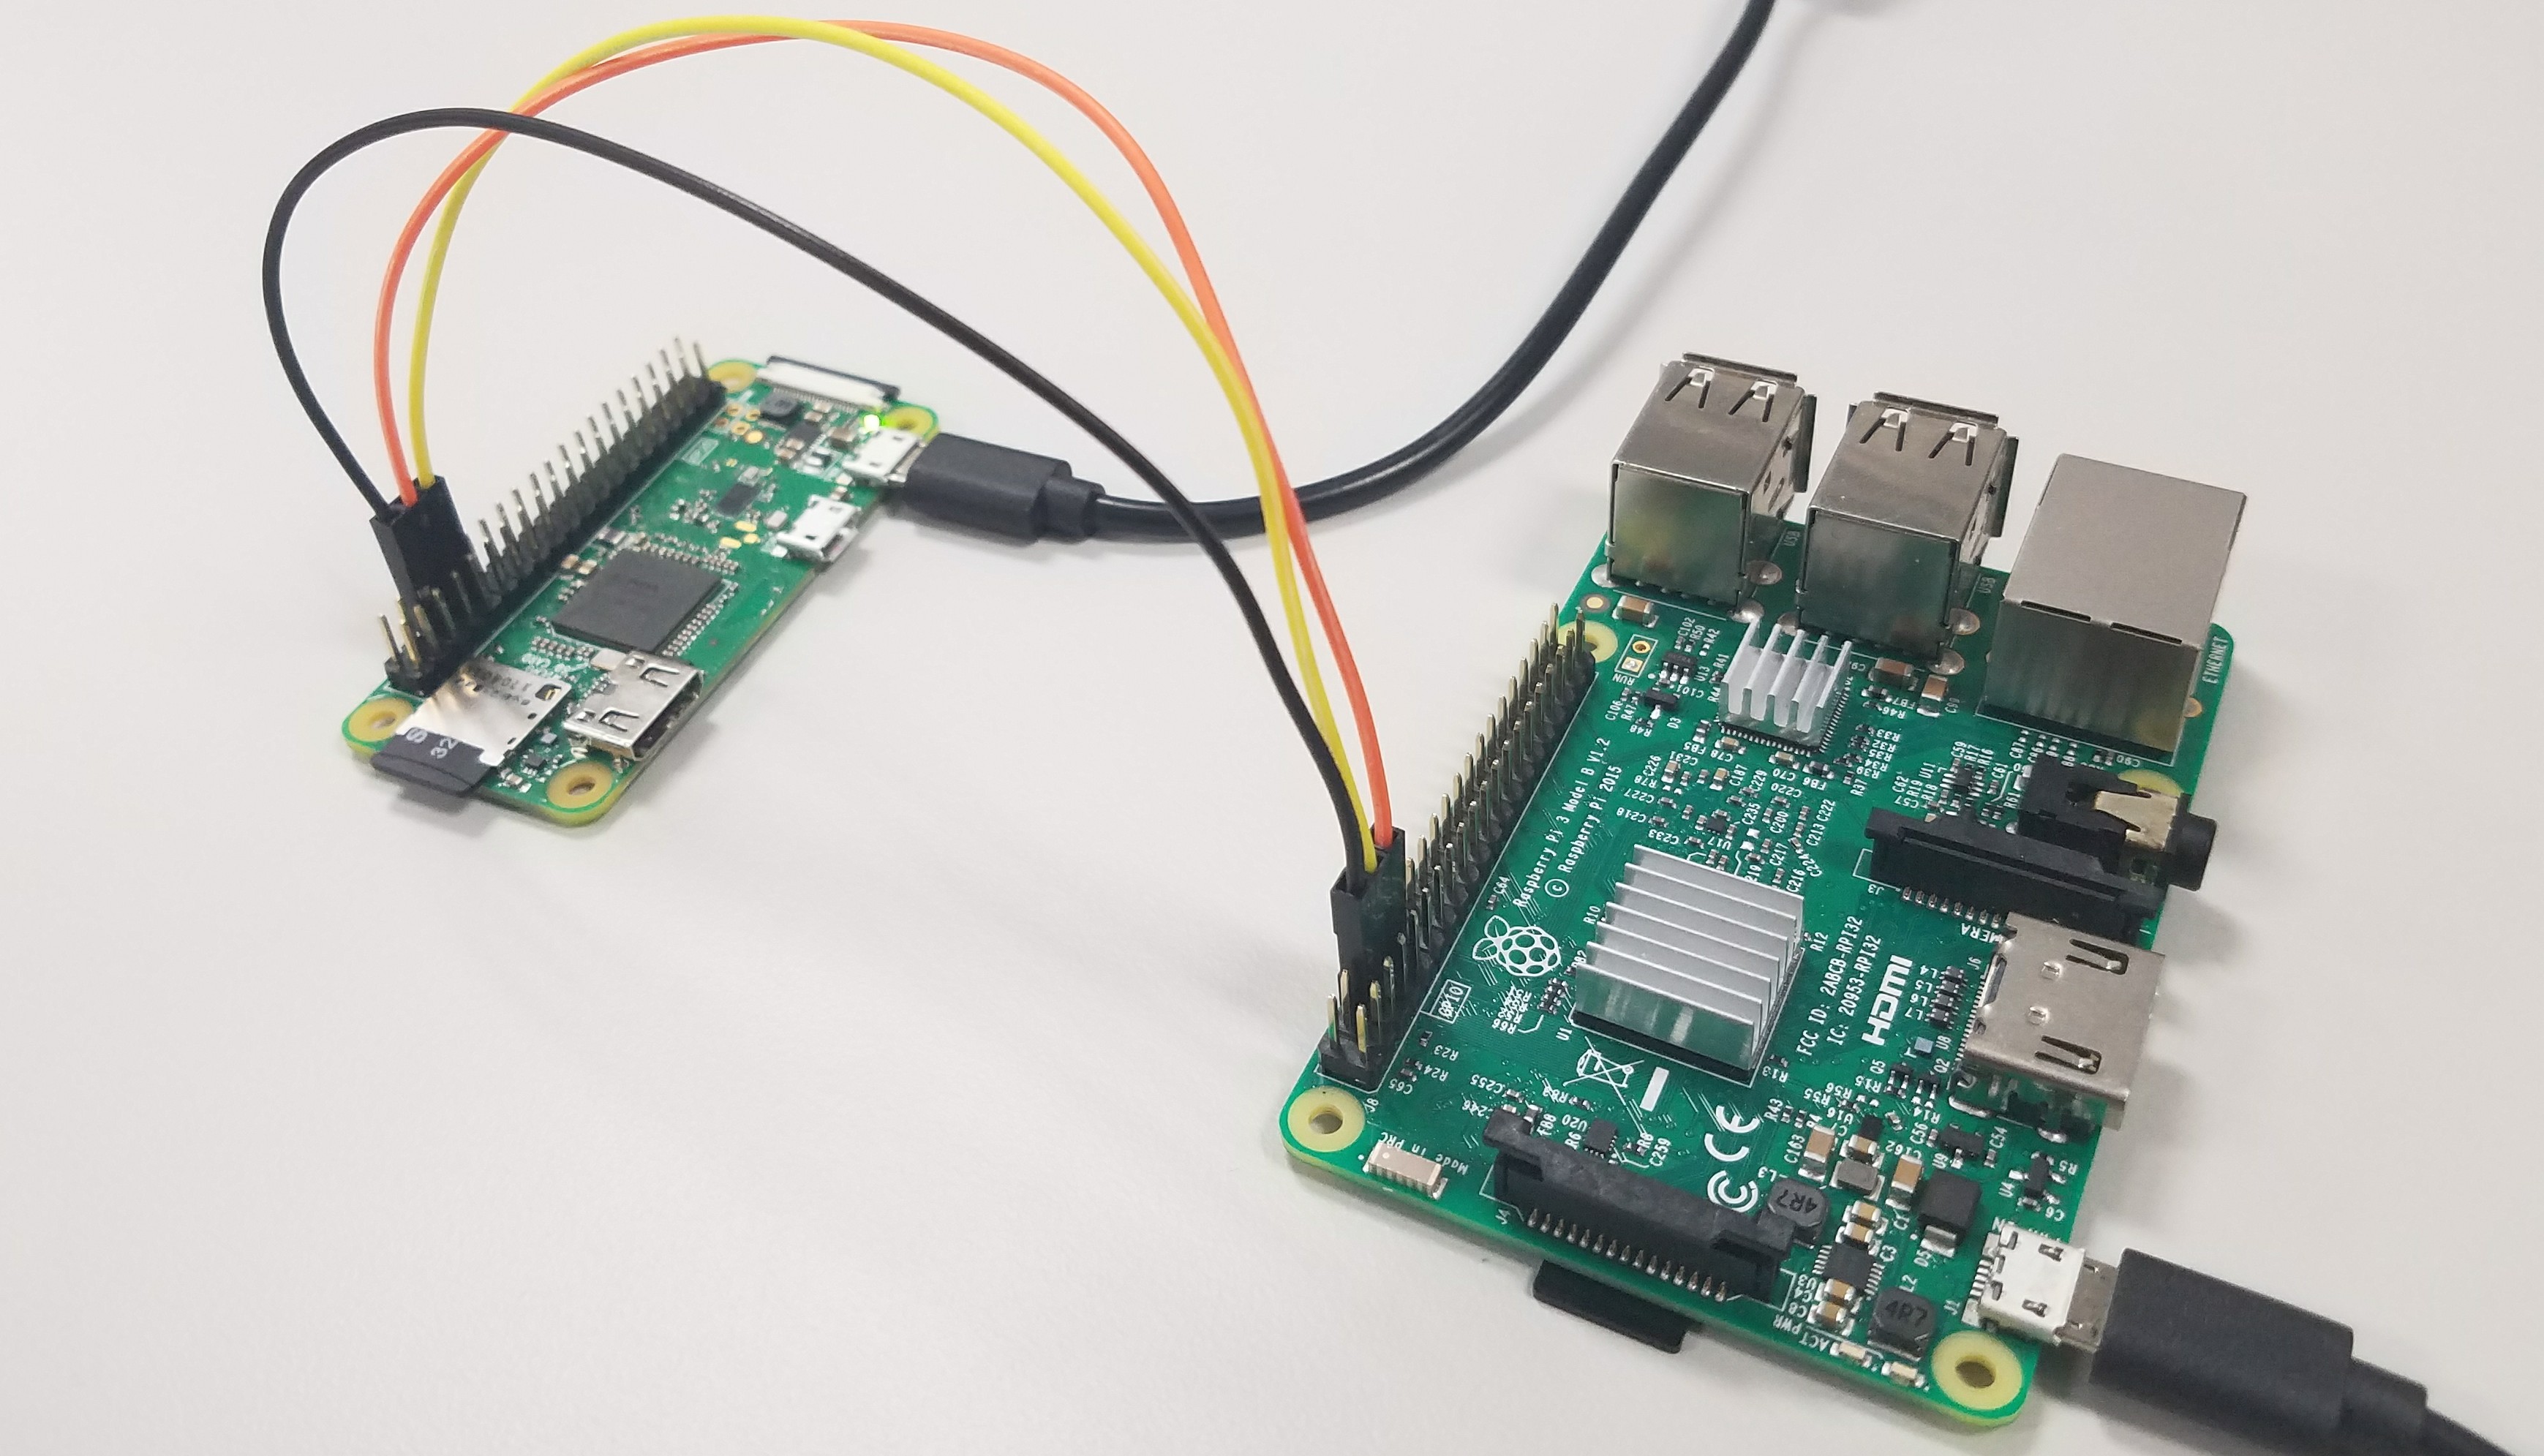
1. Wiring
Connect jumper wires between two Raspberry Pi boards. Check this useful site for pinout (GND, Tx, and Rx).

Note: Rx pin on one Raspberry Pi should be connected to Tx pin on the other Raspberry Pi.


Note: Step 2 to Step 4 need to be done on both Raspberry Pis. 

2. Enabling UART
2-1. Open “/boot/config.txt”.

sudo nano /boot/config.txt

2-2. Add the lines below at the end of the file.

# Enable UART
enable_uart=1


3. Disabling console service
3-1. Disable serial-getty service.

sudo systemctl disable serial-getty@ttyS0.service
3-2. Open “/boot/cmdline.txt”.
sudo nano /boot/cmdline.txt

3-3. Remove “console=serial0,115200”, then save the file.

3-4. Reboot.
sudo reboot


4. Setting up terminal emulator
To send and receive data, I’ll use minicom, a text-based terminal emulator.

4-1. Install minicom.

sudo apt-get install minicom -y

4-2. Type below to launch minicom and connect to UART.

minicom -b 115200 -o -D /dev/ttyS0

4-3. Press Ctrl-A then E to enable local echo. You should see “Local echo ON” message at the bottom of the screen.

4-4. Press Ctrl-A then A to enable linefeed. You should see “Add linefeed ON” message at the bottom of the screen.


5. Verify
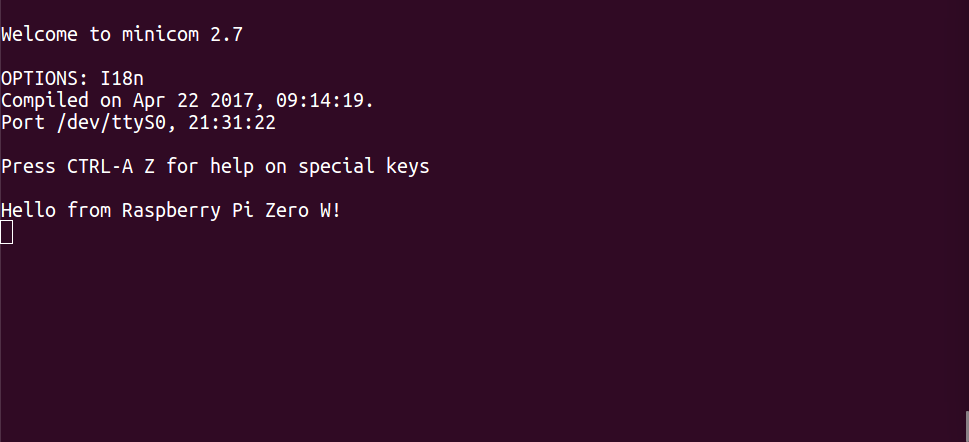
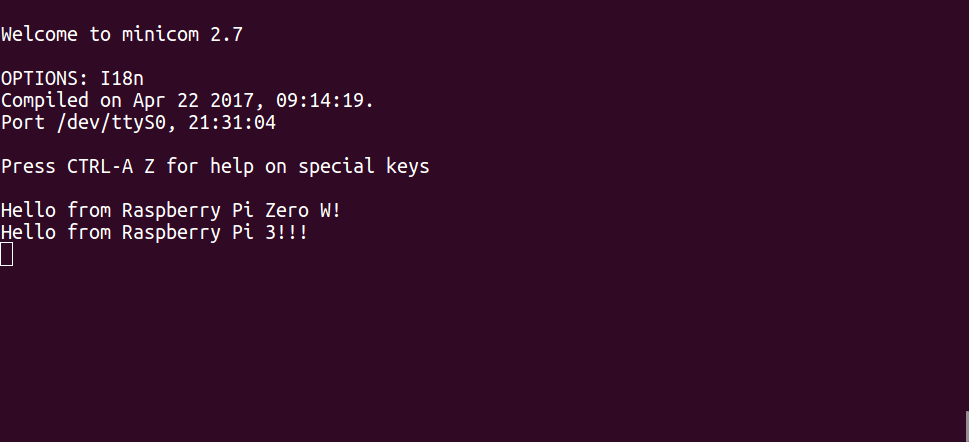
5-1. Type something in minicom on one Raspberry Pi. You should be able to see the text on the other Raspberry Pi.

5-2. Type something back on the other Raspberry Pi.


Note: You can exit minicom by pressing Ctrl-A, and X, then select “Yes”.


Updating BlueZ on Raspberry Pi (5.43 to 5.48)


Update (Jul 9, 2019):
Now, Raspbian Buster, released on 6/20/2019, has bluez 5.50 by default!


Update (March 3, 2019):
Please see this post to update BlueZ to 5.50.


This post shows how to update BlueZ from 5.43 (the default version comes with Raspbian Stretch November 2017 version) to 5.48 (the latest as of 2/14/2018) on Raspberry Pi.
According to the release notes [1], many issues (especially GATT related issues) have been fixed and also, Advertising Manager API, which was previously marked as experimental, is now stable in 5.48.

Here is the list of contents of this post.

– Assumptions
– Steps
1. Check Current BlueZ Version
2. Install Dependencies
3. Install Latest BlueZ
4. Verify Update
– Reference


Assumptions
In this post, I assume that you already have Raspberry Pi 3 B+ or Raspberry Pi Zero W running Raspbian Stretch November 2017 version.


Steps
1. Check Current BlueZ Version
1-1. Before starting, let’s check the current BlueZ version.

bluetoothctl -v

In case you are using Raspbian Stretch (November 2017 version), the BlueZ version should be 5.43.

$ bluetoothctl -v
5.43


2. Install Dependencies
2-1. Update the package list.

sudo apt-get update

2-1. Install the dependencies.

sudo apt-get install libdbus-1-dev libglib2.0-dev libudev-dev libical-dev libreadline-dev -y


3. Install Latest BlueZ
3-1. Download the latest version of BlueZ source code.

wget www.kernel.org/pub/linux/bluetooth/bluez-5.48.tar.xz

3-2. Uncompress the downloaded file.

tar xvf bluez-5.48.tar.xz && cd bluez-5.48

3-3. Configure.

./configure --prefix=/usr --mandir=/usr/share/man --sysconfdir=/etc --localstatedir=/var --enable-experimental 

3-4. Compile the source code.

make -j4

3-5. Install.

sudo make install

3-6. Reboot Raspberry Pi 3.

sudo reboot


4. Verify Update
4-1. Verify the BlueZ version by issuing the command below.

bluetoothctl -v

The result should be like this:

$ bluetoothctl -v
bluetoothctl: 5.48


References
[1] BlueZ Release Notes
[2] Installing Bluez 5.44 onto Raspbian? – Raspberry Pi Stack Exchange


Deploying existing Django App to Heroku


Heroku’s free plan is great for experimenting/prototyping cloud applications. This post shows the steps to deploy existing Django project to Heroku cloud platform using Windows host. As an example, I’ll use this django app from GitHub and deploy it to Heroku.

Here is the list of contents of this post.

Contents
– Steps
1. Setup Python Environment on Windows
2. Install Heroku CLI and Git
3. Setup Local Environment (App & Django)
4. Verify Local Environment
5. Setup Heroku
6. Deploy your application to Heroku
7. Verify
– Summary
– Reference


Steps
Note: If you already have working Python/Django environment with pipenv on your Windows PC, skip Step 1, 3 and 4.

1. Setup Python Environment on Windows
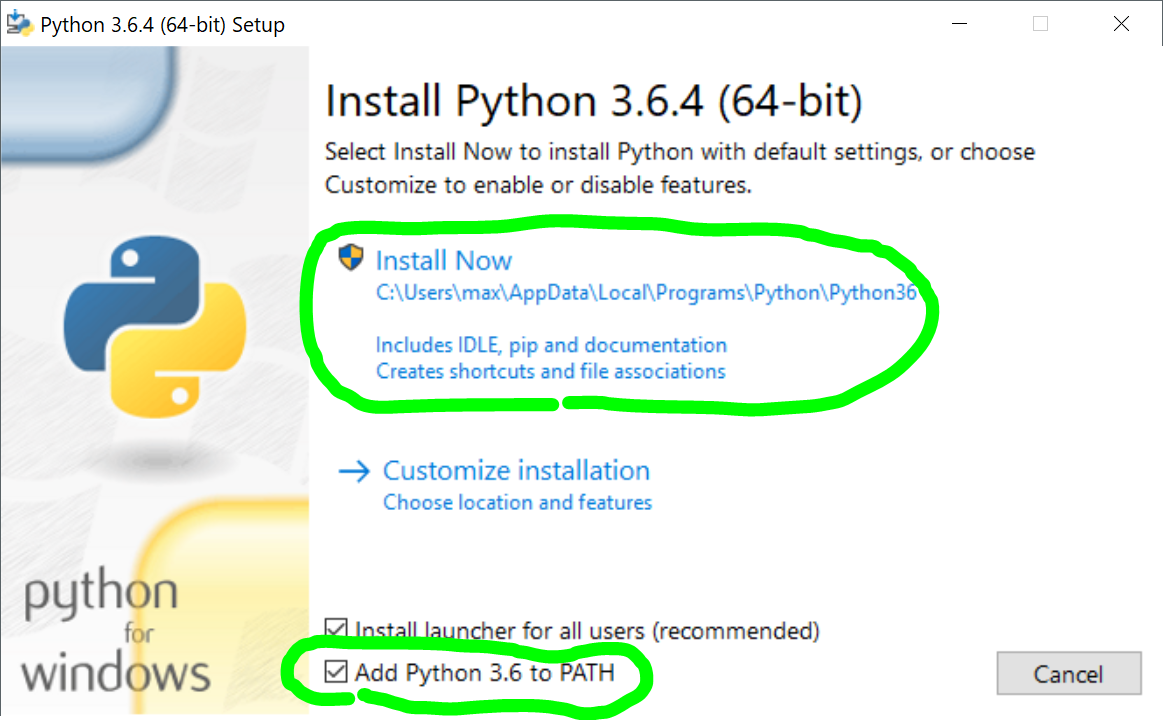
1-1. Download Python installer from here. In this post, I use Windows x86-64 executable installer for Python 3.6.4 which is the latest at the moment.


1-2. Launch the installer.


1-3. Check on “Add Python 3.6 to PATH” option, then click on “Install Now”.


1-4. After Python is successfully installed, open “Command Prompt” (Press Win + x, then select “Command Prompt”.)


1-5. Install pipenv by running the following command:

pip install pipenv


2. Install Heroku CLI and Git
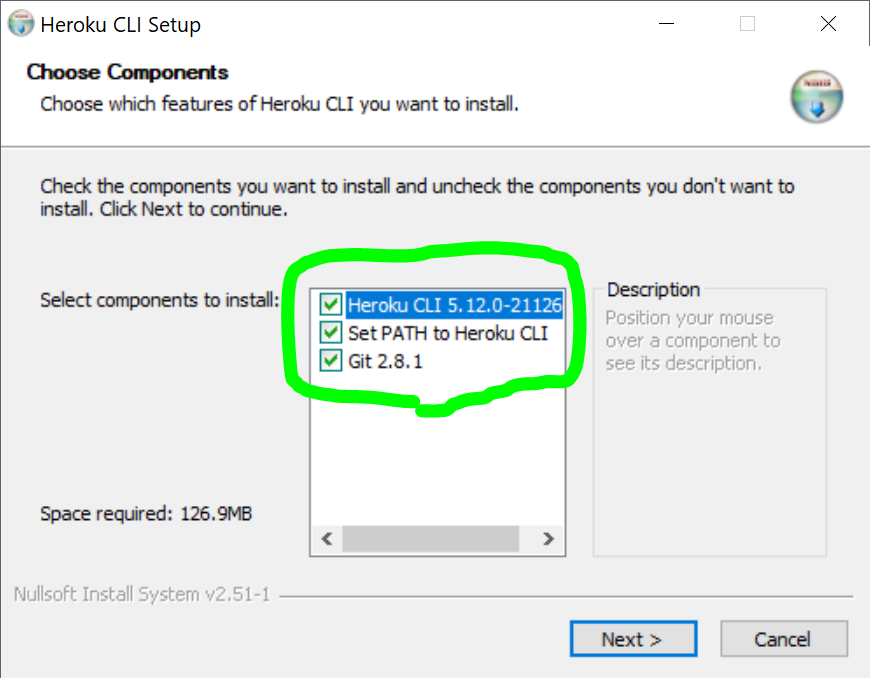
Since Heroku CLI (Command Line Interface) tool installer also installs Git which will be used in the next step, let’s install both here. Heroku CLI will be required later, in Step 5.

2-1. Download the installer from here and launch it.


2-2. When choosing components, make sure “Set Path to Heroku CLI” and “Git” is selected.


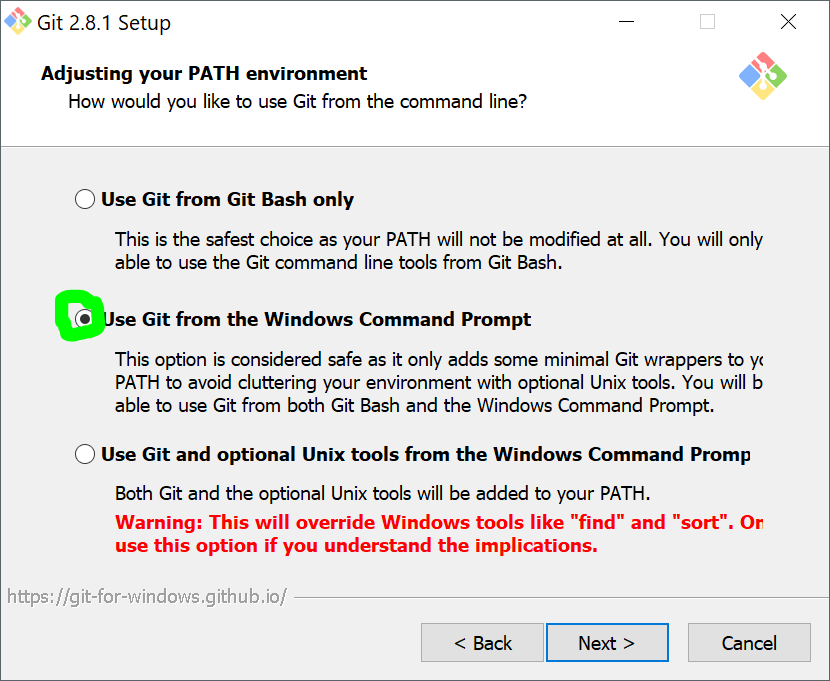
2-3. When setting up PATH environment for Git, make sure “Use Git from the Windows Command Prompt” is selected.


3. Setup Local Environment (App & Django)
Note: In this post, I use this simple-django-login as an example of existing Django app.

3-1. Re-launch “Command Prompt” to load the updated PATH environment variable for Git (and heroku CLI).


3-2. Clone an existing Django app.

git clone https://github.com/sibtc/simple-django-login.git && cd simple-django-login


3-3. Create a python virtual environment with pipenv.

pipenv --three


3-4. Spawns a shell within the virtualenv.

pipenv shell


3-5. Install “django”.

pipenv install django


4. Verify Local Environment
Before applying any changes for heroku, let’s verify if the app works in the local environment.

4-1. Run the app by typing the following command:

python manage.py runserver

The output should be like this:

C:\work\simple-django-login>python manage.py runserver
Performing system checks...

System check identified no issues (0 silenced).

You have 12 unapplied migration(s). Your project may not work properly until you apply the migrations for app(s): auth, contenttypes, sessions.
Run 'python manage.py migrate' to apply them.
February 09, 2018 - 12:21:56
Django version 2.0.2, using settings 'login.settings'
Starting development server at http://127.0.0.1:8000/
Quit the server with CTRL-BREAK.


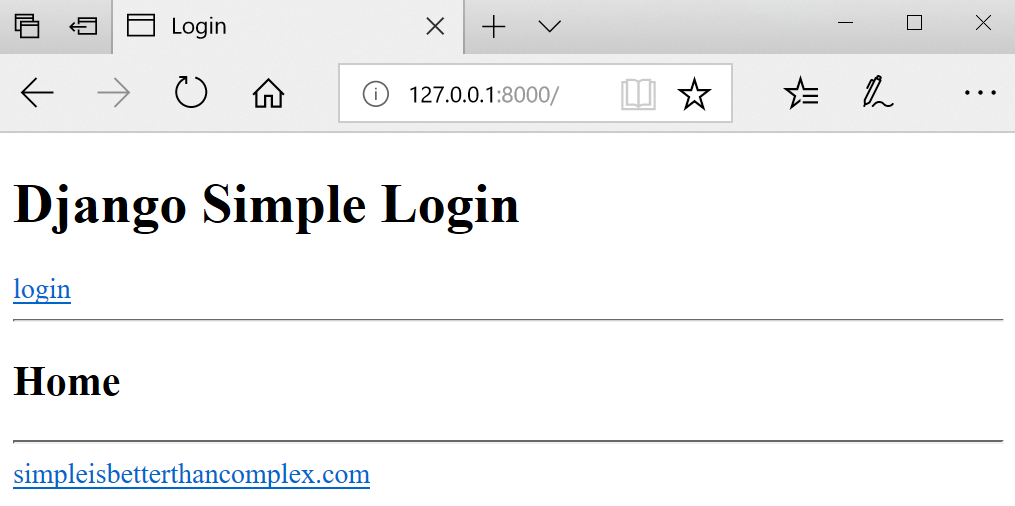
4-2. Then access “http://127.0.0.1:8000/” with a browser. If everything is fine, you should see “Django Simple Login” page.


5. Setup Heroku
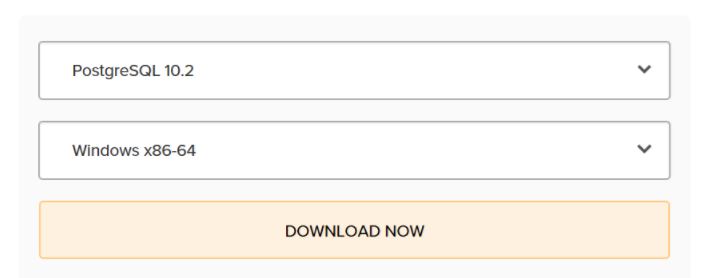
5-1. Download PostgreSQL installer from here and install it.


5-2. Install “django-heroku”. This module configures Django app for deployment on Heroku. [4]

pipenv install django-heroku


5-3. Add lines below at the bottom of “settings.py” in “login” app.

# Configure Django App for Heroku.
import django_heroku
django_heroku.settings(locals())


5-4. In “simple-django-login” folder, create a file named “Procfile.windows” with the content below.

web: python manage.py runserver localhost:8000


5-5. Verify local heroku environment by typing below:

heroku local web -f Procfile.windows

Then access “http://127.0.0.1:8000/” with browser. You should see “Django Simple Login” page same as Step 4-2. Now, the app is working with heroku local environment.


6. Deploy your application to Heroku [5]
6-1. Install gunicorn.

pipenv install gunicorn

Note: gunicorn is not required on Windows local environment but this step adds it’s package dependency to Pipfile, which will be used on heroku remote.


6-2. In “simple-django-login” folder, create a file named “Procfile” with the content below:

web: gunicorn login.wsgi --log-file -


6-3. Create a Heroku account from here if you don’t have it already.


6-4. Login heroku account by using “Heroku Command Line Interface”.

heroku login

You’ll be asked for your credentials.

C:\work\simple-django-login>heroku login
Enter your Heroku credentials:
Email: xxx@xxxxx.com
Password: ****************
Logged in as xxx@xxxxx.com


6-5. Create heroku application. It automatically creates the git remote too.

heroku create simple-django-login

The output should be like this:

C:\work\simple-django-login>heroku create simple-django-login
Creating ⬢ simple-django-login... done
https://simple-django-login.herokuapp.com/ | https://git.heroku.com/simple-django-login.git


6-6. Add files to git repo.

git add .


6-7. Commit it.

git commit -m "Initial commit"


6-8. Upload to Heroku remote.

git push heroku master


6-9. Migrate database.

heroku run python manage.py migrate


7. Verify
7-1. Open the app by typing the command below:

heroku open

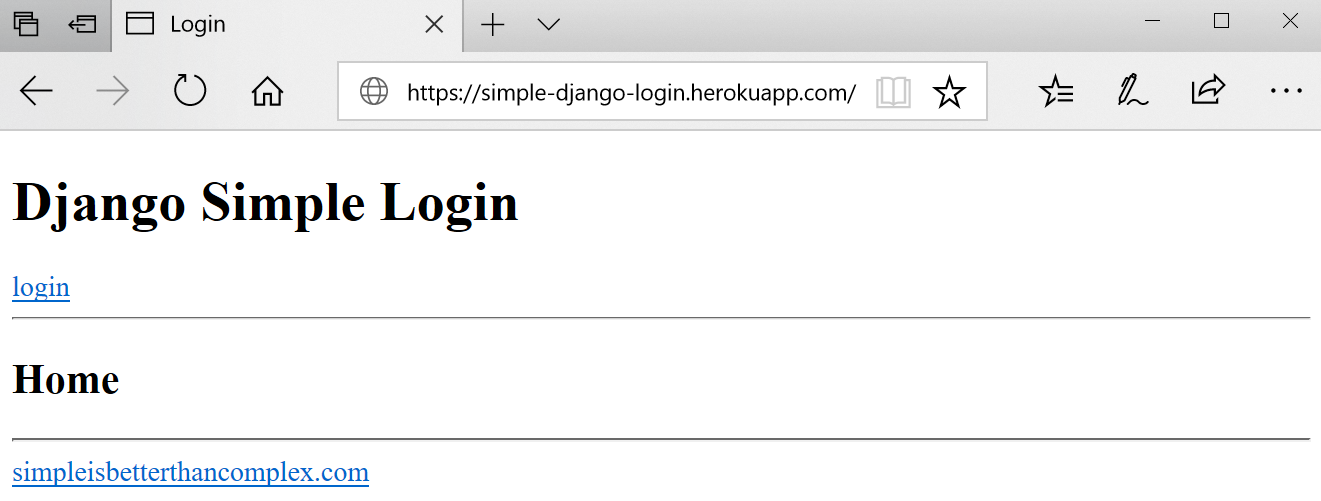
The command automatically open “https://simple-django-login.herokuapp.com/”.


Summary

Now, your django app is up and running on Heroku cloud and you can access from anywhere.


References
[1] Migrating an existing Django project
[2] Heroku Django Starter Template
[3] How to Deploy Django Applications on Heroku
[4] Django-Heroku (Python Library)
[5] Deploy your application to Heroku


Changing Screen Resolution of Mac OS VirtualBox Guest

The default screen resolution for Mac OS X VirtualBox Guest is 1024×768.
Below shows how to change the screen resolution of Mac OS VirtualBox guest running on Windows 10.


Steps
1. Open “Command Prompt”. (press Win + x and select “Command Prompt”)

2. Navigate to VirtualBox folder in which “VBoxManage.exe” resides.
e.g.)

cd C:\Program Files\Oracle\VirtualBox

3. Set resolution by typing the command below.

VBoxManage setextradata "High Sierra" VBoxInternal2/EfiGraphicsResolution 1920x1080

The third parameter (i.e. “High Sierra”) should be your VM name.

4. Start the VM


References
[1] Fix VirtualBox macOS High Sierra Screen Resolution (1920×1080 – 4K – 5K)