Setting Up Bluetooth Serial Port Profile on Raspberry Pi using sdptool

This post shows steps to set up Bluetooth Serial Port Profile (or SPP)[1] on Raspberry Pi.

The goal is to establish SPP connection between Raspberry Pi 3 and Android phone, then send/receive text using serial terminal applications on both ends.

SPP is not available by default. There are two options to enable it in BlueZ (which is the default Bluetooth stack in Linux). This post shows steps for the 1st option (sdptool).

  1. sdptool
  2. D-bus API (please see this post for this option)


Prerequisites (parentheses indicate my environment)


Steps
1. Installation
1-1. Install a serial terminal application on Raspberry Pi. In this post, I’ll use minicom[2].

sudo apt-get install minicom -y


2. Enable SPP on Raspberry Pi
In order to use SPP, Bluetooth service needs to be restarted with ‘compatibility’ flag[3].

2-1. Open Bluetooth service configuration file.

sudo nano /etc/systemd/system/dbus-org.bluez.service

2-2. Look for a line starts with “ExecStart” and add compatibility flag ‘-C’ at the end of the line.

ExecStart=/usr/lib/bluetooth/bluetoothd -C

2-3. Add a line below immediately after “ExecStart” line, then save and close the file.

ExecStartPost=/usr/bin/sdptool add SP

2-4. Reload the configuration file.

sudo systemctl daemon-reload

2-5. Restart the service.

sudo systemctl restart bluetooth.service


3. Pairing
To establish a connection, Raspberry Pi and the phone need to be paired.

3-1. Launch bluetoothctl.

bluetoothctl

3-2. Enter below in order to be discovered from the phone.

discoverable on

3-3. On the phone, scan for Raspberry Pi and pair. You should be able to see something like below.

[CHG] Device XX:XX:XX:XX:XX:XX Paired: yes

3-4. Press Ctrl+D to quit.


4. Establishing Connection from Phone

4-1. Listen for incoming connection on Raspberry Pi.

sudo rfcomm watch hci0

4-2. Install and launch “Serial Bluetooth Terminal” app[4] on the phone.

4-3. In the app, go to “Device” menu and select Raspberry Pi. If everything goes well and the connection is established, you should be able to see like this:

$ sudo rfcomm watch hci0
Waiting for connection on channel 1
Connection from XX:XX:XX:XX:XX:XX to /dev/rfcomm0
Press CTRL-C for hangup


5. Connecting Serial Terminal on Raspberry Pi
5-1. Open another terminal and launch the serial terminal.

minicom -b 9600 -o -D /dev/rfcomm0


6. Test
6-1. Input some text on the phone.

You should be able to see the text on Raspberry Pi’s serial terminal.

6-2. Input some text back to the phone on Raspberry Pi.

You should be able to see the text on the phone.


References
[1] Serial_Port_Profile_(SPP) – Wikipedia
[2] minicom(1) – Linux man page
[3] sdptool is broken in Bluez 5 – Arch Linux
[4] Serial Bluetooth Terminal – Google Play
[5] Bluetooth issues – Raspberry Pi Forum


Creating BLE GATT Server (UART Service) on Raspberry Pi


In this post, I will create BLE GATT server on Raspberry Pi 3 using BlueZ dbus interface with Python. I will reuse BlueZ example code as much as possible. As an example of GATT service, I’ll create UART service (a.k.a. Nordic UART Service/NUS [1] ), so that I can test it with Nordic’s smartphone app [2].


Assumptions


Steps
1. BlueZ Update
Raspbian Stretch comes with BlueZ 5.43. BlueZ’s Advertising Manager has been officially supported from 5.48. So, let’s update BlueZ by following this post.


2. UART Service Implementation
I’ll use “example-advertisement” and “example-gatt-server” from the downloaded source code in Step 1. Some of the classes and functions will be reused.

2-1. First, let’s create a working directory.

mkdir ble-uart-peripheral && cd ble-uart-peripheral

2-2. Copy the example code with new names so that they can be imported as modules.

cp ~/bluez-5.50/test/example-advertisement ./example_advertisement.py
cp ~/bluez-5.50/test/example-gatt-server ./example_gatt_server.py

Note: The file name of python module must have the suffix “.py” and should not have “-” (hyphen) in it.

2-3. Create a new file (e.g. “uart_peripheral.py”). I’ll reuse ‘Advertisement’ class, ‘Service’ class, ‘Characteristic’ class, and callback functions from the example code. Also, combine the both main() functions from the example code into one and modify the sub-classes of Advertisement, Application, Service, and Characteristic to realize the UART service.

import sys
import dbus, dbus.mainloop.glib
from gi.repository import GLib
from example_advertisement import Advertisement
from example_advertisement import register_ad_cb, register_ad_error_cb
from example_gatt_server import Service, Characteristic
from example_gatt_server import register_app_cb, register_app_error_cb

BLUEZ_SERVICE_NAME =           'org.bluez'
DBUS_OM_IFACE =                'org.freedesktop.DBus.ObjectManager'
LE_ADVERTISING_MANAGER_IFACE = 'org.bluez.LEAdvertisingManager1'
GATT_MANAGER_IFACE =           'org.bluez.GattManager1'
GATT_CHRC_IFACE =              'org.bluez.GattCharacteristic1'
UART_SERVICE_UUID =            '6e400001-b5a3-f393-e0a9-e50e24dcca9e'
UART_RX_CHARACTERISTIC_UUID =  '6e400002-b5a3-f393-e0a9-e50e24dcca9e'
UART_TX_CHARACTERISTIC_UUID =  '6e400003-b5a3-f393-e0a9-e50e24dcca9e'
LOCAL_NAME =                   'rpi-gatt-server'
mainloop = None

class TxCharacteristic(Characteristic):
    def __init__(self, bus, index, service):
        Characteristic.__init__(self, bus, index, UART_TX_CHARACTERISTIC_UUID,
                                ['notify'], service)
        self.notifying = False
        GLib.io_add_watch(sys.stdin, GLib.IO_IN, self.on_console_input)

    def on_console_input(self, fd, condition):
        s = fd.readline()
        if s.isspace():
            pass
        else:
            self.send_tx(s)
        return True

    def send_tx(self, s):
        if not self.notifying:
            return
        value = []
        for c in s:
            value.append(dbus.Byte(c.encode()))
        self.PropertiesChanged(GATT_CHRC_IFACE, {'Value': value}, [])

    def StartNotify(self):
        if self.notifying:
            return
        self.notifying = True

    def StopNotify(self):
        if not self.notifying:
            return
        self.notifying = False

class RxCharacteristic(Characteristic):
    def __init__(self, bus, index, service):
        Characteristic.__init__(self, bus, index, UART_RX_CHARACTERISTIC_UUID,
                                ['write'], service)

    def WriteValue(self, value, options):
        print('remote: {}'.format(bytearray(value).decode()))

class UartService(Service):
    def __init__(self, bus, index):
        Service.__init__(self, bus, index, UART_SERVICE_UUID, True)
        self.add_characteristic(TxCharacteristic(bus, 0, self))
        self.add_characteristic(RxCharacteristic(bus, 1, self))

class Application(dbus.service.Object):
    def __init__(self, bus):
        self.path = '/'
        self.services = []
        dbus.service.Object.__init__(self, bus, self.path)

    def get_path(self):
        return dbus.ObjectPath(self.path)

    def add_service(self, service):
        self.services.append(service)

    @dbus.service.method(DBUS_OM_IFACE, out_signature='a{oa{sa{sv}}}')
    def GetManagedObjects(self):
        response = {}
        for service in self.services:
            response[service.get_path()] = service.get_properties()
            chrcs = service.get_characteristics()
            for chrc in chrcs:
                response[chrc.get_path()] = chrc.get_properties()
        return response

class UartApplication(Application):
    def __init__(self, bus):
        Application.__init__(self, bus)
        self.add_service(UartService(bus, 0))

class UartAdvertisement(Advertisement):
    def __init__(self, bus, index):
        Advertisement.__init__(self, bus, index, 'peripheral')
        self.add_service_uuid(UART_SERVICE_UUID)
        self.add_local_name(LOCAL_NAME)
        self.include_tx_power = True

def find_adapter(bus):
    remote_om = dbus.Interface(bus.get_object(BLUEZ_SERVICE_NAME, '/'),
                               DBUS_OM_IFACE)
    objects = remote_om.GetManagedObjects()
    for o, props in objects.items():
        if LE_ADVERTISING_MANAGER_IFACE in props and GATT_MANAGER_IFACE in props:
            return o
        print('Skip adapter:', o)
    return None

def main():
    global mainloop
    dbus.mainloop.glib.DBusGMainLoop(set_as_default=True)
    bus = dbus.SystemBus()
    adapter = find_adapter(bus)
    if not adapter:
        print('BLE adapter not found')
        return

    service_manager = dbus.Interface(
                                bus.get_object(BLUEZ_SERVICE_NAME, adapter),
                                GATT_MANAGER_IFACE)
    ad_manager = dbus.Interface(bus.get_object(BLUEZ_SERVICE_NAME, adapter),
                                LE_ADVERTISING_MANAGER_IFACE)

    app = UartApplication(bus)
    adv = UartAdvertisement(bus, 0)

    mainloop = GLib.MainLoop()

    service_manager.RegisterApplication(app.get_path(), {},
                                        reply_handler=register_app_cb,
                                        error_handler=register_app_error_cb)
    ad_manager.RegisterAdvertisement(adv.get_path(), {},
                                     reply_handler=register_ad_cb,
                                     error_handler=register_ad_error_cb)
    try:
        mainloop.run()
    except KeyboardInterrupt:
        adv.Release()

if __name__ == '__main__':
    main()


3. Test
3-1. Run the UART service on Raspberry Pi.

python uart_peripheral.py

If all goes well, the output should be like this. Now, the service is running on Raspberry Pi and it’s broadcasting BLE advertising message.
* See Troubleshoot when you get error.

$ python uart_peripheral.py 
GATT application registered
GetAll
returning props
Advertisement registered

3-2. Lauch nRF Toolbox app on the smartphone and tap on “UART”.

3-3. Tap on “CONNECT” button. Then the app will start scanning for nearby BLE devices.

3-4. Select your Raspberry Pi from the detected device list. It triggers the connection between the Raspberry Pi and the app.


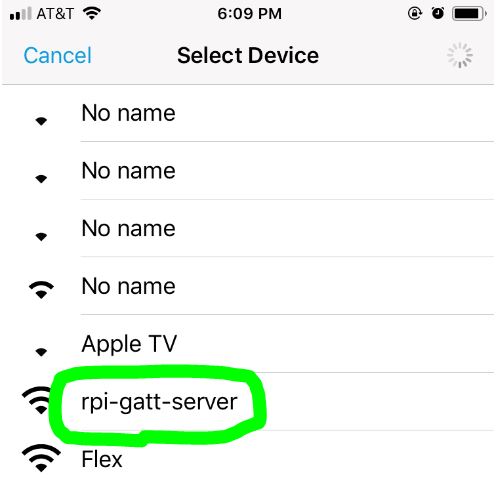
* In case of iPhone, Raspberry Pi’s host name may be displayed instead of LOCAL_NAME in the code.

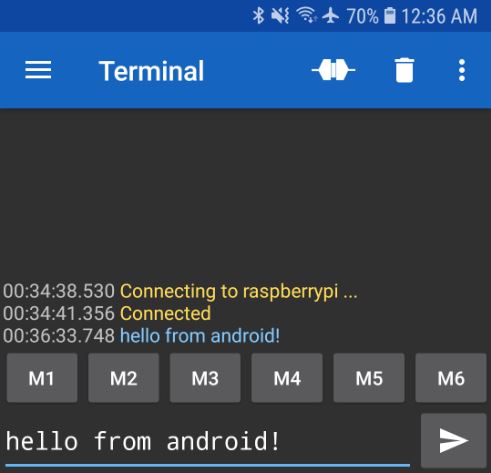
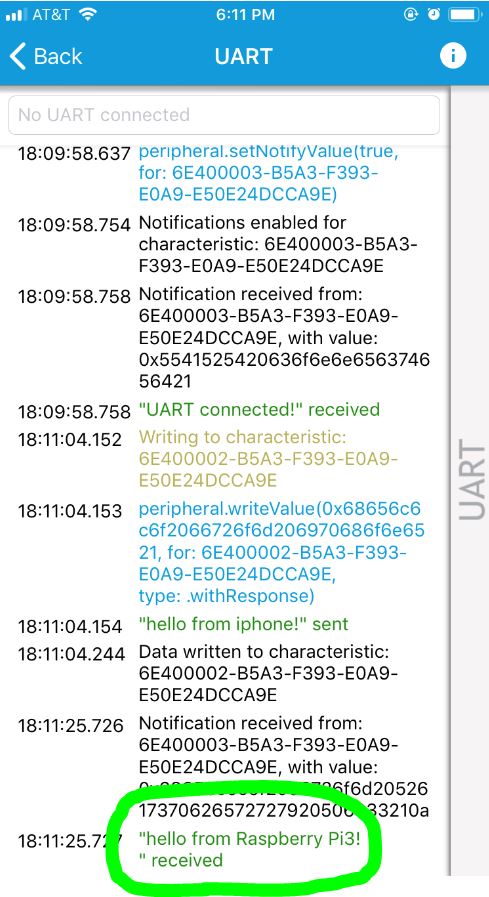
3-5. Tap on “Show Log”, enter some strings and tap on “Send”.


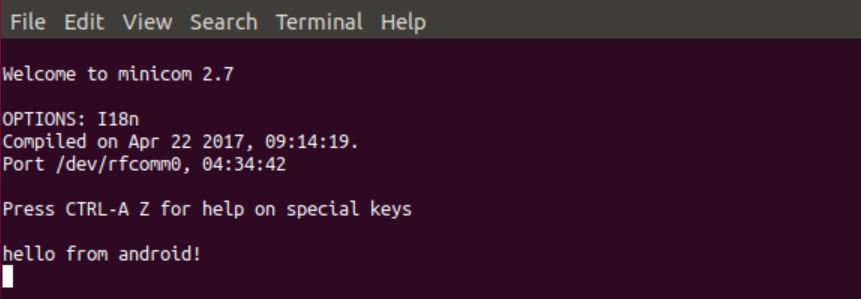
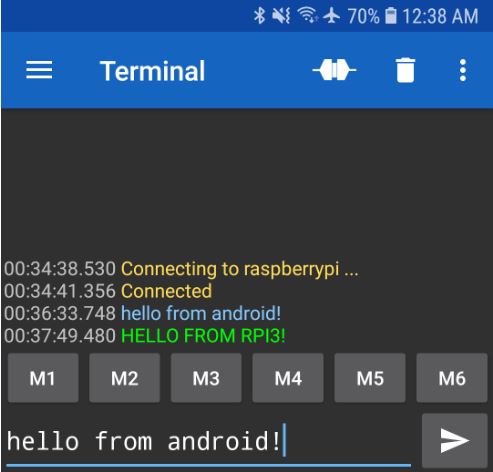
3-7. Check the console on Raspberry Pi. You should be able to see what you sent from the app like below.

remote: hello from iphone!

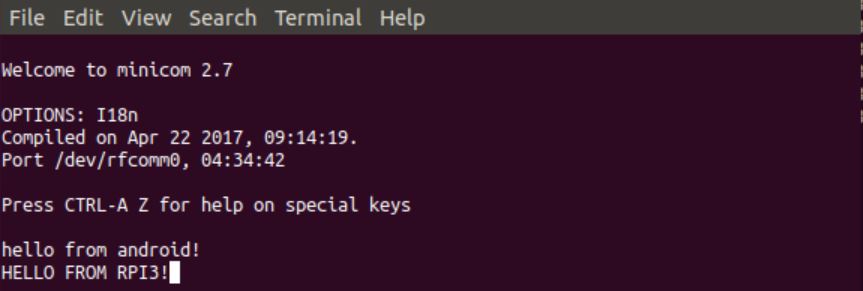
3-8. Let’s send back something from Raspberry Pi by entering below on Raspberry Pi’s console.

hello from Raspberry Pi!

3-9. Check the app screen.


Troubleshoot
If you are getting “Failed to register advertisement” error below, it’s most likely because the advertisement wasn’t unregistered when the script exited previously.

Failed to register advertisement: org.bluez.Error.Failed: Failed to register advertisement

An easy way to recover is to restart bluetooth service.

sudo systemctl restart bluetooth.service


References
[1] UART/Serial Port Emulation over BLE – Nordic Semiconductor 
[2] nRF Toolbox App – Nordic Semiconductor
[3] Turning a Raspberry Pi 3 into a Bluetooth Low Energy peripheral


Updating BlueZ on Raspberry Pi (from 5.43 to 5.50)


Update (Jul 9, 2019):
Now, Raspbian Buster, released on 6/20/2019, has bluez 5.50 by default!


This post shows how to update BlueZ on Raspberry Pi from 5.43 (the default version comes with Raspbian Stretch) to 5.50 (released notes [1]). In this post, I assume that you already have a Raspberry Pi 3 B+ or Raspberry Pi Zero W running Raspbian Stretch.


Steps [2]
1. Check Current BlueZ Version
1-1. Before starting, let’s check the current BlueZ version.

bluetoothctl -v

In case of Raspbian Stretch, the BlueZ version should be 5.43.

$ bluetoothctl -v
5.43


2. Install Dependencies
2-1. Update the package list.

sudo apt-get update

2-1. Install the dependencies.

sudo apt-get install libdbus-1-dev libglib2.0-dev libudev-dev libical-dev libreadline-dev -y


3. Install BlueZ
3-1. Download BlueZ source code.

wget www.kernel.org/pub/linux/bluetooth/bluez-5.50.tar.xz

3-2. Uncompress the downloaded file.

tar xvf bluez-5.50.tar.xz && cd bluez-5.50

3-3. Configure.

./configure --prefix=/usr --mandir=/usr/share/man --sysconfdir=/etc --localstatedir=/var --enable-experimental 

3-4. Compile the source code.

make -j4

3-5. Install.

sudo make install

3-6. Reboot Raspberry Pi 3.

sudo reboot


4. Verify Update[3] [4]
4-1. Verify the BlueZ version by issuing the command below.

bluetoothctl -v

The result should be like this:

$ bluetoothctl -v
bluetoothctl: 5.50


References
[1] BlueZ Release Notes
[2] Installing Bluez 5.44 onto Raspbian? – Stack Exchange
[3] Bluetooth LE upgrade not working – Raspberry Pi Forum
[4] Why does bluetoothd show version 5.37 after installing Bluez 5.45? – Stack Exchange


Enabling Amazon Alexa on Raspberry Pi

This post shows steps to enable Amazon Alexa on Raspberry Pi. While there is already a comprehensive tutorial on Amazon Alexa official site [1], this post focuses on doing the same with minimal setup.


Example Setup


Steps
1. Raspberry Pi Setup
1-1. Setup headress Raspberry Pi.

1-2. Connect the speaker and the microphone on Raspberry Pi.

1-3. Make sure the speaker is working. The command below can be used for speaker output test. To end the test, press Ctrl-C.

speaker-test -t wav

1-4. Check if the microphone is working. First, record some audio from the microphone by the command below.

arecord --format=S16_LE --duration=5 --rate=16000 --file-type=raw out.raw -D sysdefault:CARD=1

1-5. Next, play the recorded audio by the command below.

aplay --format=S16_LE --rate=16000 out.raw

If everything goes right, you can hear the recorded audio from the speaker. If the speaker output or microphone input is too low, you can adjust the gain with alsamixer.

alsamixer


2. Register Product Info
2-1. Open a web browser on PC and log in to Amazon Developer. Please sign up if you don’t already have the account.

2-2. Click on “GET STARTED” and then “CREATE PRODUCT”.

2-3. Enter “rpialexa” for both Product Name and Product ID.

2-4. Check on “Device with Alexa built-in”.

2-5. Check on “No” for “Will your device use a companion app?”.

2-6. Select “Other” for “Product category” and enter “Alexa on Raspberry Pi” both for the category description and the product description.

2-7. Check on “Touch-initiated” and “Hands-free”.

2-8. Skip the image section and check on “No” for the rest of the questions, then click on “NEXT”.


3. Create Security Profile
3-1. Click on “Create New Profile”.

3-2. Enter “rpialexa security profile” for “Security Profile Name” and “Security Profile Description”, then click on “NEXT”.

3-3. Select “Other devices and platforms” in “Platform information” section.

3-4. Enter “rpialexa” as Client ID name then clock on “GENERATE ID”.

3-5. Click on “DOWNLOAD”.

3-6. Copy downloaded “config.json” file to Raspberry Pi’s home directory. If you are using Linux PC, you can do it like below.

scp ~/Downloads/config.json pi@$RPI_IP_ADDRESS:~

3-7. Review the agreement and check on it, then click on “FINISH”.

3-8. Your will be prompted “Your product has been created”. Click on “OK”.

3-9. Open a web browser and access to Login with Amazon Console.

3-10. Select the security profile just created and click on “Confirm”.

3-11. Enter a privacy policy URL and click on “Save”. In this example, let’s use a fake URL below.

http://example.com


4. SDK Installation and Configuration on RPi
4-1. Make sure you are in home directory (or wherever you copied “config.json” to in step 3-6).

4-2. Download scripts.

wget https://raw.githubusercontent.com/alexa/avs-device-sdk/master/tools/Install/setup.sh
wget https://raw.githubusercontent.com/alexa/avs-device-sdk/master/tools/Install/genConfig.sh
wget https://raw.githubusercontent.com/alexa/avs-device-sdk/master/tools/Install/pi.sh

4-3. Run setup.sh with config.json.

sudo bash setup.sh config.json

4-4. Type “AGREE” when asked for licensing agreement.

4-5. Once setup is completed, run startsample.sh.

sudo bash startsample.sh

4-6. The script will show the line like below, then access the URL with a web browser, enter the code and click on “Continue”.

To authorize, browse to: 'https://amazon.com/us/code' and enter the code: {AXRRLC}

4-7. Select “Allow”. Then you’ll be prompted as below.

Also, you will be able to see the lines below in the terminal window. Now, Alexa is ready.

########################################
#       Alexa is currently idle!       #
########################################


5. Test
You can ask Alexa like

Alexa, what time is it?


References
[1] AVS Tutorials Prototype with Raspberry Pi – amazon alexa
[2] Raspberry Pi Quick Start Guide with Script – alexa/avs-device-sdk – GitHub


Controlling LEDs on Raspberry Pi using Voice with Amazon Echo

The goal of this post is to create an Alexa skill [1] that controls three LEDs (red, yellow, and green) connected to Raspberry Pi’s GPIO pins. The skill will enable to turn ON/OFF each LED by specifying the color of light and the ON/OFF status via voice command.


Prerequisites (parentheses indicate my environment)


Steps
1. Setup LEDs on Raspberry Pi
Connect LEDs to Raspberry Pi’s GPIO pins. In this post, I’ll use Pi Traffic Light. Please refer this post for setup.


2. Create Alexa skill on Raspberry Pi
flask-ask is a Flask extension that makes it easier to build Alexa skill [2].

2-1. Install Flask and flask-ask.

sudo pip install Flask flask-ask

2-2. Create a python file.

2-3. Create a python file and implement a skill like below.

from flask import Flask
from flask_ask import Ask, statement
import RPi.GPIO as GPIO

app = Flask(__name__)
ask = Ask(app, '/')

@ask.intent('LedIntent')
def led(color, status):
  if color.lower() not in pins.keys():
    return statement("I don't have {} light".format(color)) 
  GPIO.output(pins[color], GPIO.HIGH if status == 'on' else GPIO.LOW)
  return statement('Turning the {} light {}'.format(color, status))

if __name__ == '__main__':
  try:
    GPIO.setmode(GPIO.BCM)
    pins = {'red':9, 'yellow':10, 'green':11}
    for pin in pins.values(): 
      GPIO.setup(pin, GPIO.OUT)
    app.run(debug=True)
  finally:
    GPIO.cleanup()

2-4. Save the file and run the code. In this example, the file name is “led.py”.

python led.py

Now the skill is running as a local web service on default port (i.e. localhost:5000).


3. Publish Skill on the Internet
To communicate with Alexa, the skill needs to be accessible from the internet. In this post, I’ll use a tunnel service called serveo [3].

3-1. Open another terminal.

3-2. Enter the command below. It will connect the local server to a public URL.

ssh -R 80:localhost:5000 serveo.net

In the output, you should be able to find a line like below. This URL will be required as an endpoint when configuring the skill in next step.

Forwarding HTTP traffic from https://xxxxx.serveo.net


4. Configure Skill on Amazon Cloud 

4-1. Open a browser and log in to Amazon Developer. Please sign up if you don’t already have the account.

4-2. Navigate to Alexa Developer Console and click on “Create Skill”.

4-3. Enter a skill name. In this example, it’s “raspberry pi”.

4-4. Make sure “Custom” is selected then click on “Create skill”.

4-5. Make sure “Start from scratch” is selected then click on “Choose”.

4-6. Click on “+” icon next to “Slot types” in the left pane.

4-7. Enter “STATUS” and click on “Create custom slot type” button.

4-8. Add “on” and “off” as the slot values.

4-9. Click on “+” icon next to “Slot types” in the left pane again.

4-10. Click on “Use an existing slot type from Alexa’s built-in library”

4-11. Search “AMAZON.Color” and click on “Add slot type”.

4-12. Click on “+” icon next to “Intents” in the left pane again.

4-13. Enter “LedIntent” as an intent name, then click on “Create custom intent”.

4-14. Enter below as a Sample Utterances, then click on “+” button.

turn the {color} light {status}

4-15. Select “AMAZON.Color” and “STATUS” types for color and status slots respectively.

4-16. Click on “Build Model” button on the top. If everything goes right, you’ll get a “Build Successful” notification.

4-17. Select Endpoint in the left pane and and check on “HTTPS”.

4-18. Enter the URL generated by serveo in Step 3.2 under Default Region.

4-19. Select “My development endpoint is sub-domain of domain that has a wildcard certificate from a certificate authority” for SSL certificate type.

4-20. Click on “Save Endpoints”


5. Testing Skill in Alexa Developer Console

5-1. Select “Test” tab in the top menu bar.

5-2. Select “Development” in the pull down menu to enable Skill testing.

5-3. Say or input below to Alexa Simulator.

ask raspberry pi to turn the red light on

This should turn on LED light connected to you Raspberry Pi. Also, you should be able to see similar to below in Alexa Simulator.


6. Testing Skill with Amazon Echo
You can test the skill on your Alexa-enable device (e.g Echo dot) like this.

Alexa, ask raspberry pi to turn the red light on


References
[1] Alexa Skills Kit – Amazon Alexa
[2] Welcome to Flask-Ask
[3] serveo – Expose local servers to the internet
[4] Amazon Alexa + Raspberry PI + jasm.eu: Our first steps together
[5] Flask-Ask: A New Python Framework for Rapid Alexa Skills Kit Development