Creating AltBeacon with Raspberry Pi using BlueZ Example Code (updated)

This post shows steps to create an AltBeacon [1] with Raspberry Pi, by modifying BlueZ BLE Advertisement example code (i.e. “example-advertisement).

*If you want to create Apple’s iBeacon [2], please see this post.


Prerequisites (parentheses indicate my environment)

  • Raspberry Pi (Raspberry Pi4 B with Raspbian Buster 2019-06-20)
  • Internet access
    To download BlueZ example code. Here is a Wi-Fi Setup steps. If you downloaded already, you can work offline.


Steps
1. Downloading BlueZ
1-1. Download BlueZ source code archive.

wget www.kernel.org/pub/linux/bluetooth/bluez-5.50.tar.xz

1-2. Extract the archive file.

tar xvf bluez-5.50.tar.xz

1-3. Make sure that the sample code works. [Optional]

./bluez-5.50/test/example-advertisement

Output should be like this:

$ ./bluez-5.50/test/example-advertisement
GetAll
returning props
Advertisement registered


2. Modify BLE Advertisement Example Code
2-1. Copy the example code.

cp ./bluez-5.50/test/example-advertisement ./example-altbeacon

2-2. Open the file and look for TestAdvertisement class.

2-3. Replace ‘__init__’ method:

    def __init__(self, bus, index):
        Advertisement.__init__(self, bus, index, 'peripheral')
        self.add_service_uuid('180D')
        self.add_service_uuid('180F')
        self.add_manufacturer_data(0xffff, [0x00, 0x01, 0x02, 0x03, 0x04])
        self.add_service_data('9999', [0x00, 0x01, 0x02, 0x03, 0x04])
        self.add_local_name('TestAdvertisement')
        self.include_tx_power = True
        self.add_data(0x26, [0x01, 0x01, 0x00])

with:

    def __init__(self, bus, index):
        company_id =  0x0118
        type =       [0xBE, 0xAC]
        id1 =        [0x01, 0x02, 0x03, 0x04, 0x05, 0x06, 0x07, 0x08,
                      0x09, 0x10, 0x11, 0x12, 0x13, 0x14, 0x15, 0x16]
        id2 =        [0x11, 0x22]
        id3 =        [0x33, 0x44]
        rssi_at_1m = [0xB3]
        feature  =   [0x00]
        Advertisement.__init__(self, bus, index, 'peripheral')
        self.add_manufacturer_data(company_id, type + id1 + id2 + id3 + rssi_at_1m + feature)


3. Test
3-1. Run the code. The console output should be same as Step 1-3.

./example-altbeacon

3-2. Find your AltBeacon running on Raspberry Pi using a beacon scanner app. I used nRF Connect on an Android phone.


Summary
If everything goes well, the Raspberry Pi should be broadcasting AltBeacon message and you can find it with a scanner app. Some of the AltBeacon data can be configured on Step 2-3 for your application. Here is a brief explanation of those data.

  • ‘company_id’
    Company Identifiers are defined by Bluetooth SIG [3].
  • ‘beacon_type’
    It must be ‘0xBEAC’ for AltBeacon.
  • ‘id1’
    Application unique UUID.
  • id2‘ and ‘id3
    Additional unique IDs which correspond iBeacon’s Major Number and Minor Number respectively.
  • ‘rssi_at_1m’
    Value of received signal strength at 1 meter from the device. It must be calibrated for each device when it’s deployed.

AltBeacon is an open source version of Apple’s iBeacon. It has the same functionality as iBeacon, and the two have similar data structure as below.

*2 : Bluetooth 4.0 Core Specification, Volume 3, Part C, Appendix C, 18.1 Flags
*4 Manufacture dependent value
*5 Application dependent value
*6 Device dependent value


References
[1] AltBeacon
[2] iBeacon – Apple Developer
[3] Company Identifiers – Bluetooth SIG
[4] BlueZ Release Notes



Creating iBeacon with Raspberry Pi using BlueZ Example Code (updated)

This post shows steps to create an iBeacon with Raspberry Pi, by modifying BlueZ BLE Advertisement example code (i.e. “example-advertisement).

Note:
Even though it uses Bluetooth Low Energy standard, iBeacon is Apple’s proprietary protocol and making/deploying iBeacon devices requires the license from Apple [1]. The scope of this post is limited to getting familiar with BlueZ advertising example code and iBeacon format for experimental purpose.

*If you want to create AltBeacon [2], which is kind of an open source version of iBeacon, please see this post.


Prerequisites (parentheses indicate my environment)

  • Raspberry Pi (Raspberry Pi4 B with Raspbian Buster 2019-06-20)
  • Internet access
    To download BlueZ example code. Here is a Wi-Fi Setup steps. If you downloaded already, you can work offline.


Steps
1. Downloading BlueZ
1-1. Download BlueZ source code archive.

wget www.kernel.org/pub/linux/bluetooth/bluez-5.50.tar.xz

1-2. Extract the archive file.

tar xvf bluez-5.50.tar.xz

1-3. Make sure that the sample code works. [Optional]

./bluez-5.50/test/example-advertisement

Output should be like this:

$ ./bluez-5.50/test/example-advertisement
GetAll
returning props
Advertisement registered


2. Modify BLE Advertisement Example Code
2-1. Copy the example code.

cp ./bluez-5.50/test/example-advertisement ./example-ibeacon

2-2. Open the file and look for TestAdvertisement class.

2-3. Replace ‘__init__’ method:

    def __init__(self, bus, index):
        Advertisement.__init__(self, bus, index, 'peripheral')
        self.add_service_uuid('180D')
        self.add_service_uuid('180F')
        self.add_manufacturer_data(0xffff, [0x00, 0x01, 0x02, 0x03, 0x04])
        self.add_service_data('9999', [0x00, 0x01, 0x02, 0x03, 0x04])
        self.add_local_name('TestAdvertisement')
        self.include_tx_power = True
        self.add_data(0x26, [0x01, 0x01, 0x00])

with:

    def __init__(self, bus, index):
        company_id =   0x004C
        beacon_type = [0x02, 0x15]
        uuid =        [0x01, 0x02, 0x03, 0x04, 0x05, 0x06, 0x07, 0x08, 
                       0x09, 0x10, 0x11, 0x12, 0x13, 0x14, 0x15, 0x16]
        major =       [0x11, 0x22]
        minor =       [0x33, 0x44]
        tx_power =    [0xB3]
        Advertisement.__init__(self, bus, index, 'peripheral')
        self.add_manufacturer_data(company_id, beacon_type + uuid + major + minor + tx_power)


3. Test
3-1. Run the code. The console output should be same as Step 1-3.

./example-ibeacon

3-2. Find your ibeacon running on Raspberry Pi using a beacon scanner app. I used nRF Connect on an Android phone.


Summary
If everything goes well, the Raspberry Pi should be broadcasting iBeacon message and you can find it with a scanner app. Some of the iBeacon data can be configured on Step 2-3 for your application. Here is a brief explanation of those data.

  • ‘company_id’
    Company Identifiers are defined by Bluetooth SIG [3]. For iBeacon, it must be Apple’s ID (i.e. 0x004C).
  • ‘beacon_type’
    It must be ‘0x0215’ which means Proximity Beacon.
  • ‘uuid’
    Proximity UUID is an application unique ID.
  • major‘ and ‘minor
    Major Number and Minor Number are application dependent values which can be used to identify more precise location, etc.
  • ‘tx_power’
    Tx Power is a device dependent value. It must be calibrated for each device when it’s deployed.

iBeacon and AltBeacon have the similar functionality and data structure as below.

*2 : Bluetooth 4.0 Core Specification, Volume 3, Part C, Appendix C, 18.1 Flags
*4 Manufacture dependent value
*5 Application dependent value
*6 Device dependent value


References
[1] iBeacon – Apple Developer
[2] AltBeacon
[3] Company Identifiers – Bluetooth SIG
[4] BlueZ Release Notes


Setting Up I2C Serial Communication on Raspberry Pi

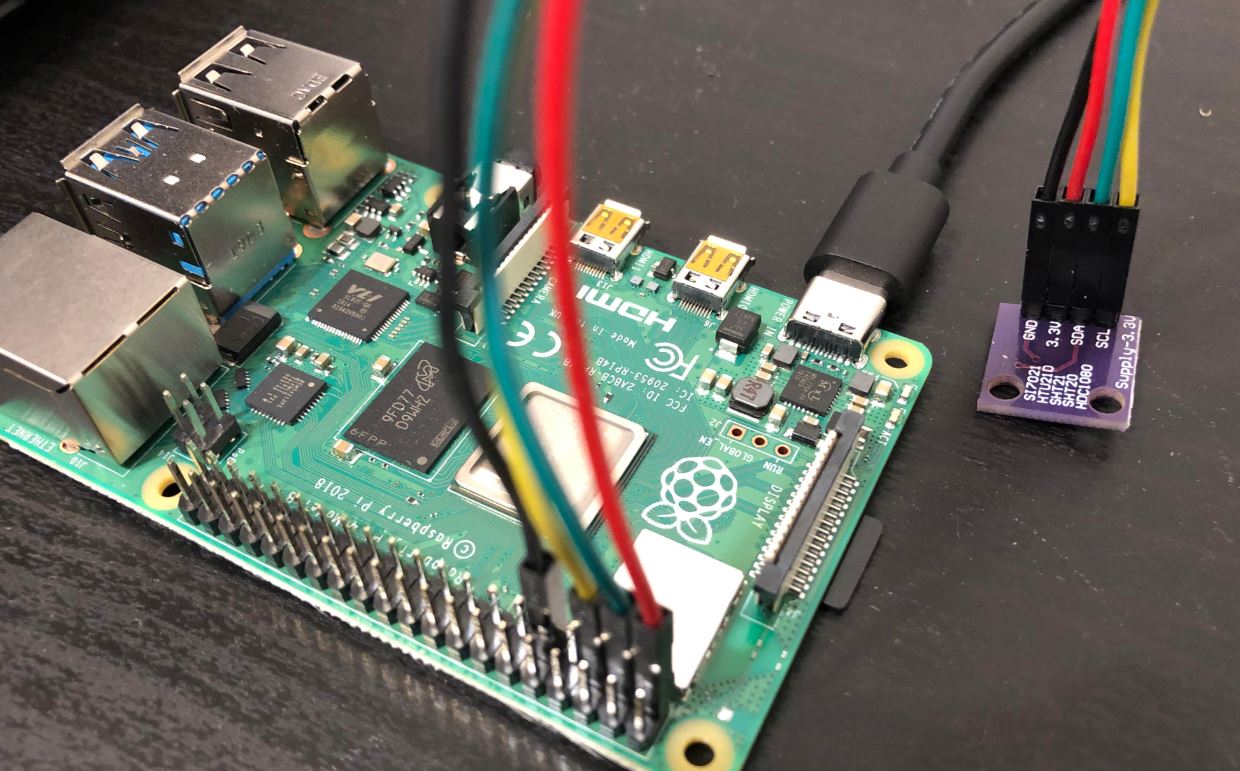
This post shows steps to setup I2C serial communication [1] on Raspberry Pi with an I2C peripheral device. I’ll use a temperature and humidity sensor as an example of I2C peripheral. The goal is to read those sensors value on Raspberry Pi.


Assumptions

I assume that you already installed Raspbian OS on your Pi, if not, please setup Raspbian OS first.


Example Setup


Steps
1. Enabling I2C
1-1. I2C is disabled by default on Raspbian. To enable I2C, run raspi-config.

sudo raspi-config

1-2. Select “Interfacing Options”, then “I2C”.

1-3. Select “Yes” when it asks you to enable I2C.

1-5. Select “OK” and exit raspi-config.


2.  Installing i2c-tools
2-1. Install i2c-tools if it’s not already.

sudo apt-get install i2c-tools -y

2-2. Let’s check the I2C bus before connecting the sensor.

i2cdetect -y 1

The result should be like this. If any I2C device is connected, it’s going to be showing up with its I2C slave address. Since nothing is connected yet, nothing is coming up this time.

$ i2cdetect -y 1
     0  1  2  3  4  5  6  7  8  9  a  b  c  d  e  f
00:          -- -- -- -- -- -- -- -- -- -- -- -- --
10: -- -- -- -- -- -- -- -- -- -- -- -- -- -- -- --
20: -- -- -- -- -- -- -- -- -- -- -- -- -- -- -- --
30: -- -- -- -- -- -- -- -- -- -- -- -- -- -- -- --
40: -- -- -- -- -- -- -- -- -- -- -- -- -- -- -- --
50: -- -- -- -- -- -- -- -- -- -- -- -- -- -- -- --
60: -- -- -- -- -- -- -- -- -- -- -- -- -- -- -- --
70: -- -- -- -- -- -- -- --


3. Wiring

3-1. Power off the Raspberry Pi.

3-2. Connect Raspberry Pi and the sensor with jumper wires (for Power, GND, Data, and Clock lines). You can find pins for I2C from here.

3-3. Boot up the Raspberry Pi.

3-4. Run the command again and check if the sensor is detected as an I2C peripheral.

i2cdetect -y 1

The result should be like this.

$ i2cdetect -y 1
     0  1  2  3  4  5  6  7  8  9  a  b  c  d  e  f
00:          -- -- -- -- -- -- -- -- -- -- -- -- -- 
10: -- -- -- -- -- -- -- -- -- -- -- -- -- -- -- -- 
20: -- -- -- -- -- -- -- -- -- -- -- -- -- -- -- -- 
30: -- -- -- -- -- -- -- -- -- -- -- -- -- -- -- -- 
40: 40 -- -- -- -- -- -- -- -- -- -- -- -- -- -- -- 
50: -- -- -- -- -- -- -- -- -- -- -- -- -- -- -- -- 
60: -- -- -- -- -- -- -- -- -- -- -- -- -- -- -- -- 
70: -- -- -- -- -- -- -- --               


4. Testing
4-1. Install a library for HTU21D sensor. [3]

pip install htu21df

4-2. Launch python interactive shell.

python

4-3. Import the library and create HTU21 object.

from htu21 import HTU21 
htu = HTU21()

4-4. Read the temperature value.

htu.read_temperature()

4-5. Then, read the humidity value.

htu.read_humidity()

The result should be like this:

>>> htu.read_temperature()
26.670544433593754
>>> htu.read_humidity()
44.258636474609375


*If you want to connect other device than HTU21D sensor, use smbus/smbus2 [5] or raw device [6] instead.


References
[1] I2C – Wikipedia
[2] HTU21D(F) Sensor Datasheet
[3] MSeal/htu21df_sensor – GitHub
[4] Raspberry Pi I2C Pinout
[5] smbus2 – PyPI
[6] Need help with HTU21D Humidity Sensor (for RPi outreach)


Showing Album Cover Art Images for Bluetooth Audio

In the previous post, I was able to show song title, artist name, and album name of Bluetooth audio. Then, I thought it would be nice if the album cover art images could be displayed too.

Specification wise, transferring cover art over Bluetooth is supported since AVRCP 1.6 [1], but unfortunately it’s not widely implemented yet. So, my idea is to get cover art from Google Images [2] by web scraping the search results.


Assumptions
Bluetooth audio streaming (A2DP) and song info display (AVRCP) should be enabled by following the previous posts:


Example Setup


Steps
1. Installation of Required Software
1-1. Install “feh”, which will be used to display images.

sudo apt-get install feh -y

1-2. Install “beautifulsoup4” python package, which will be used for web scraping.

pip install beautifulsoup4


2. Updating Code
2-1. Open “media_control.py” from the previous post.

2-2. Add the following code which implements the cover art feature. [3] [4] [5]

import argparse
import requests
import bs4
import json
import subprocess

URL = 'https://www.google.com/search?tbm=isch&q='
HEADER = {'User-Agent': "Mozilla/5.0 (Windows NT 6.1; WOW64) AppleWebKit/537.36 (KHTML, like Gecko) Chrome/43.0.2357.134 Safari/537.36"}
viewer = None

def show_album_art(artist, album):
    if artist == '' or album == '':
        return

    global viewer
    if viewer:
        viewer.terminate()
        viewer.kill()

    artist = '"' + '+'.join(artist.split()) + '"'
    album = '"' + '+'.join(album.split()) + '"'
    res = requests.get(URL+'+'.join((artist, album)), headers=HEADER)
    soup = bs4.BeautifulSoup(res.text, 'html.parser')
    meta_elements = soup.find_all("div", {"class": "rg_meta"})
    meta_dicts = (json.loads(e.text) for e in meta_elements)

    for d in meta_dicts:
        if d['oh'] == d['ow']:
            image_url = d['ou']
            break

    res = requests.get(image_url)
    if res.status_code != 200:
        return

    with open('album_art', 'wb') as f:
        f.write(res.content)

    viewer = subprocess.Popen(['feh', '-g', '220x220', 'album_art'])

 2-3. Add the line below at the end of elif block in “on_property_changed()”.

show_album_art(value.get('Artist', ''), value.get('Album', ''))

After the modification, “on_property_changed()” should look like this.

def on_property_changed(interface, changed, invalidated):
    if interface != 'org.bluez.MediaPlayer1':
        return
    for prop, value in changed.iteritems():
        if prop == 'Status':
            print('Playback Status: {}'.format(value))
        elif prop == 'Track':
            print('Music Info:')
            for key in ('Title', 'Artist', 'Album'):
                print('   {}: {}'.format(key, value.get(key, '')))
            show_album_art(value.get('Artist', ''), value.get('Album', ''))


3. Test
3-1. Make sure Bluetooth audio connection is already established and bluealsa audio forwarding is enabled.

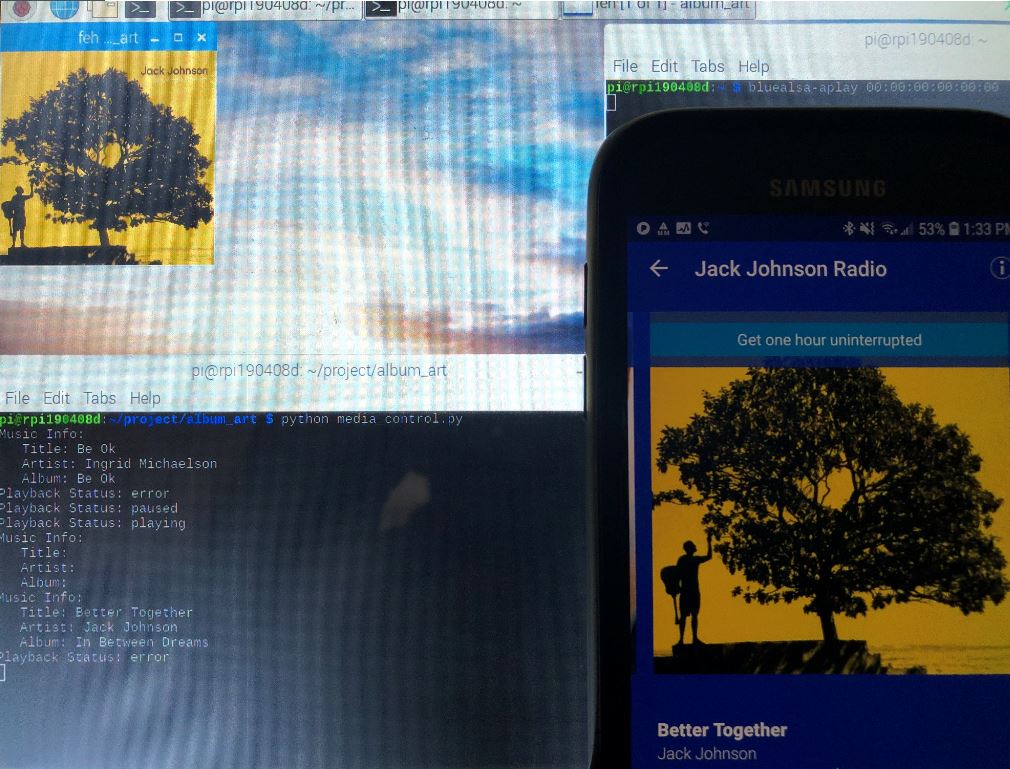
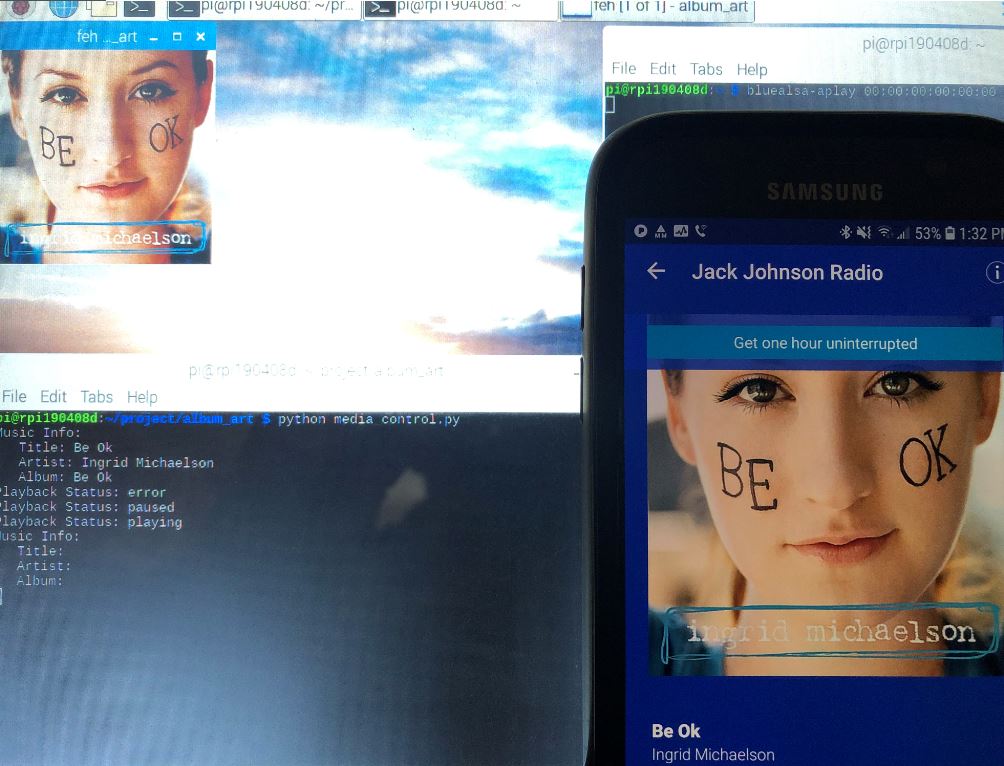
3-2. Run the updated program. Following images are examples of the results. The right side is the smartphone screen running Pandora streaming music. The left side (background) is the Raspberry Pi’s desktop showing the cover art image from Google Images.

When song changes, it closes feh window for the previous song, then re-open it with new cover art image for the current song.


Summary
There is still room for improvement (e.g. logic for image selection, error handling, etc), but so far I’m satisfied with the result as a prototype.


References
[1] Traditional Profile Specifications – Bluetooth SIG
[2] Google Images
[3] Python – Download Images from google Image search? – Stack Overflow
[4] scraping full size images from Google Images – GitHub Gist
[5] How can I close an image shown to the user with the Python Imaging Library? – Stack Overflow


Controlling Bluetooth Audio on Raspberry Pi


Update (April 21, 2020):
Volume control support added.


This post shows steps to control playback status of Bluetooth audio which is streamed from a connected phone (or any Bluetooth capable media player). The goal is to enable below.

  • Playback control (play, pause, next/previous song, and volume control)
  • Music information display in real time (song title, artist name, and album name)


Prerequisites


Steps
1. Enabling Bluetooth Audio (A2DP Sink)
1-1. If it’s not already done, please follow this post and enable Bluetooth Audio and connect a phone.


2. Implement Playback Control and Music Info Display [1]
2-1. Create a python script. This script prints playback status and music info when it’s updated. It also accept command input (i.e. “play”, “pause”, “next”, “prev”).

import dbus, dbus.mainloop.glib, sys
from gi.repository import GLib

def on_property_changed(interface, changed, invalidated):
    if interface != 'org.bluez.MediaPlayer1':
        return
    for prop, value in changed.items():
        if prop == 'Status':
            print('Playback Status: {}'.format(value))
        elif prop == 'Track':
            print('Music Info:')
            for key in ('Title', 'Artist', 'Album'):
                print('   {}: {}'.format(key, value.get(key, '')))

def on_playback_control(fd, condition):
    str = fd.readline()
    if str.startswith('play'):
        player_iface.Play()
    elif str.startswith('pause'):
        player_iface.Pause()
    elif str.startswith('next'):
        player_iface.Next()
    elif str.startswith('prev'):
        player_iface.Previous()
    elif str.startswith('vol'):
        vol = int(str.split()[1])
        if vol not in range(0, 128):
            print('Possible Values: 0-127')
            return True
        transport_prop_iface.Set(
                'org.bluez.MediaTransport1',
                'Volume',
                dbus.UInt16(vol))
    return True

if __name__ == '__main__':
    dbus.mainloop.glib.DBusGMainLoop(set_as_default=True)
    bus = dbus.SystemBus()
    obj = bus.get_object('org.bluez', "/")
    mgr = dbus.Interface(obj, 'org.freedesktop.DBus.ObjectManager')
    player_iface = None
    transport_prop_iface = None
    for path, ifaces in mgr.GetManagedObjects().items():
        if 'org.bluez.MediaPlayer1' in ifaces:
            player_iface = dbus.Interface(
                    bus.get_object('org.bluez', path),
                    'org.bluez.MediaPlayer1')
        elif 'org.bluez.MediaTransport1' in ifaces:
            transport_prop_iface = dbus.Interface(
                    bus.get_object('org.bluez', path),
                    'org.freedesktop.DBus.Properties')
    if not player_iface:
        sys.exit('Error: Media Player not found.')
    if not transport_prop_iface:
        sys.exit('Error: DBus.Properties iface not found.')

    bus.add_signal_receiver(
            on_property_changed,
            bus_name='org.bluez',
            signal_name='PropertiesChanged',
            dbus_interface='org.freedesktop.DBus.Properties')
    GLib.io_add_watch(sys.stdin, GLib.IO_IN, on_playback_control)
    GLib.MainLoop().run()

2-2. Run the script.

python media_control.py


3. Test: Playback Status and Music Info
3-1. Start music by operating a media player on the phone. The script should print the info like below:

$ python media_control.py 
Playback Status: playing
Music Info:
   Title: Basket Case
   Artist: Green Day
   Album: Dookie (Explicit)


4. Test: Playback/Volume Control
4-1. Enter commands from keyboard. You should be able to control the music. In the example below, line 1, 3, 5 and 10 are commands entered.

pause
Playback Status: paused
play
Playback Status: playing
next
Music Info:
   Title: Sloppy Seconds
   Artist: Watsky
   Album: Cardboard Castles
vol 100


What’s Next?
If you are interested in showing album cover art images, please check this out.


References
[1] bluez/doc/media-api.txt