Headless Setup for Raspberry Pi 3 and Raspberry Pi Zero W


This is an initial setup steps to create a headless Raspberry Pi 3 B+ or Raspberry Pi Zero W (Wireless). It enables access to Raspberry Pi’s console without having a dedicated keyboard, mouse, or display. A PC and Wi-Fi network is required since we’ll access to the console from PC using ssh over Wi-Fi.


Contents
– Prerequisites
– Steps
1. Burn Raspbian OS on micro SD card
2. Enable SSH
3. Enable Wi-Fi access
4. Boot up Raspberry Pi board
5. Check Raspberry Pi’s IP address
6. Access to Raspberry Pi via SSH


Prerequisites

  • Raspberry Pi board (Raspberry Pi 3 B+ or Pi Zero W)
  • Micro SD card
  • Micro SD card reader like this (in case your PC doesn’t have SD card slot)
  • PC (for burning the OS image, accessing to Raspberry Pi via ssh)
  • Micro USB cable for power supply


Steps
1. Burn Raspbian OS on micro SD card
Follow the official instruction to prepare OS image in a SD card.


2. Enable SSH
2-1. After finishing writing OS image, open the created “boot” partition.

2-2. Create an empty file with name “ssh”.


3. Enable Wi-Fi access
In the same partition, create a file named “wpa_supplicant.conf” with lines below. Please replace <SSID> and <PASSWORD> with your own Wi-Fi network name and password.

ctrl_interface=DIR=/var/run/wpa_supplicant GROUP=netdev
update_config=1
country=US

network={
	ssid="<SSID>"
	psk="<PASSWORD>"
	key_mgmt=WPA-PSK
}


4. Boot up Raspberry Pi board
4-1. Eject the micro SD card from PC and insert it into Raspberry Pi

4-2. Connect Micro USB Power Cable and boot Raspberry up.


5. Check Raspberry Pi’s IP address
Find out Raspberry Pi’s IP address to access via ssh. I used “nmap” command on Linux PC.

Note: You need to specify netmask of your own Wi-Fi network.

nmap -sn 192.168.1.0/24

Output:

$ nmap -sn 192.168.1.0/24

Starting Nmap 7.01 ( https://nmap.org ) at 2017-09-04 17:35 EDT
Nmap scan report for 192.168.1.1
Host is up (0.032s latency).
Nmap scan report for 192.168.1.141
Host is up (0.049s latency).
Nmap scan report for 192.168.1.142
Host is up (0.00017s latency).
Nmap done: 256 IP addresses (3 hosts up) scanned in 2.83 seconds


6. Access to Raspberry Pi via SSH
ssh from PC to the IP address you found out.

ssh pi@192.168.1.141


Qt Creator Cross Compiling Environment for Raspberry Pi3 with QtRpi


Update (June 2, 2018):
If you are using Raspbian Stretch, please check this post. The steps below are for Raspbian Jessie.


This is the steps how I created Qt Creator cross compiling environment on Ubuntu PC for Raspberry Pi 3 B+ by using QtRpi. Thanks to QtRpi, it’s pretty straightforward. I followed the official site and its GitHub page. The purpose of this post is mostly for myself, to reproduce the steps in future (on other PCs or when I need to reinstall, etc).


Here is the list of contents of this post.

Contents
– Assumptions
– Steps
1. Preparation
2. Install Qt
3. Deploy Qt to Raspberry Pi
4. Qt Creator Configuration
5. Verify Cross Compiling Environment
– Troubleshoot
– Reference


Assumptions
Here are some assumptions before starting the steps:

– Ubuntu Linux running on host PC
– Raspbian running on the target Raspberry Pi 3 B+
– Qt Creator running on host PC
– SSH access from host PC to target Raspberry Pi

In the steps below, I used following:

Ubuntu 16.04 as host
Raspbian Jessie (2017-07-05) running on Raspberry Pi 3 as target
Qt Creator 4.3.1 running on host


Steps
1. Preparation
1-1. Install dependencies

sudo apt-get install curl g++ gdb-multiarch git realpath unzip zip -y

1-2. Configure environment variables
In my case, the environment variables are below since Qt version is 5.7.0 and target device is Raspberry Pi 3. In case you use different version or device, click here and see “2. Configure your environment variables” for other options.

export QTRPI_QT_VERSION='5.7.0'
export QTRPI_TARGET_DEVICE='linux-rpi3-g++'

Also, set your target’s IP address.

export QTRPI_TARGET_HOST='pi@192.168.0.5'

1-3. Password less SSH login
Generate SSH key and copy it to the target so that you can log in without requiring a password.

ssh-keygen

Just press enter when you asked about pass phrase.  Then, copy the key by typing:

ssh-copy-id $QTRPI_TARGET_HOST


2. Install Qt
The beauty of QtRpi is that scripts will take care of all the installation and deployment.

2-1. First, clone QtRpi from GitHub.

git clone https://github.com/neuronalmotion/qtrpi.git

2-2. Then run “init-qtrpi-minimal.sh” script. This will take a while.

cd qtrpi
./init-qtrpi-minimal.sh


3. Deploy Qt to Raspberry Pi
3-1. Run “./deploy-qtrpi.sh” to deploy Qt

./deploy-qtrpi.sh --prepare-rpi

3-2. This step is a workaround for font display. (see troubleshoot section for detail.)
3-2-1. Login to Raspberry Pi.

ssh $QTRPI_TARGET_HOST

3-2-2. Copy font files.

cp -r /usr/share/fonts/truetype/dejavu /usr/local/qt5pi/lib/fonts


4. Qt Creator Configuration
To cross-compile and deploy from Qt Creator SDK, some configurations are required.

4-1. Device Configuration
4-1-1. Launch Qt Creator on host.
4-1-2. Navigate to “Tools” > “Options…”
4-1-3. In Options window, select “Devices” from left side bar.
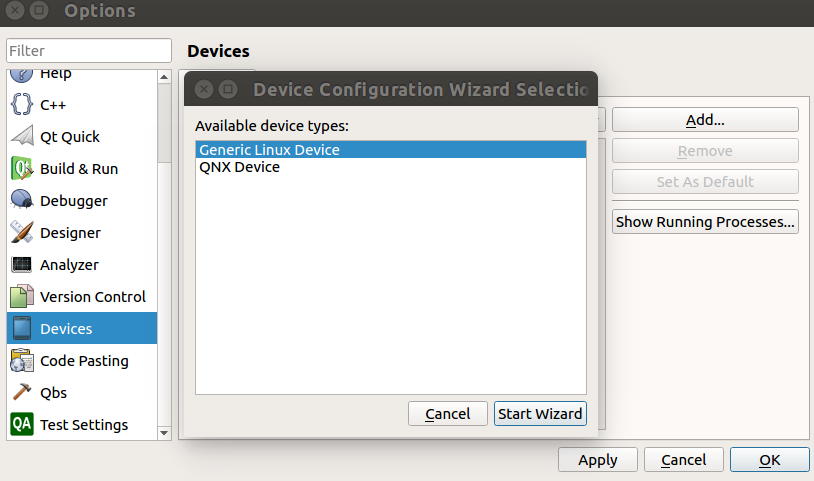
4-1-4. Select “Add…”
4-1-5. Double click on “Generic Linux Device”

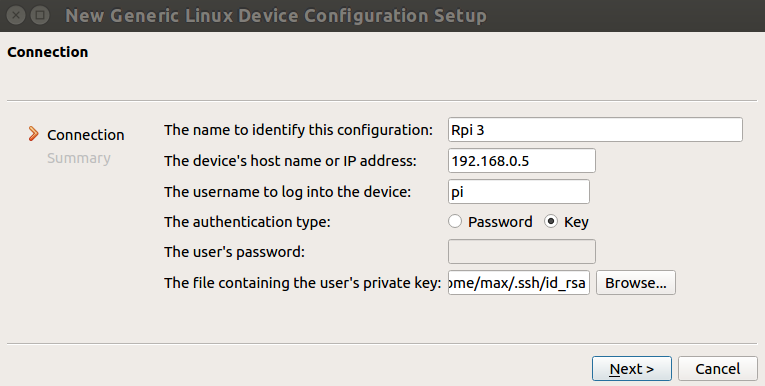
4-1-6. Enter information below into “New Generic Linux Device Configuration Setup” window.
Configuration name : Rpi 3
IP address : 192.168.0.5
Username : pi
Authentication type : Key

4-1-7. Click on “Next”, Then “Finish”. Then, it will automatically start “Device Test”.
4-1-8. Click “Close” to close “Device Test” window.
4-1-9. Click “Apply” on “Options” window (just in case?)

4-2. Debuggers
4-2-1. In Options window, select “Build & Run” from left side bar.
4-2-2. Click on “Debuggers” tab
4-2-3. Click on “Add” button
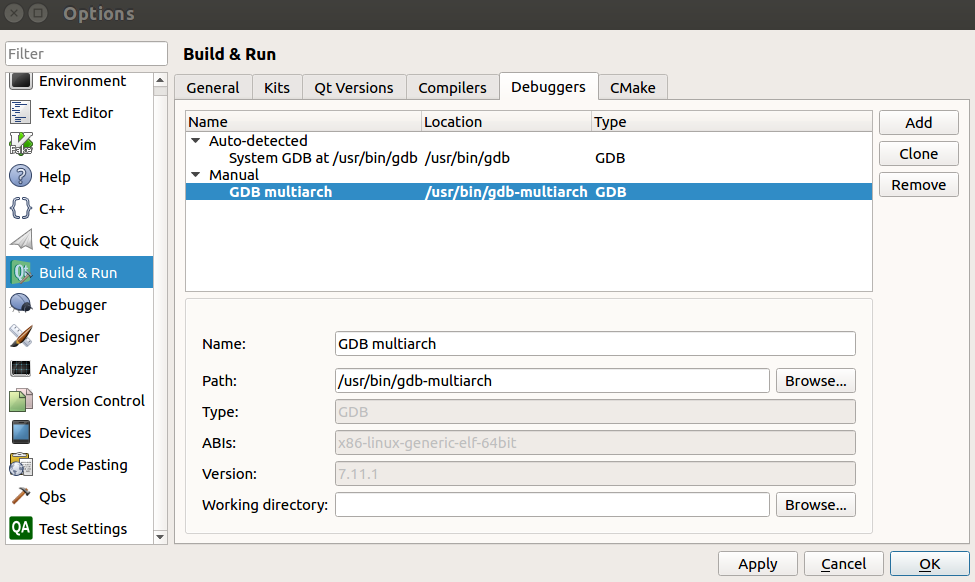
4-2-4. Put information below:
Name: GDB multiarch
Path : /usr/bin/gdb-multiarch

4-2-5. Click on “Apply”

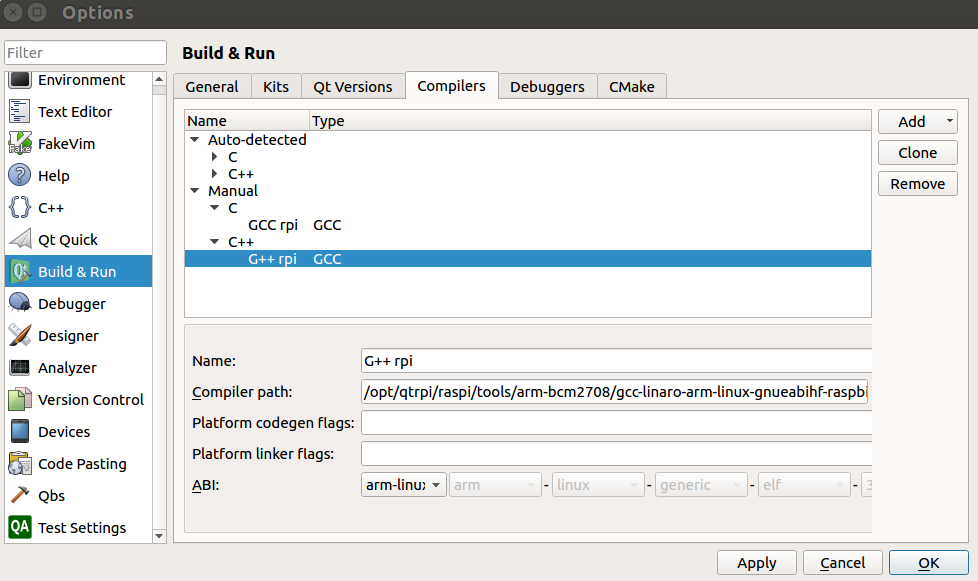
4-3. Compilers
4-3-1. Click on “Compilers” tab
4-3-2. Navigate to “Add” > “GCC” > “C”
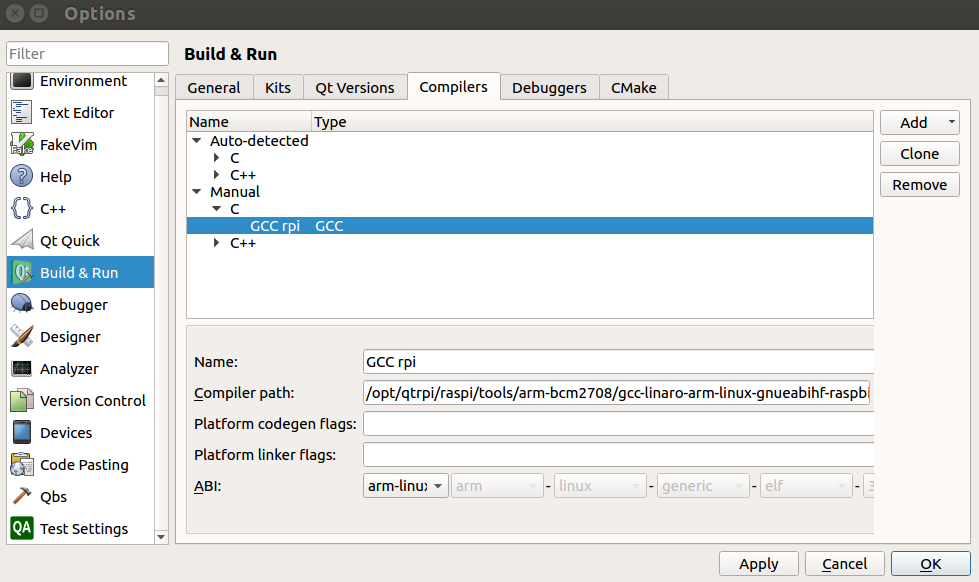
4-3-3. Enter information below:
Name: GCC rpi
Compiler Path: /opt/qtrpi/raspi/tools/arm-bcm2708/gcc-linaro-arm-linux-gnueabihf-raspbian-x64/arm-linux-gnueabihf/bin/gcc

4-3-4. Click on “Apply” button
4-3-5. Navigate to “Add” > “GCC” > “C++”
4-3-6. Enter information below:
Name :G++ rpi
Compiler Path:/opt/qtrpi/raspi/tools/arm-bcm2708/gcc-linaro-arm-linux-gnueabihf-raspbian-x64/arm-linux-gnueabihf/bin/g++

4-3-7. Click on “Apply” button

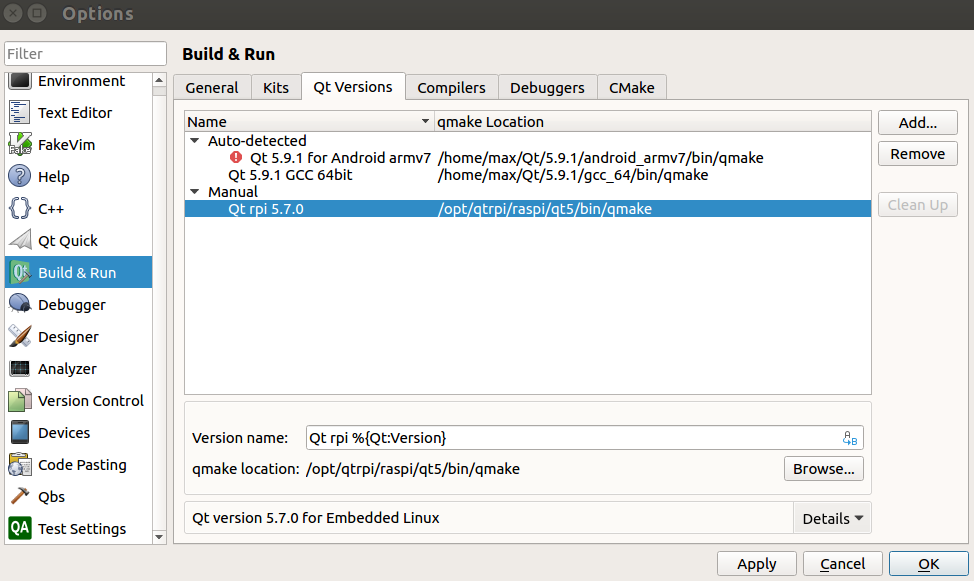
4-4. Qt Versions
4-4-1. Click on “Qt Versions” tab
4-4-2. Click on “Add…”
4-4-3. Navigate qmake path to “/opt/qtrpi/raspi/qt5/bin/qmake”
4-4-4. Enter “Qt rpi %{Qt:Version}” as “Version name”.

4-4-5. Click on “Apply” button

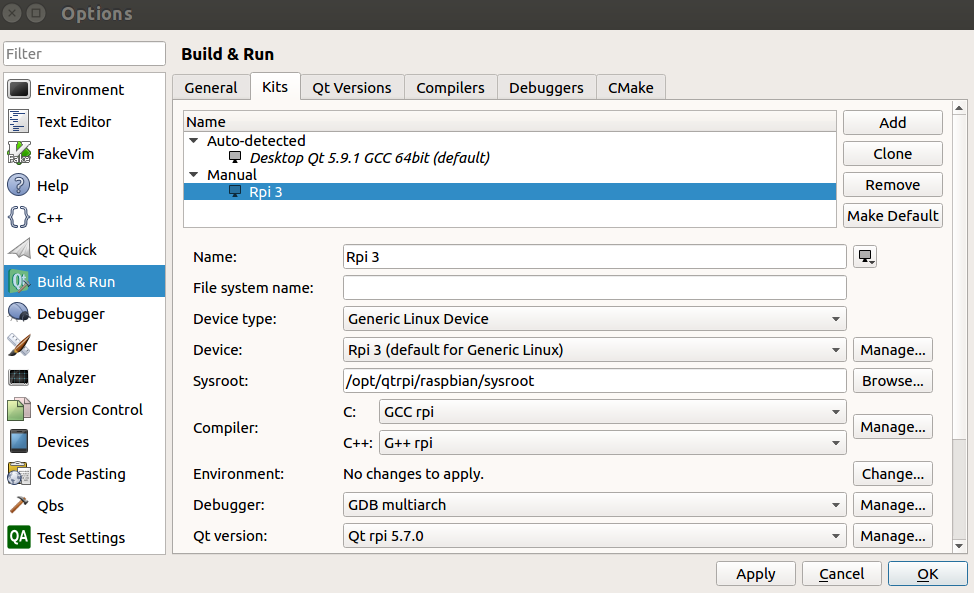
4-5. Kits
4-5-1. Click on “Kits” tab
4-5-2. Click on “Add” button
4-5-3. Enter (or select) information below:
Name : Rpi 3
Device Type: Generic Linux Device
Sysroot : /opt/qtrpi/raspbian/sysroot
Compiler: C: GCC rpi
Compiler: C++: G++ rpi
Debugger : GDB multiarch
Qt Version : Qt rpi 5.7.0

4-5-4. Click on “Apply” button, then “OK”.


5. Verify Cross Compiling Environment
Let’s check if everything is OK by building a sample project on host and executing it on RPi.

5-1. “File” > “New File or Project”
5-2. “Application” > “Qt Qucick Controls 2 Application”, then click on “Choose…” button.
5-3. Enter project name and click on “Next”.
5-4. Click on “Next” on “Define Build System” and “Define Project Details”.
5-5. Check on “Rpi 3” on “Kit Selection”.
5-6. Click on “Finish” button on “Project Management”.
5-7. Open .pro file from project tree.
5-8. Add two lines below at the end of the file and save it.

target.path = /home/pi/
INSTALLS += target

5-9. Select “Projects” icon on left side bar.
5-10. Click on “Rpi 3” under “Build & Run”.
5-11. Click on “Run” icon on the left side bar.


Troubleshoot
Originally, I’ve added the following environment variables to ~/.bashrc on Raspberry Pi after deploying Qt to Raspberry Pi based on video on official site.

export QT_QPA_EGLFS_PHYSICAL_WIDTH=528
export QT_QPA_EGLFS_PHYSICAL_HEIGHT=295
export QT_QPA_FONTDIR=/usr/share/fonts/truetype/dejavu/

However, when I run a program from Qt Creator on host PC, it seems that those variables are not set and no font is displayed on the application window. (getting below messages in “Application Output” on Qt Creator.) If I launch the same application from Raspberry Pi’s console, the issue doesn’t happen.

QML debugging is enabled. Only use this in a safe environment.
Unable to query physical screen size, defaulting to 100 dpi.
To override, set QT_QPA_EGLFS_PHYSICAL_WIDTH and QT_QPA_EGLFS_PHYSICAL_HEIGHT (in millimeters).
QFontDatabase: Cannot find font directory /usr/local/qt5pi/lib/fonts.
Note that Qt no longer ships fonts. Deploy some (from http://dejavu-fonts.org for example) or switch to fontconfig.

I’ve not been able to figure out the cause but found a workaround (step 3-2 above).


Reference
– QtRpi FAQ
http://www.qtrpi.com/faq#howtohttps://github.com/neuronalmotion/qtrpiinstall

– GitHub
https://github.com/neuronalmotion/qtrpi


Customizing Boot Up Screen on Raspberry Pi

This is a steps to customize Raspberry Pi’s boot up screen, specifically to change the splash image and remove unwanted images and texts. By default, Raspbian Jessie Desktop displays below during boot up before starting desktop GUI.

(1) Rainbow image
(2) Raspberry Pi Logo (image of four raspberries in the top left corner)
(3) Boot message log
(4) Blinking cursor for boot message logs (at the top left corner)
(5) Splash Image (“Welcome to pixel”)
(6) One-line text under splash image

By following the steps below, we’ll remove (1)-(4) and (6), then replace the default splash image with whatever you want to display at (5).


Assumption:
You should have your own splash image somewhere. In the steps below, assuming that the file name of the splash image is “my_splash.png” and it’s located home directory. (i.e. “~/my_splash.png”)


Here are the steps:

Remove Rainbow Screen
Open “/boot/config.txt” as root.

sudo nano /boot/config.txt

Then add below line at the end of the file.

disable_splash=1


Remove text message under splash image:
Open “/usr/share/plymouth/themes/pix/pix.script” as root.

sudo nano /usr/share/plymouth/themes/pix/pix.script

Then, remove (or comment out) four lines below:

message_sprite = Sprite();
message_sprite.SetPosition(screen_width * 0.1, screen_height * 0.9, 10000);
       my_image = Image.Text(text, 1, 1, 1);
       message_sprite.SetImage(my_image);

Note : This is a quick and dirty method I found. It works, but there might be better way.


Remove Boot Messages
Open “/boot/cmdline.txt” as root.

sudo nano /boot/cmdline.txt

Then, replace “console=tty1” with “console=tty3”. This redirects boot messages to tty3.


Remove other things
Still in “/boot/cmdline.txt”, add below at the end of the line

splash quiet plymouth.ignore-serial-consoles logo.nologo vt.global_cursor_default=0

Here are brief explanations.
‘splash’ : enables splash image
‘quiet’ : disable boot message texts
‘plymouth.ignore-serial-consoles’ : not sure about this but seems it’s required when use Plymouth.
‘logo.nologo’ : removes Raspberry Pi logo in top left corner.
‘vt.global_cursor_default=0’ : removes blinking cursor.

Note : The first three should be there by default, but make sure if those exist.


Replace Splash Image
Now, everything unwanted images and texts are gone. Let’s replace the default splash image (/usr/share/plymouth/themes/pix/splash.png) with your own splash image.

sudo cp ~/my_splash.png /usr/share/plymouth/themes/pix/splash.png

Note : As described in above assumption, “my_splash.png” should be your new splash image.


Verify the costumed boot up screen
Check the boot up screen by simply rebooting.

sudo reboot


Reference:
Guide: A custom splash screen on the Raspberry Pi, for Raspbian Jessie
https://yingtongli.me/blog/2016/12/21/splash.html

Custom boot up screen
http://www.raspberry-projects.com/pi/pi-operating-systems/raspbian/custom-boot-up-screen


Auto Power On Bluetooth Adapter on Boot-up

By default, it’s automatically powered on with Raspberry Pi 3 and Raspbian Jessie on boot. But after I updated Bluez from 5.23 to 5.43, it’s not turning on automatically and I needed to do so manually by using hciconfig or bluetoothctl as below.

Powering on manually by hciconfig:

$ hciconfig
hci0:	Type: Primary  Bus: USB
	BD Address: xx:xx:xx:xx:xx:xx  ACL MTU: 310:10  SCO MTU: 64:8
	DOWN 
	RX bytes:574 acl:0 sco:0 events:30 errors:0
	TX bytes:368 acl:0 sco:0 commands:30 errors:0

$ sudo hciconfig hci0 up
$ hciconfig
hci0: Type: Primary Bus: USB
 BD Address: xx:xx:xx:xx:xx:xx ACL MTU: 310:10 SCO MTU: 64:8
 UP RUNNING PSCAN 
 RX bytes:1794 acl:0 sco:0 events:102 errors:0
 TX bytes:1772 acl:0 sco:0 commands:102 errors:0

Or, powering on manually by bluetoothctl:

$ hciconfig
hci0:	Type: Primary  Bus: USB
	BD Address: xx:xx:xx:xx:xx:xx  ACL MTU: 310:10  SCO MTU: 64:8
	DOWN 
	RX bytes:574 acl:0 sco:0 events:30 errors:0
	TX bytes:368 acl:0 sco:0 commands:30 errors:0

$ bluetoothctl 
[NEW] Controller xx:xx:xx:xx:xx:xx raspberry [default]
[bluetooth]# power on
Changing power on succeeded
[CHG] Controller xx:xx:xx:xx:xx:xx Powered: yes
[bluetooth]# quit
[DEL] Controller xx:xx:xx:xx:xx:xx raspberry [default]
$ hciconfig
hci0:	Type: Primary  Bus: USB
	BD Address: xx:xx:xx:xx:xx:xx  ACL MTU: 310:10  SCO MTU: 64:8
	UP RUNNING PSCAN 
	RX bytes:1184 acl:0 sco:0 events:66 errors:0
	TX bytes:1070 acl:0 sco:0 commands:66 errors:0


This is how to power on Bluetooth adapter automatically on Raspberry Pi boot up.

1. Make ‘bluetooth’ directory under /etc

sudo mkdir /etc/bluetooth

2. Open a new file named “main.conf” under the directory.

sudo nano /etc/bluetooth/main.conf

3. Add two lines below, save it and close the file.

[Policy]
AutoEnable=true

4. Restart Raspberry Pi.

sudo reboot

5. Verify if it’s powered on by hciconfig command.

$ hciconfig
hci0: Type: Primary Bus: USB
 BD Address: xx:xx:xx:xx:xx:xx ACL MTU: 310:10 SCO MTU: 64:8
 UP RUNNING PSCAN 
 RX bytes:658 acl:0 sco:0 events:44 errors:0
 TX bytes:2668 acl:0 sco:0 commands:44 errors:0


Updating BlueZ on Raspberry Pi (5.23 to 5.43)


Update (Jul 9, 2019):
Now, Raspbian Buster, released on 6/20/2019, has bluez 5.50 by default!


Update (Feb 14, 2018):
If you want to install newer BlueZ on Raspbian Stretch, please see the post below:
Updating BlueZ on Raspberry Pi (5.43 to 5.48)


Update (Sep 8, 2017):
Raspbian Stretch was released on 8/16/2017, and it has BlueZ 5.43 pre-installed. So these steps below won’t be necessary if you are using Stretch.  With pre-installed BlueZ 5.43, the on-board Bluetooth chip on Raspberry Pi 3 is working fine so far.


BlueZ is an open source Bluetooth stack for Linux. This is how I updated BlueZ on my Raspberry Pi 3 B+ from 5.23 (pre-installed version in Jessie) to 5.43. The motivation is that I wanted to test a Bluetooth Low Energy (BLE) feature and that is not supported in the original version.

Originally, I tried to update to 5.46 which is the latest version as of 7/27/2017. However, I found that hci tools have been not included in BlueZ since 5.44 for some reason. Since I wanted to use hci tools, I decided to update to 5.43, which still has hci tools.

Also, I should mention one more thing here. After update, I’ve been facing a problem with Raspberry Pi 3’s on-board Bluetooth module. So I decided to use a USB Bluetooth dongle instead. So if you’re planning to use on-board Bluetooth chip, this post is not probably for you…


Here is the list of contents of this post.

Contents
– Assumptions
– Steps
1. Disabling On-board Bluetooth Chip
2. Current Version Check
3. Uninstall Current BlueZ
4. Install BlueZ
5. Bluetooth Service Setting
6. Check If Everything is Fine

Let’s get started.


Assumptions
<Hardware>
Raspberry Pi 3 B+ with Bluetooth dongle (Panda Bluetooth 4.0 USB Adapter)

<Software>
– Raspbian OS Jessie
– BlueZ (original version:5.23, target version 5.43)


Steps
1. Disabling On-board Bluetooth Chip
1-1. Boot up Raspberry Pi Board. If it’s not set up yet, please refer this post.
1-2. Let’s check if Bluetooth interfaces are recognized.

pi@raspberrypi:~ $ hciconfig -a
hci1:	Type: BR/EDR  Bus: UART
	BD Address: xx:xx:xx:xx:xx:xx  ACL MTU: 1021:8  SCO MTU: 64:1
	UP RUNNING 
	RX bytes:1046 acl:0 sco:0 events:52 errors:0
	TX bytes:2516 acl:0 sco:0 commands:52 errors:0
	Features: 0xbf 0xfe 0xcf 0xfe 0xdb 0xff 0x7b 0x87
	Packet type: DM1 DM3 DM5 DH1 DH3 DH5 HV1 HV2 HV3 
	Link policy: RSWITCH SNIFF 
	Link mode: SLAVE ACCEPT 
	Name: 'raspberrypi'
	Class: 0x000000
	Service Classes: Unspecified
	Device Class: Miscellaneous, 
	HCI Version: 4.1 (0x7)  Revision: 0xb6
	LMP Version: 4.1 (0x7)  Subversion: 0x2209
	Manufacturer: Broadcom Corporation (15)

hci0:	Type: BR/EDR  Bus: USB
	BD Address: yy:yy:yy:yy:yy:yy  ACL MTU: 310:10  SCO MTU: 64:8
	UP RUNNING 
	RX bytes:947 acl:0 sco:0 events:49 errors:0
	TX bytes:2446 acl:0 sco:0 commands:49 errors:0
	Features: 0xff 0xff 0x8f 0xfe 0xdb 0xff 0x5b 0x87
	Packet type: DM1 DM3 DM5 DH1 DH3 DH5 HV1 HV2 HV3 
	Link policy: RSWITCH HOLD SNIFF PARK 
	Link mode: SLAVE ACCEPT 
	Name: 'raspberrypi #1'
	Class: 0x000000
	Service Classes: Unspecified
	Device Class: Miscellaneous, 
	HCI Version: 4.0 (0x6)  Revision: 0x22bb
	LMP Version: 4.0 (0x6)  Subversion: 0x22bb
	Manufacturer: Cambridge Silicon Radio (10)

It looks both on-board chip and the dongle are recognized correctly. In this case, hci1 is the on-board chip (Broadcom) and hci0 is the dongle (CSR).
(* BD Addresses are replaced with “xx:xx:xx:xx:xx:xx” and “yy:yy:yy:yy:yy:yy”)

1-3. Since I don’t use the on-board BT chip, let’s disable it. Open “/etc/modprobe.d/raspi-blacklist.conf”,

sudo nano /etc/modprobe.d/raspi-blacklist.conf

1-4. Add two lines below and save.

blacklist btbcm
blacklist hci_uart

1-5. Then reboot Raspberry Pi 3.

sudo reboot

1-7. After reboot, type ‘hciconfig -a’ again.

pi@raspberrypi:~ $ hciconfig -a
hci0: Type: BR/EDR Bus: USB
 BD Address: yy:yy:yy:yy:yy:yy ACL MTU: 310:10 SCO MTU: 64:8
 UP RUNNING 
 RX bytes:670 acl:0 sco:0 events:46 errors:0
 TX bytes:2437 acl:0 sco:0 commands:46 errors:0
 Features: 0xff 0xff 0x8f 0xfe 0xdb 0xff 0x5b 0x87
 Packet type: DM1 DM3 DM5 DH1 DH3 DH5 HV1 HV2 HV3 
 Link policy: RSWITCH HOLD SNIFF PARK 
 Link mode: SLAVE ACCEPT 
 Name: 'raspberrypi'
 Class: 0x000000
 Service Classes: Unspecified
 Device Class: Miscellaneous, 
 HCI Version: 4.0 (0x6) Revision: 0x22bb
 LMP Version: 4.0 (0x6) Subversion: 0x22bb
 Manufacturer: Cambridge Silicon Radio (10)

The on-board chip is successfully disabled.


2. Current Version Check
2-1. BlueZ version can be retrieved by typing:

pi@raspberrypi:~ $ bluetoothctl -v
5.23 

2-2. Also, let’s check the Bluetooth related packages.

pi@raspberrypi:~ $ dpkg -l|grep blue
ii  bluej                                 3.1.7b                                    all          A simple but powerful Java IDE.
ii  bluez                                 5.23-2+rpi2                               armhf        Bluetooth tools and daemons
ii  bluez-firmware                        1.2-3+rpi1                                all          Firmware for Bluetooth devices
ii  libbluetooth3:armhf                   5.23-2+rpi2                               armhf        Library to use the BlueZ Linux Bluetooth stack
ii  pi-bluetooth                          0.1.3                                     armhf        Raspberry Pi 3 bluetooth
ii  pulseaudio-module-bluetooth           5.0-13                                    armhf        Bluetooth module for PulseAudio sound server
pi@raspberrypi:~ $ 


3. Uninstall Current BlueZ
3-1. Uninstall the current version of BlueZ.

sudo apt-get purge bluez -y

3-2. Remove unnecessary packages.

sudo apt-get autoremove -y

After uninstallation, the package list looks like this. (not sure why libbluetooth3 is still there…)

pi@raspberrypi:~/src/bluez $ bluetoothctl --version
-bash: /usr/bin/bluetoothctl: No such file or directory
pi@raspberrypi:~/src/bluez $ dpkg -l|grep blue
ii  bluej                                 3.1.7b                                    all          A simple but powerful Java IDE.
ii  libbluetooth3:armhf                   5.23-2+rpi2                               armhf        Library to use the BlueZ Linux Bluetooth stack


4. Install BlueZ
4-1. Update package list and installed packages.

sudo apt-get update && sudo apt-get upgrade -y

4-2. Install dependencies.

sudo apt-get install -y libusb-dev libdbus-1-dev libglib2.0-dev libudev-dev libical-dev libreadline-dev

4-3. Download and extract BlueZ 5.43.

wget www.kernel.org/pub/linux/bluetooth/bluez-5.43.tar.xz
tar xvf bluez-5.43.tar.xz
cd bluez-5.43/

4-4. Configure.

./configure --prefix=/usr --mandir=/usr/share/man --sysconfdir=/etc --localstatedir=/var --enable-experimental --enable-tools --with-systemdsystemunitdir=/lib/systemd/system --with-systemduserunitdir=/usr/lib/system

4-5. Compile the source code.

make -j4

4-6. Install BlueZ.

sudo checkinstall --fstrans=no

You can ‘sudo make install’ instead of ‘sudo checkinstall’ as below:

sudo make install

4-7. Check the version if the installation is successfully done.

pi@raspberrypi:~ $ bluetoothctl -v
5.43


5. Bluetooth Service Setting
5-1. Enable Bluetooth service so that it will start on boot up.

sudo systemctl enable bluetooth

It’ll create symlinks and output like below:

pi@raspberrypi:~/src/bluez/bluez-5.43 $ sudo systemctl enable bluetooth
Created symlink from /etc/systemd/system/dbus-org.bluez.service to /lib/systemd/system/bluetooth.service.
Created symlink from /etc/systemd/system/bluetooth.target.wants/bluetooth.service to /lib/systemd/system/bluetooth.service.

5-2. Reboot Raspberry Pi 3.

sudo reboot


6. Check If Everything is Fine
6-1. After reboot, check if hci is UP.

pi@raspberrypi:~ $ hciconfig -a
hci0:	Type: Primary  Bus: USB
	BD Address: yy:yy:yy:yy:yy:yy  ACL MTU: 310:10  SCO MTU: 64:8
	DOWN 
	RX bytes:574 acl:0 sco:0 events:30 errors:0
	TX bytes:368 acl:0 sco:0 commands:30 errors:0
	Features: 0xff 0xff 0x8f 0xfe 0xdb 0xff 0x5b 0x87
	Packet type: DM1 DM3 DM5 DH1 DH3 DH5 HV1 HV2 HV3 
	Link policy: RSWITCH HOLD SNIFF PARK 
	Link mode: SLAVE ACCEPT

6-2. If it’s DOWN, then type:

sudo hciconfig hci0 up

6-3. And check again.

pi@raspberrypi:~ $ hciconfig -a
hci0:	Type: Primary  Bus: USB
	BD Address: yy:yy:yy:yy:yy:yy  ACL MTU: 310:10  SCO MTU: 64:8
	UP RUNNING 
	RX bytes:1178 acl:0 sco:0 events:65 errors:0
	TX bytes:1066 acl:0 sco:0 commands:65 errors:0
	Features: 0xff 0xff 0x8f 0xfe 0xdb 0xff 0x5b 0x87
	Packet type: DM1 DM3 DM5 DH1 DH3 DH5 HV1 HV2 HV3 
	Link policy: RSWITCH HOLD SNIFF PARK 
	Link mode: SLAVE ACCEPT 
	Name: 'raspberrypi'
	Class: 0x000000
	Service Classes: Unspecified
	Device Class: Miscellaneous, 
	HCI Version: 4.0 (0x6)  Revision: 0x22bb
	LMP Version: 4.0 (0x6)  Subversion: 0x22bb
	Manufacturer: Cambridge Silicon Radio (10)

Now it should be UP and RUNNING.
* If you want Bluetooth adapter powered up automatically at boot, see this.

6-4. Check if Bluetooth service is working.

systemctl status bluetooth

If everything is fine, you should see like:

pi@raspberrypi:~ $ systemctl status bluetooth
● bluetooth.service - Bluetooth service
   Loaded: loaded (/lib/systemd/system/bluetooth.service; enabled)
   Active: active (running) since Fri 2017-07-28 00:34:23 UTC; 2min 14s ago
     Docs: man:bluetoothd(8)
 Main PID: 456 (bluetoothd)
   Status: "Running"
   CGroup: /system.slice/bluetooth.service
           └─456 /usr/libexec/bluetooth/bluetoothd

Make sure it’s ‘active (running)’.

6-5. Now you should be able to use bluetoothctl to pair devices.

pi@raspberrypi:~ $ bluetoothctl
[NEW] Controller yy:yy:yy:yy:yy:yy raspberrypi [default]
[bluetooth]#