I’ve been using Raspberry Pi for my projects and have many Raspbian OS image backups. It’s eating up storage space on my PC, so I decided to shrink those images so that I can create more space. I’ve found several sites explain how to do it and writing this post mostly for myself to repeat the process since it’s a little complicated.
If you will follow the steps, please do so at your own risk. Manipulating partition may cause damage to your system.
Contents
– Assumptions
– Steps
1. Find out SD card mount points on your PC
2. Create OS image from SD card
3. Shrink root partition
4. Update partition table
5. Trim empty space from the image file
– Summary
– Reference
Hardware
- Linux PC (I used Ubuntu 16.04)
- Micro-SD card reader like this (in case your PC doesn’t have SD card slot)
- Micro-SD card which contains Raspbian OS you want to shrink
Software
- GParted (Partition management tool)
If it’s not installed on your PC, please do so.
sudo apt-get install gparted -y
Steps
1. Find device name of SD card on your PC
1-1. Before insert SD card into your PC, check all the mounted devices by typing:
df -h
Output should be like this:
$ df -h
Filesystem      Size  Used Avail Use% Mounted on
udev            1.9G     0  1.9G   0% /dev
tmpfs           385M  6.2M  379M   2% /run
/dev/sda1       290G   24G  252G   9% /
tmpfs           1.9G   24M  1.9G   2% /dev/shm
tmpfs           5.0M  4.0K  5.0M   1% /run/lock
tmpfs           1.9G     0  1.9G   0% /sys/fs/cgroup
tmpfs           385M   68K  385M   1% /run/user/1000
1-2. Then, insert the SD card and check it again.
$ df -h
Filesystem      Size  Used Avail Use% Mounted on
udev            1.9G     0  1.9G   0% /dev
tmpfs           385M  6.2M  379M   2% /run
/dev/sda1       290G   24G  252G   9% /
tmpfs           1.9G   24M  1.9G   2% /dev/shm
tmpfs           5.0M  4.0K  5.0M   1% /run/lock
tmpfs           1.9G     0  1.9G   0% /sys/fs/cgroup
tmpfs           385M   68K  385M   1% /run/user/1000
/dev/sdb2        30G  3.3G   25G  12% /media/max/037616fd-28fe-4652-8248-2042ea30b929
/dev/sdb1        42M   21M   21M  51% /media/max/boot
1-3. Compare the outputs. Since Raspbian has two partitions, there should be two new lines added. In the example above, /dev/sdb1 and /dev/sdb2. Also, the device name of the SD card is /dev/sdb. The last character in a mount point represents the partition number.
2. Create OS image from SD card
2-1. First, unmount the partitions.
sudo umount /dev/sdb1 /dev/sdb2
2-2. Copy the image from SD card to PC. In the below example, please replace “/dev/sdb” with device name which you found out in above steps, and “raspbian.img” with anything you want for the file name on your PC.
sudo dd bs=4M if=/dev/sdb of=raspbian.img status=progress conv=fsync
2-3. Change owner of the newly created image file.
sudo chown $USER:$USER raspbian.img
3. Shrink root partition
3-1. Raspbian has two partitions, “boot” and “root”. “boot” is very small and it’s not worth to compress. So, let’s find out the start sector of “root” partition by typing:
fdisk -l raspbian.img
The output should be like this. Take a note of value of “Start” of the bigger partition. It’s start sector of “root” partition. In example below, it’s “94208”.
$ fdisk -l raspbian.img
Disk raspbian.img: 29.7 GiB, 31914983424 bytes, 62333952 sectors
Units: sectors of 1 * 512 = 512 bytes
Sector size (logical/physical): 512 bytes / 512 bytes
I/O size (minimum/optimal): 512 bytes / 512 bytes
Disklabel type: dos
Disk identifier: 0xede1dcd1

Device        Boot Start      End  Sectors  Size Id Type
raspbian.img1       8192    93814    85623 41.8M  c W95 FAT32 (LBA)
raspbian.img2      94208 62333951 62239744 29.7G 83 Linux
3-2. Create a loopback device with the Raspbian image so that GParted can recognize the image as device. Please replace “94208” with the value you got in previous step.
sudo losetup /dev/loop0 raspbian.img -o $((94208*512))
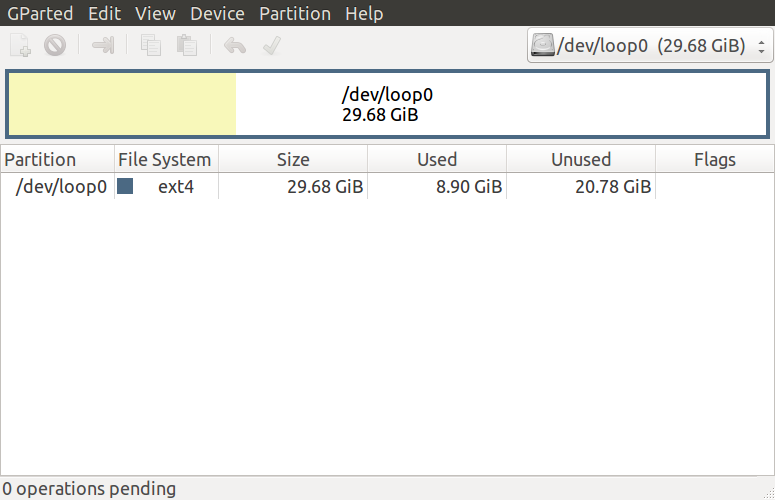
3-3. Launch GParted.
sudo gparted /dev/loop0
It will open a new window.

3-4. Click “/dev/loop0” and select “Partition” > “Resize/Move”.
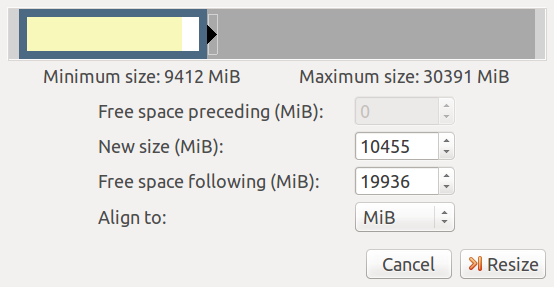
3-5. Then, change “New size” of the image.
Note: This step is a little tricky. It seems it requires some margin but I couldn’t figure out how much margin it exactly requires. Seems it differs based on the “Minimum size”. I needed to do trial-and-error till successfully complete resizing.

3-6. Click on “Resize” button.
3-7. Select “Edit” > “Apply All Operations”.
Note : If you get “resize2fs: New size smaller than minimum” error, go back to step 3-4.
3-8. Click on “Save Details”.
3-9. Open saved “gparted_details.htm” file on browser and search a line starts with “resize2fs”. The value followed by “K” is new size for “root” partition. Take a note of this value. In example below, it’s “4934656K”.
resize2fs -p /dev/loop0 4934656K 00:00:00 ( SUCCESS )
3-10. Click on “Close” button and close GParted.
3-11. Remove the loopback device.
sudo losetup -d /dev/loop0
4. Update partition table
4-1. Create a new loopback device for the whole image
sudo losetup /dev/loop0 raspbian.img
4-2. Launch fdisk to update partition table.
sudo fdisk /dev/loop0
4-3. Delete 2nd partition (i.e. root partition).
4-3-1. Type “d” and enter.
Command (m for help): d
4-3-2. Type “2” and enter to select 2nd partition.
Partition number (1,2, default 2): 2
4-4. Create new 2nd partition.
4-4-1. Type “n” and enter to create new partition.
Command (m for help): n
4-4-2. Type “p” and enter to make it a primary partition.
Select (default p): p
4-4-3. Type “2” and enter to select partition number.
Partition number (2-4, default 2): 2
4-4-4. Enter the start sector of 2nd partition. (See step 3-1)
First sector (2048-31116287, default 2048): 94208
4-4-5. Type “+” and the new size for 2nd partition (see step 3-9).
Last sector, +sectors or +size{K,M,G,T,P} (94208-62333951, default 62333951): +4934656K
4-5. Apply all the changes by typing “w” and enter.
Command (m for help): w
Then you’ll get a warning message like below but you can ignore it.
The partition table has been altered.
Calling ioctl() to re-read partition table.
Re-reading the partition table failed.: Invalid argument

The kernel still uses the old table. The new table will be used at the next reboot or after you run partprobe(8) or kpartx(8).
5. Trim empty space from the image file
5-1. Find out the end sector of the 2nd partition by using fdisk.
sudo fdisk -l /dev/loop0
The output should be like this:
$ sudo fdisk -l /dev/loop0
Disk /dev/loop0: 29.7 GiB, 31914983424 bytes, 62333952 sectors
Units: sectors of 1 * 512 = 512 bytes
Sector size (logical/physical): 512 bytes / 512 bytes
I/O size (minimum/optimal): 512 bytes / 512 bytes
Disklabel type: dos
Disk identifier: 0x366b9010

Device       Boot Start     End Sectors  Size Id Type
/dev/loop0p1       8192   93814   85623 41.8M  c W95 FAT32 (LBA)
/dev/loop0p2      94208 9963519 9869312  4.7G 83 Linux
Note down the end sector value of 2nd partition. (i.e. “9963519”)
5-2. Remove the loopback device.
sudo losetup -d /dev/loop0
5-3. Trim the empty space from the image file. Please replace “9963519” in the example below with your end sector value from the previous step.
truncate -s $(((9963519+1)*512)) raspbian.img
That’s it. Now the Raspbian image has been shrinked. In the example below, the size is now 1.8 GB. (originally it’s 30 GB)
$ ls -lh raspbian.img
-rw-r--r-- 1 max max 4.8G Sep 10 21:36 raspbian.img
Summary
It’s not very easy but it can definitely reduce the size of the SD card image. If you want more free space on your PC, you can zip the image file.
zip raspbian.zip raspbian.img
Here is an example (32 GB SD card) of comparison between before, after, and after + zip.
-rw-r--r-- 1 max max 30G Sep 6 16:19 raspbian-before.img
-rw-r--r-- 1 max max 4.8G Sep  6 19:18 raspbian-after.img
-rw-rw-r-- 1 max max 1.9G Sep  6 19:22 raspbian-after.zip
To write Raspbian image (.img or .zip) to SD card, please see this.
Reference
– Shrinking Raspberry Pi SD Card Images
http://www.aoakley.com/articles/2015-10-09-resizing-sd-images.php
– How to BackUp and Shrink Your Raspberry Pi Image
http://www.instructables.com/id/How-to-BackUp-and-Shrink-Your-Raspberry-Pi-Image/
– Installing operating system images on Linux
https://www.raspberrypi.org/documentation/installation/installing-images/linux.md
