This post shows how to create Qt Creator cross development environment on Ubuntu PC for Raspbian Stretch by using QtRpi. Although QtRpi does not officially support Raspbian Stretch [1], additional few steps make it possible to create the cross development environment for Stretch. (For Raspbian Jessie, please see this post.)
Contents
– Assumptions
– Steps
1. Host Preparation (Ubuntu)
2. QtRpi Installation
3. Deploy to Raspberry Pi
4. Raspberry Pi Configuration
5. Qt Creator Configuration
6. Verify Cross Compiling Environment
– Reference
Assumptions
Here are some assumptions for the steps below.
- Ubuntu Linux running on host PC
- Raspbian Stretch running on target Raspberry Pi
- Qt Creator running on host PC
- SSH access from host PC to target Raspberry Pi
In this post, the versions I use are below:
- Ubuntu 18.04 (host)
- Qt Creator 4.6.1 (host)
- Raspbian Stretch April 2018 version running on Raspberry Pi 3 B+ (target)
- Qt 5.7.0 (target)
Steps
1. Host Preparation (Ubuntu)
1-1. Install dependencies.
sudo apt-get update
sudo apt-get install curl g++ gdb-multiarch git unzip zip -y
1-2. Configure environment variable for Qt version. As of writing this, QtRpi supports only 5.6.2 and 5.7.0. [2]
export QTRPI_QT_VERSION='5.7.0'
1-3. Configure environment variable for Raspberry Pi model. For different models, check the official site.
export QTRPI_TARGET_DEVICE='linux-rpi3-g++'
1-4. Configure environment variable for target IP address.
export QTRPI_TARGET_HOST='pi@192.168.0.5'
1-5. Generate SSH key. Just press enter when you asked about pass phrase.
ssh-keygen
1-6. Copy the key to the target so that you can log in without requiring a password afterwards.
ssh-copy-id $QTRPI_TARGET_HOST
2. QtRpi Installation
2-1. On host, download QtRpi from GitHub.
git clone https://github.com/neuronalmotion/qtrpi.git && cd qtrpi
2-2. Then run “init-qtrpi-minimal.sh” script. This will take a while.
./init-qtrpi-minimal.sh
3. Deploy to Raspberry Pi
Before start the deployment script, one modification is required since a name of a package has been changed. [3]
3-1. Open the deployment script file.
nano deploy-qtrpi.sh
3-2. Look for the line below and replace “libinput5” with “libinput10”.
ssh $TARGET_HOST 'sudo apt-get install -y libts-0.0-0 libinput5 fontconfig'
After the change, the line should be this:
ssh $TARGET_HOST 'sudo apt-get install -y libts-0.0-0 libinput10 fontconfig'
3-3. Then, run the deployment script.
./deploy-qtrpi.sh --prepare-rpi
4. Raspberry Pi Configuration
4-1. Login to Raspberry Pi.
ssh $QTRPI_TARGET_HOST
4-2. Create symbolic links since some libraries has changed names in Stretch. [4] [5] [6]
sudo ln -s /opt/vc/lib/libbrcmEGL.so /usr/lib/arm-linux-gnueabihf/libEGL.so
sudo ln -s /opt/vc/lib/libbrcmGLESv2.so /usr/lib/arm-linux-gnueabihf/libGLESv2.so
4-3. Copy font files.
cp -r /usr/share/fonts/truetype/dejavu /usr/local/qt5pi/lib/fonts
Note: This step is a workaround for font display. (see troubleshoot in the previous post for detail.)
5. Qt Creator Configuration
5-1. Device Configuration
5-1-1. Launch Qt Creator on host.
5-1-2. Navigate to “Tools” > “Options…”
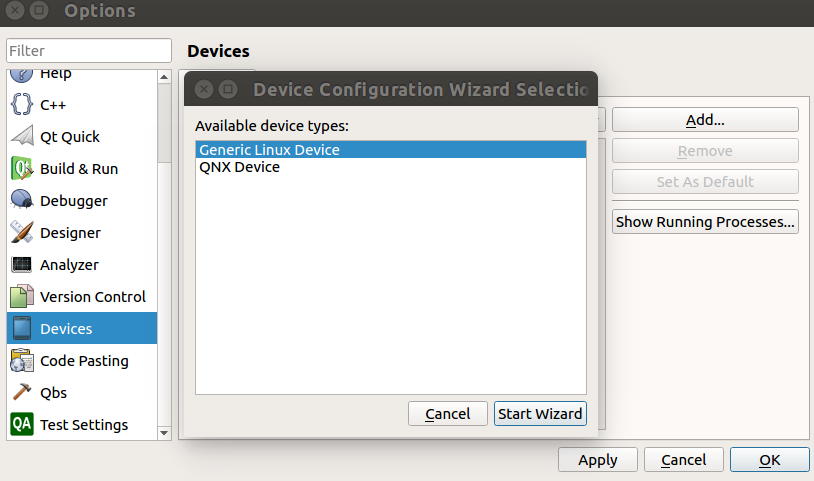
5-1-3. In Options window, select “Devices” from left side bar.
5-1-4. Select “Add…”
5-1-5. Double click on “Generic Linux Device”
5-1-6. Enter information below into “New Generic Linux Device Configuration Setup” window.
Configuration name:
Rpi 3
IP address: (your RPi’s IP address)
192.168.0.5
Username:
pi
Authentication type:
Key
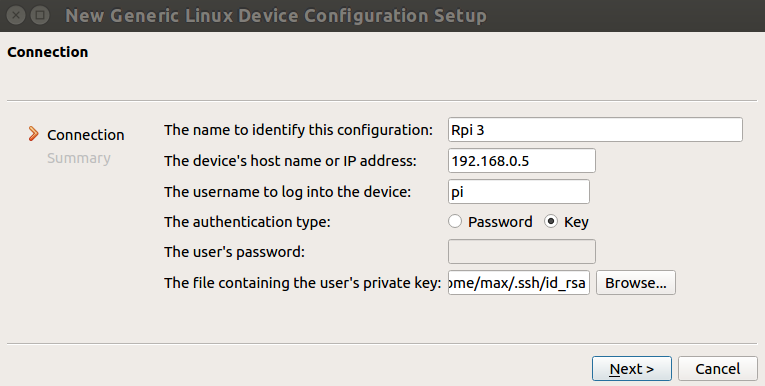
5-1-7. Click on “Next”, Then “Finish”. Then, it will automatically start “Device Test”.
5-1-8. Click “Close” to close “Device Test” window.
5-2. Debuggers
5-2-1. In Options window, select “Build & Run” from left side bar.
5-2-2. Click on “Debuggers” tab
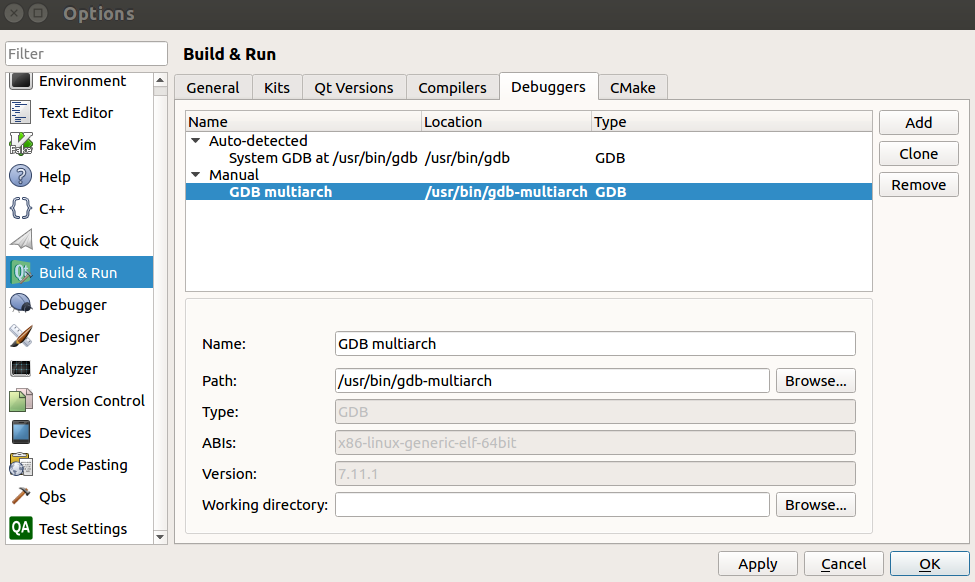
5-2-3. Click on “Add” button
5-2-4. Put information below:
Name:
GDB multiarch
Path:
/usr/bin/gdb-multiarch
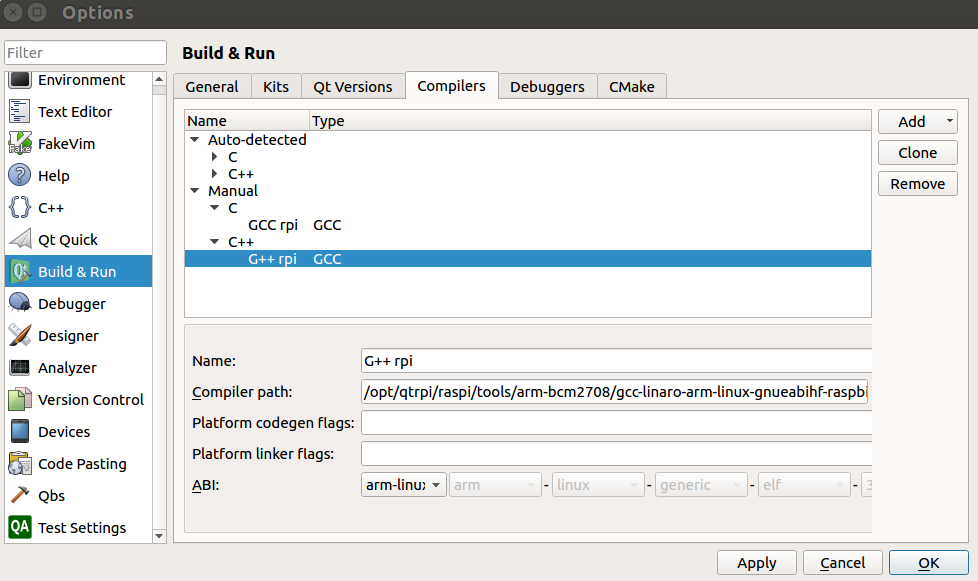
5-3. Compilers
5-3-1. Click on “Compilers” tab
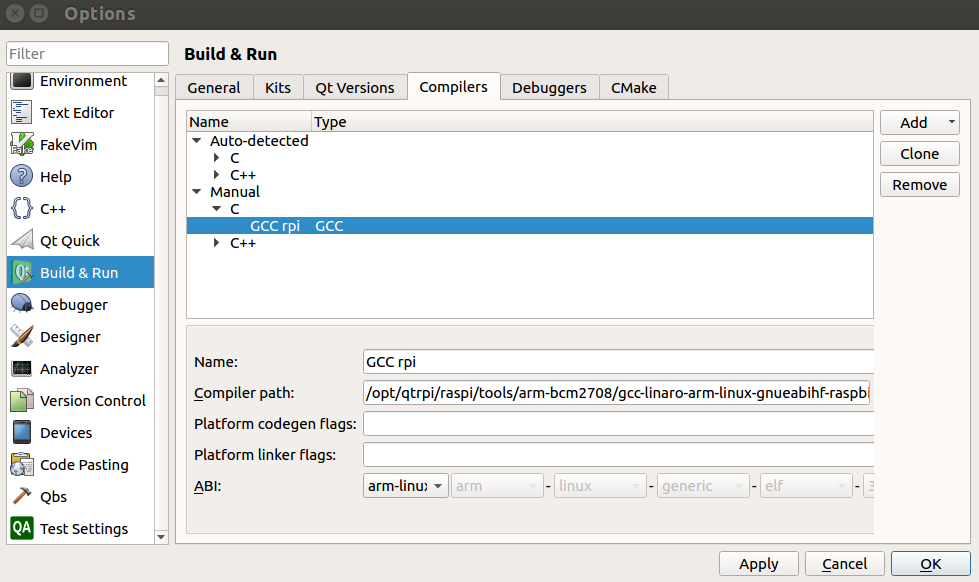
5-3-2. Navigate to “Add” > “GCC” > “C”
5-3-3. Enter information below:
Name:
GCC rpi
Compiler Path:
/opt/qtrpi/raspi/tools/arm-bcm2708/gcc-linaro-arm-linux-gnueabihf-raspbian-x64/arm-linux-gnueabihf/bin/gcc
5-3-4. Navigate to “Add” > “GCC” > “C++”
5-3-5. Enter information below:
Name:
G++ rpi
Compiler Path:
/opt/qtrpi/raspi/tools/arm-bcm2708/gcc-linaro-arm-linux-gnueabihf-raspbian-x64/arm-linux-gnueabihf/bin/g++
5-4. Qt Versions
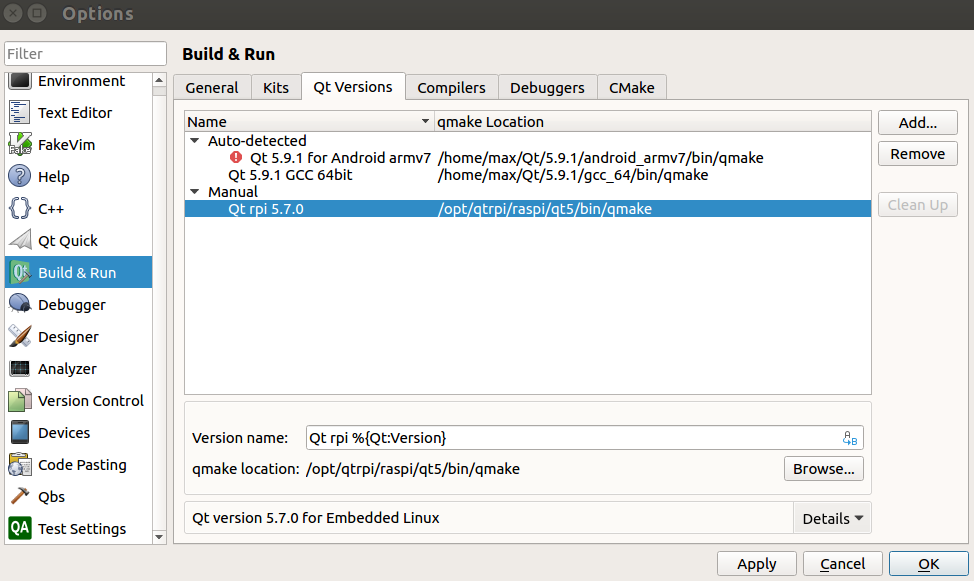
5-4-1. Click on “Qt Versions” tab
5-4-2. Click on “Add…”
5-4-3. Navigate the qmake path:
/opt/qtrpi/raspi/qt5/bin/qmake
5-4-4. Enter below as “Version name”.
Qt rpi %{Qt:Version}
5-4-5. Click on “Apply” button
5-5. Kits
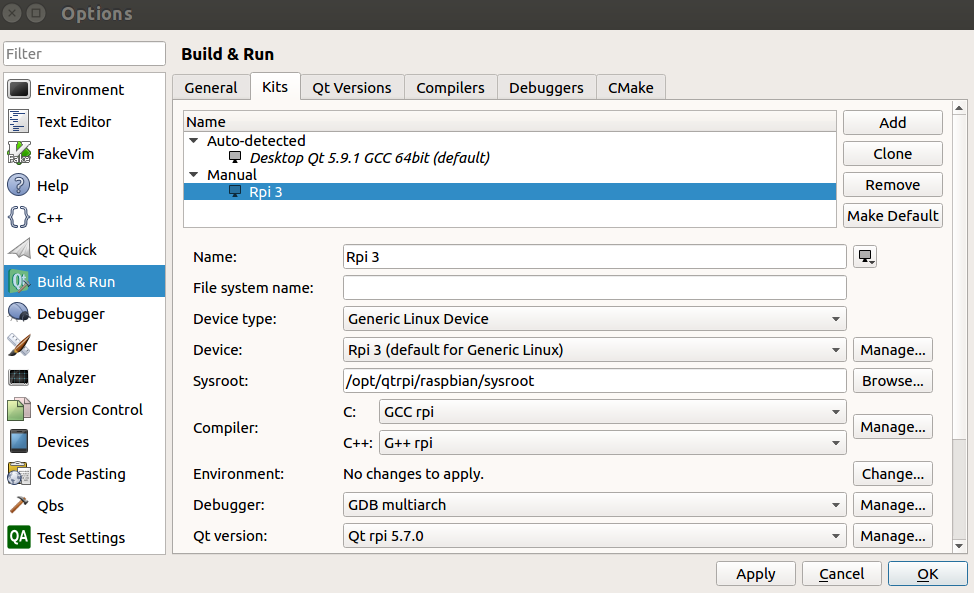
5-5-1. Click on “Kits” tab and then “Add” button
5-5-2. Enter (or select) information below:
Name :
Rpi 3
Device Type:
Generic Linux Device
Sysroot :
/opt/qtrpi/raspbian/sysroot
Compiler: C:
GCC rpi
Compiler: C++:
G++ rpi
Debugger :
GDB multiarch
Qt Version :
Qt rpi 5.7.0
5-5-3. Click on “Apply” button, then “OK”.
6. Verify Cross Compiling Environment
Let’s check if everything is OK by building a sample project on host and executing it on RPi.
6-1. “File” > “New File or Project”
6-2. “Application” > “Qt Qucick Application”, then click on “Choose…” button.
6-3. Enter project name and click on “Next”.
6-4. Click on “Next” on “Define Build System”.
6-5. Select “Qt 5.7” and click “Next” on “Define Project Details”.
6-6. Check on “Rpi 3” and click “Next” on “Kit Selection”.
6-7. Click on “Finish” button on “Project Management”.
6-8. Open .pro file from the project tree.
6-9. Replace “Default rules for deployment” portion with the two lines below.
target.path = /home/pi/
INSTALLS += target
6-10. Select “Projects” icon on left side bar.
6-11. Click on “Rpi 3” under “Build & Run”.
6-12. Click on “Run” icon on the left side bar.
References
[1] QtRpi Requirements – GitHub
[2] What versions of Qt is available? – QtRpi FAQ
[3] deploy-qtrpi.sh “unable to locate libinput5” #69 – qtrpi – GitHub
[4] Games that uses libGLESv2.so doen’t work in raspbian stretch – raspberrypi.org
[5] ArchLinux Qt eglfs – raspberrypi.org
[6] Linking the Application to the Static Version of Qt – Qt Documentation

do we need internet connection on ubuntu PC for working this???
Hi hemraj. Yes, both ubuntu and rpi need internet connection.