
The goal of this post is to create an Alexa skill [1] that controls three LEDs (red, yellow, and green) connected to Raspberry Pi’s GPIO pins. The skill will enable to turn ON/OFF each LED by specifying the color of light and the ON/OFF status via voice command.

Prerequisites (parentheses indicate my environment)
- Raspberry Pi (Raspberry Pi 3 B+) running Raspbian Stretch (Nov. 2018)
- LEDs (Pi Traffic Light)
- Alexa-enabled Device (Amazon Echo Dot 3rd Gen)
- Internet connection
Steps
1. Setup LEDs on Raspberry Pi
Connect LEDs to Raspberry Pi’s GPIO pins. In this post, I’ll use Pi Traffic Light. Please refer this post for setup.
2. Create Alexa skill on Raspberry Pi
flask-ask is a Flask extension that makes it easier to build Alexa skill [2].
2-1. Install Flask and flask-ask.
sudo pip install Flask flask-ask
2-2. Create a python file.
2-3. Create a python file and implement a skill like below.
from flask import Flask
from flask_ask import Ask, statement
import RPi.GPIO as GPIO

app = Flask(__name__)
ask = Ask(app, '/')

@ask.intent('LedIntent')
def led(color, status):
  if color.lower() not in pins.keys():
    return statement("I don't have {} light".format(color))
  GPIO.output(pins[color], GPIO.HIGH if status == 'on' else GPIO.LOW)
  return statement('Turning the {} light {}'.format(color, status))

if __name__ == '__main__':
  try:
    GPIO.setmode(GPIO.BCM)
    pins = {'red':9, 'yellow':10, 'green':11}
    for pin in pins.values():
      GPIO.setup(pin, GPIO.OUT)
    app.run(debug=True)
  finally:
    GPIO.cleanup()
2-4. Save the file and run the code. In this example, the file name is “led.py”.
python led.py
Now the skill is running as a local web service on default port (i.e. localhost:5000).
3. Publish Skill on the Internet
To communicate with Alexa, the skill needs to be accessible from the internet. In this post, I’ll use a tunnel service called serveo [3].
3-1. Open another terminal.
3-2. Enter the command below. It will connect the local server to a public URL.
ssh -R 80:localhost:5000 serveo.net
In the output, you should be able to find a line like below. This URL will be required as an endpoint when configuring the skill in next step.
Forwarding HTTP traffic from https://xxxxx.serveo.net
4. Configure Skill on Amazon Cloud
4-1. Open a browser and log in to Amazon Developer. Please sign up if you don’t already have the account.
4-2. Navigate to Alexa Developer Console and click on “Create Skill”.
4-3. Enter a skill name. In this example, it’s “raspberry pi”.
4-4. Make sure “Custom” is selected then click on “Create skill”.
4-5. Make sure “Start from scratch” is selected then click on “Choose”.
4-6. Click on “+” icon next to “Slot types” in the left pane.
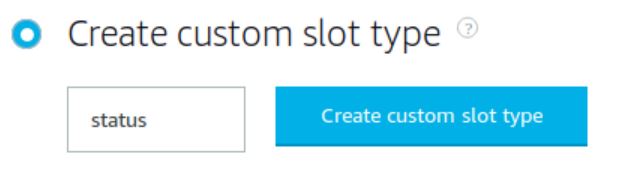
4-7. Enter “STATUS” and click on “Create custom slot type” button.
4-8. Add “on” and “off” as the slot values.

4-9. Click on “+” icon next to “Slot types” in the left pane again.
4-10. Click on “Use an existing slot type from Alexa’s built-in library”
4-11. Search “AMAZON.Color” and click on “Add slot type”.
4-12. Click on “+” icon next to “Intents” in the left pane again.
4-13. Enter “LedIntent” as an intent name, then click on “Create custom intent”.
4-14. Enter below as a Sample Utterances, then click on “+” button.
turn the {color} light {status}
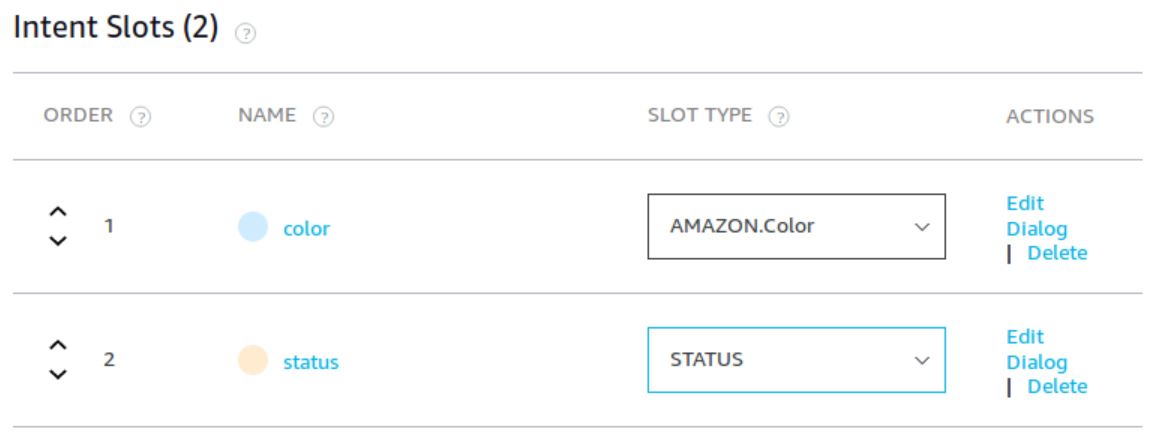
4-15. Select “AMAZON.Color” and “STATUS” types for color and status slots respectively.
4-16. Click on “Build Model” button on the top. If everything goes right, you’ll get a “Build Successful” notification.

4-17. Select Endpoint in the left pane and and check on “HTTPS”.
4-18. Enter the URL generated by serveo in Step 3.2 under Default Region.
4-19. Select “My development endpoint is sub-domain of domain that has a wildcard certificate from a certificate authority” for SSL certificate type.
4-20. Click on “Save Endpoints”
5. Testing Skill in Alexa Developer Console
5-1. Select “Test” tab in the top menu bar.
5-2. Select “Development” in the pull down menu to enable Skill testing.
5-3. Say or input below to Alexa Simulator.
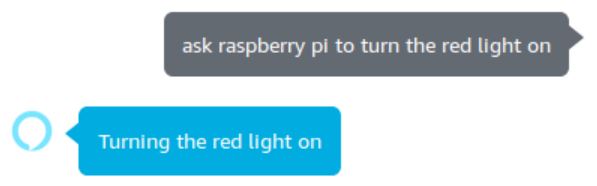
ask raspberry pi to turn the red light on
This should turn on LED light connected to you Raspberry Pi. Also, you should be able to see similar to below in Alexa Simulator.
6. Testing Skill with Amazon Echo
You can test the skill on your Alexa-enable device (e.g Echo dot) like this.
Alexa, ask raspberry pi to turn the red light on

References
[1] Alexa Skills Kit – Amazon Alexa
[2] Welcome to Flask-Ask
[3] serveo – Expose local servers to the internet
[4] Amazon Alexa + Raspberry PI + jasm.eu: Our first steps together
[5] Flask-Ask: A New Python Framework for Rapid Alexa Skills Kit Development
Heeeelp brooo, when I use serveo.net it doesn’t work, my output is time out :(. Please check my answer bro
This was one of the best Alexa Voice Service tutorials that I have ever seen!! The only problem that I encountered which prevented me from getting it to work is that I could not get the serveo.net tunnel service to generate a forwarding IP address for the Alexa endpoint. I keep getting a connection time-out error on port 22 when I issue the ssh command. I did enter the WAN address for my router in the endpoint field in the Alexa Developer Console for the skill. (I set up port forwarding in my router to forward TCP requests on port 5000 to the Raspberry Pi.) Unfortunately, when I issue a voice command using Alexa, the corresponding request to turn an LED on or off is never received by the Raspberry Pi and Alexa announces that it did not receive a response from the Raspberry Pi. However, if I use the Safari browser on my phone to access the Raspberry Pi (through the WAN) with a HTTP (not HTTPS) GET request, the Flask web server properly displays the header so I know the URL of the endpoint is correct.
It would be helpful to know why a tunnel cannot be created using serveo.net or why manually entering the endpoint does not work.