
This post shows steps to set up Raspberry Pi Zero W as a wireless router.
I tested it with Raspbian Buster Lite (September 2019 version) on Raspberry Pi Zero W and this USB WiFi adapter. [Updated on 11.25.2019]
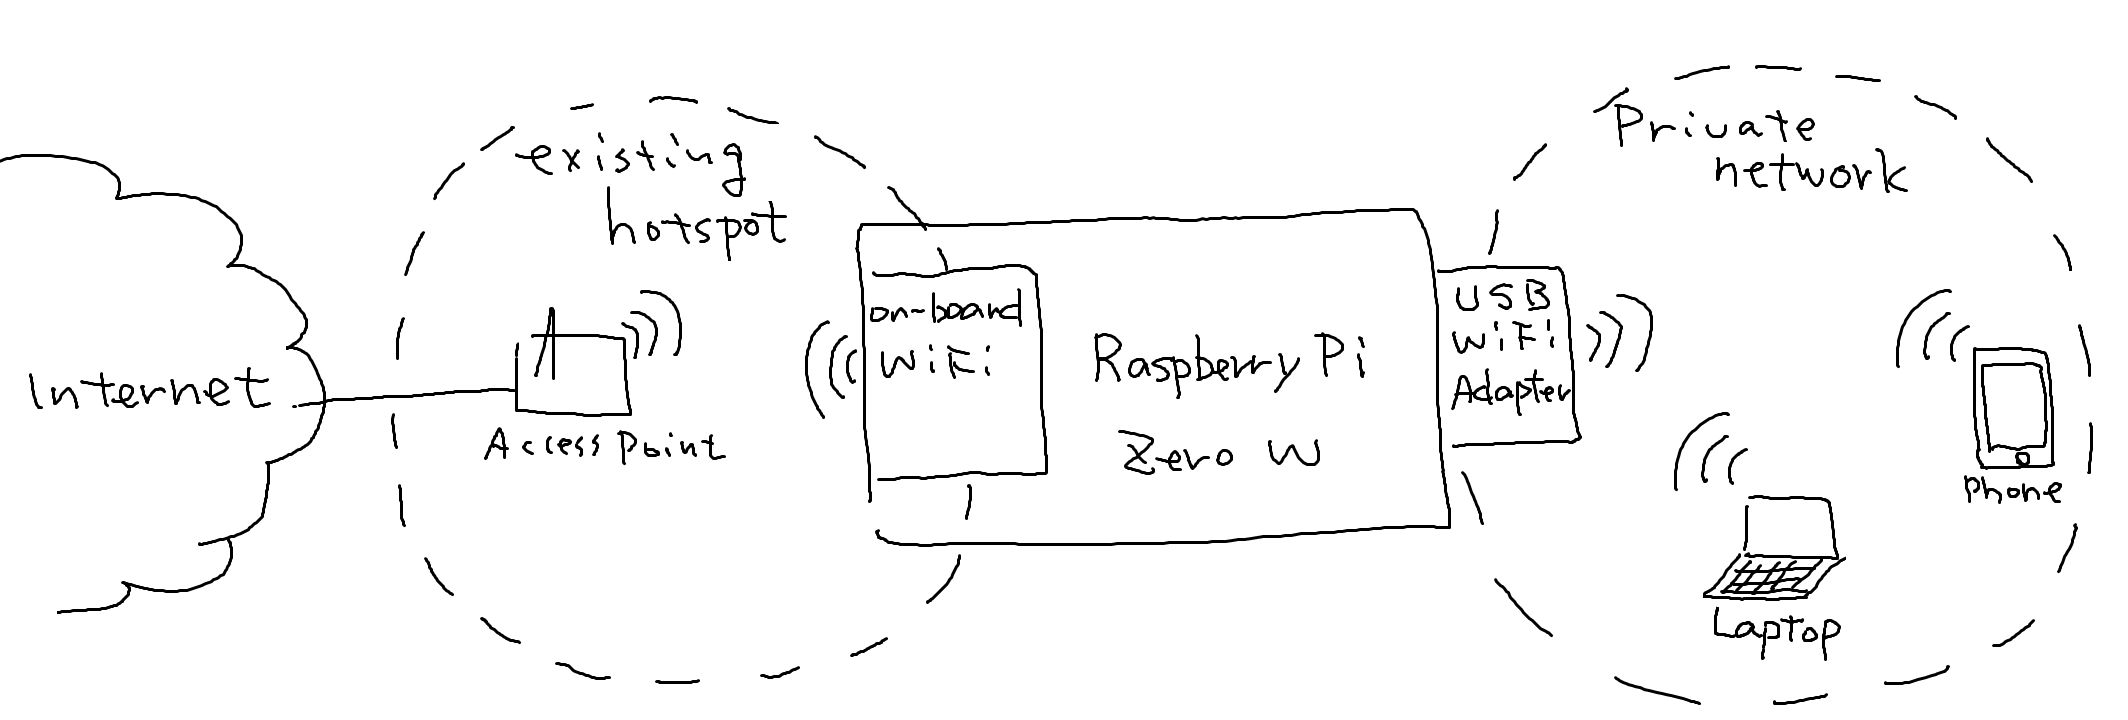
The figure above shows overview of the idea. Here are some assumptions:
- Raspberry Pi Zero W (the router) connects to an existing WiFi network (i.e. hotspot/access point) for Internet access via the on-board WiFi adapter.
- The router creates a private WiFi network (192.168.3.0/24) using a USB WiFi adapter.
- The IP address of the interface for the private network is set to 192.168.3.254.
- The IP address range for the private network is from 192.168.3.1 to 192.168.3.20.
- A device connected to the private network can access the Internet through the router.
Here is the list of contents of this post.
Contents
– Prerequisites
– Steps
1. Package installation
2. Wireless interface names
3. Assigning a static IP address for USB WiFi adapter (wlan1)
4. DHCP server setting
5. Access point setting
6. Enabling traffic forwarding
7. Forwarding rule configuration
8. Connecting to existing WiFi network (If it’s not connected yet)
9. Test
– Reference
- Raspberry Pi Zero W running Raspbian Stretch
- USB WiFi adapter (e.g. Edimax EW-7811Un 150Mbps 11n Wi-Fi USB Adapter)
- USB Micro-B male to Type-A female adapter (I like this. it’s the smallest I found.)
1-1. As always, update the package list and upgrade the installed software first.
sudo apt-get update && sudo apt-get upgrade -y
1-2. Install ‘hostapd’ and ‘dnsmasq’.
sudo apt-get install hostapd dnsmasq -y
2. Wireless interface names
Before starting work on the configurations, check the interface names for the on-board WiFi and WiFi adapter. Those names will be used later.
2-1. Run ‘ifconfig’ command without connecting the WiFi adapter.
ifconfig
You should be able to see “wlan0”. It’s the interface name for the on-board WiFi adapter.
2-2. Then, connect the WiFi adapter and run the same command. This time you’ll notice that “wlan1” is added. It’s the name for newly connected USB WiFi adapter. So, now we know the interface names:
wlan0 : on-board WiFi
wlan1 : WiFi adapter
3. Assigning a static IP address for USB WiFi adapter (wlan1)
3-1. Open /etc/dhcpcd.conf
sudo nano /etc/dhcpcd.conf
3-2. Copy below at the end of the file. [6]
interface wlan1
static ip_address=192.168.3.254/24
nohook wpa_supplicant   # don't call the wpa_supplicant hook
denyinterfaces wlan1    # don't send DHCP requests
after reboot, wlan1 should look like this:
pi@raspberrypi:~ $ ifconfig wlan1
wlan1: flags=4163<UP,BROADCAST,RUNNING,MULTICAST>  mtu 1500
        inet 192.168.3.254  netmask 255.255.255.0  broadcast 192.168.3.255
...
4. DHCP server setting
As suggested in [1], rename the original configuration file and create a new file from the scratch.
4-1. Rename the original file.
sudo mv /etc/dnsmasq.conf /etc/dnsmasq.conf.orig
4-2. Create a new file.
sudo nano /etc/dnsmasq.conf
4-3. Copy lines below, save and close the file.
interface=wlan1
dhcp-range=192.168.3.1,192.168.3.20,255.255.255.0,24h
5. Access point setting
5-1. Create the configuration file.
sudo nano /etc/hostapd/hostapd.conf
5-2. Copy the lines below, save and close the file. Replace <NETWORK_NAME> and <PASSWORD> with whatever you want for your private network.
interface=wlan1
hw_mode=g
channel=7
wmm_enabled=0
macaddr_acl=0
auth_algs=1
ignore_broadcast_ssid=0
wpa=2
wpa_key_mgmt=WPA-PSK
wpa_pairwise=TKIP
rsn_pairwise=CCMP
ssid=<NETWORK_NAME>
wpa_passphrase=<PASSWORD>
5-3. Specify the location of the configuration file. To do that, first open /etc/default/hostapd
sudo nano /etc/default/hostapd
5-4. Then, add the line below, save and close the file.
DAEMON_CONF="/etc/hostapd/hostapd.conf"
5-5. Enable hostapd by running the commands below [5]. (Thank you Dan for the info!)
sudo systemctl unmask hostapd.service
sudo systemctl enable hostapd.service
6. Enabling traffic forwarding
6-1. Open the configuration file.
sudo nano /etc/sysctl.conf
6-2. Look for the line below.
#net.ipv4.ip_forward=1
6-3. Uncomment the line. Now, it should be like:
net.ipv4.ip_forward=1
7. Forwarding rule configuration
7-1. Run these command:
sudo iptables -t nat -A POSTROUTING -o wlan0 -j MASQUERADE
sudo iptables -A FORWARD -m conntrack --ctstate RELATED,ESTABLISHED -j ACCEPT
sudo iptables -A FORWARD -i wlan1 -o wlan0 -j ACCEPT
7-2. Backup the configuration.
sudo sh -c "iptables-save > /etc/iptables.ipv4.nat"
7-3. In order to load the rules on boot, open /etc/rc.local,
sudo nano /etc/rc.local
7-4. Then add this line above “exit 0”.
iptables-restore < /etc/iptables.ipv4.nat
8. Connecting to existing WiFi network (If it’s not connected yet)
8-1. Open /etc/wpa_supplicant/wpa_supplicant.conf
sudo nano /etc/wpa_supplicant/wpa_supplicant.conf
8-2. Add lines below at the end of the file. Replace <NETWORK_NAME> and <PASSWORD> to appropriate strings for your WiFi network for Internet access.
network={
    ssid="<NETWORK_NAME>"
    psk="<PASSWORD>"
    key_mgmt=WPA-PSK
}
9. Test
9-1. Reboot the board.
sudo reboot
9-2. Search the WiFi network configured in step 5-2 from a WiFi enabled device (e.g. PC, phone) and connect to it. After connected, you should be able to access the Internet from the device.
References
[1] How to use your Raspberry Pi as a wireless access point
[2] Internet sharing – Arch Linux
[3] How-To: Turn a Raspberry Pi into a WiFi router
[4] What is the difference between -m conntrack –ctstate and -m state –state
[5] RPi Update broke Access Point setup #1093 – GitHub
[6] How do I configure dhcpcd to call wpa_supplicant for a specific interface? – StackExchange
I purchased this Wifi adapter for a Dell 17R laptop that we purchased in late 2011. The built in Intel adapter was working fine but typically attached at 72 Mbps at best. Since I was in the process of also updating our router to one capable of 802.11ac I was looking for some way to upgrade our laptop. Even though there is an internal option in an Intel upgraded card I checked the process to get to the card and i decided to hold on off on that option. When I installed this EDUP adapter along with the driver shipped on a mini CD it did not work well and was unstable. Before sending it back I contacted EDUP support via email and they were very helpful and quick to reply. They sent me the link to the updated driver and gave me some other excellent recommendations on improving the performance. After installing the driver and implementing the other changes the EDUP connected at 150 Mbps on my old router and was very stable. Then I received my new ac capable router and installed it and wow what a difference. Now the EDUP is consistently running at 433 Mbps. Thanks to EDUP for an affordable well made adapter and excellent customer service.
It’s really a great article. I just followed the steps and it’s done. Thanks for the altruism.
Thanks for your comment! I’m glad it worked for you!
Hey, thanks for the great article! Was wondering if this could be done but using USB ethernet as the exit instead? I have a Pi Zero W with USB dongle, so if I plug it into my laptop can I get the internet from the wlan0 and connect to it using the USB ethernet connection?
Can this be done in reverse? My grandfather has moved nextdoor to me in a neighborhood type subdivision. I would like to use a high gain directional USB wifi antenna to get the internet for the pi. Then broadcast it using the on board pi wifi. I’m guessing it would be the same directions and just reverse the wlan1 with wlan0 and vice versa. Thanks in advance.
Hi Ryan,
Yes, as you guessed, you should be able to do that by just swapping “wlan0” and “wlan1”. Let me know how it goes!
With RPi 3B+ had to use following for hostapd to work corrctly:
sudo systemctl unmask hostapd.service
sudo systemctl enable hostapd.service
sudo reboot
source: https://github.com/raspberrypi/documentation/issues/1093
Thanks Dan for your feedback! I added the step (5-5) for RPi3.
also got Pi-Hole working on the same setup.
Pi-Hole listening on wlan1 (selected during Pi-Hole setup), and Pi-Hole acting as DHCP server (as above dnsmasq DHCP not working with Pi-Hole).
All traffic/requests then get forwarded to wlan0, using same as above config. Works great.
That’s really interesting. I want to try that too. Thank you for sharing the info!
i did it 5 times but it don’t work
Hi Amadeusz, I’m sorry to hear that. Can you tell me which part didn’t work?
I cant get the dongle to accept the static ip.
Any ideas?
Hi Derek, the problem may be the same as Nathaniel’s. I updated step 3-2 and it may fix your problem. Can you give it a try?
I can see my AP up on another device, but there is no internet available through it. I have checked to see if the internet is connected properly on the correct interface device and it is, so it seems to me that the issue is that it is not forwarding the data through to the internet connected interface. I have checked to make sure that the iptable rules are all correct and they are and i have made sure that ip forwarding is also configured to be on.
What do you think this could be?
Thanks
Hi Cain,
Is dnsmasq running? Can you run the command “systemctl status dnsmasq.service”?
This tutorial is crap, no offense. I followed this tutorial exactly as described several times, each time reinstalling a fresh copy of Raspbian Stretch and it always come to the same conclusion. I can see my AP but cannot connect to it.
Hi Ethan, sorry for my late reply…!
I believe your problem is the same as Nathaniel’s. I’ve updated step 3-2 based on his input. Can you try it and let me know how it goes?
Thanks for creating this tutorial. I worked on this today on a Zero W with the latest version of raspbian (Buster) and it went OK, but took a few extra steps to get the Pi to show up as an Access Point. I ended up needing to run command “sudo systemctl status hostapd.service” in step 5-5 to figure out the service wasn’t running and then use “sudo systemctl start hostapd.service” to get it going.
One *tiny* problem though… as soon as I connect a device the Pi goes into Kernel Panic and crashes. I’ll trouble shoot more tomorrow and see what’s wrong. I’ll post more once I get it figured out. If anyone has any ideas, then I’m all ears. Thanks again Max!
Hi Jeff, thanks for your feedback!
Regarding step 5-5, hostapd.service should start upon the booting (i.e. step 9-1). That’s the reason why I’m not implicitly starting the service in step 5-5.
About kernel panic, I’ve never observed that… Can you share how your troubleshoot went?
I managed to get completely through the tutorial, and the AP is set up and visible. My only problem now is that I am unable to connect as I get an “IP Configuration Failure” when I try and connect to it with my phone. Any ideas on how to fix this?
Also in order to get this far, instead of “denyinterfaces” in step 3-2 I had to do “nohook wpa_supplicant”.
I have now got this working with a fresh install of raspbian. I the used “nohook wpa_supplicant” before “denyinterfaces wlan1” in steps 3-2. This fixed the problem for me.
Hi Nathaniel, thank you for sharing it!
I tested it and was able to reproduce the problem. Your solution worked perfectly!
I updated step 3-2 accordingly. Thanks again!
Nice tutorial! I’m looking to do something similar but trying to minimize the number of additional components.
Do you think it’s possible to use the onboard bluetooth instead of the additional usb wifi adapter?
Laptop/iPhone -> [bt] -> raspberry pi zero w -> [wifi #0] -> Access point -> Internet
Thank you Larry for your comment! That’s an interesting idea, I think it’s possible with Bluetooth PAN profile. Let me know how it does!
Ah… I have no clue how to set it up lol… I did follow the above guide with a spare Wifi adapter and it worked fine with the latest OS (Buster) without any modifications on my Raspberry Pi Zero W.
Hello, Great tutorial.
Do you know if is it possible to do the opposite using onboard wifi as a private network AP and the dongle to connect to Internet? Is the PI Zero onboard wifi capable to act in AP mode?
Thank you
Thanks for your comment, lorenzo! Yes, it’s possible. Just swap “wlan0” and “wlan1” in the steps. Let me know how it goes!
Hello
works fine swapping “wlan0” and “wlan1”, but i had some dns server issues fixed by adding a dhcp-option in /etc/dnsmasq.conf to use external dns servers .
Also i had to make some changes in /etc/wpa_supplicant/wpa_supplicant.conf adding the ctrl_interface directive and the update_config directive.
Great tutorial, it’s exactly what i needed, thank you
I am having trouble it shows the network I can connect but it shows no internet access I tested that config and dns masq is running
Hello,
I was wondering whether I can use this Pi as a WLAN Router but with my Smartphone as the access gateway to the internet.
The reason behind it is that I have two Sonos speakers. Unfortunately they need WLAN and an active internet connection in order to work.
I am completely new to this topic though.
Best regards
Alex
Hi Alex,
Yes, you can use your smartphone as the gateway as long as your phone supports tethering. What you need to do is set your phone’s network info in step 8.
Hi Max
I followed your guide, and in some sense it worked, but i’m seeing a strange problem, that i can’t my head around.
When connecting to the PI AP. I get the expected ip address, i can do dns lookup, I can even ping the upstream ip of router that the PI connects to.
On the parent network i have multiple units connected (NAS etc) and i’m able to connect to these without any problems (where they say the ip connecting is the ip of the PI, as expected due to nat).
I also connected directly to the PI and here i’m able to ping internet sites as well, so nothing blocking the PI.
I suspected som configuration in my parent network, but i’m seeing the same when connecting to my 4G Hotspot.
I believe i followed your guide to the point, so i’m kind of scratching my head why my PI network can connect to the parrent net but has no internet access.
Thanks for your feedback
Did you fix that? I think I have the same issue.
Thanks.
What a great tutorial.
I have a problem, I could manage to setup the secondary network and my devices get connected to the AP, but internet is not being shared across… Looks like some is blocking yet. No ufw installed.
Gateway inet 192.168.1.254
wlan0 inet 192.168.1.161
wlan1 inet 192.168.1.253
VPN range 192.168.1.64-84
A device connected got 192.168.1.65
Any idea?
Thanks.
Hi Max,
I ran across your article looking for a wireless to wireless router configuration. I like your approach but I seem to have a weird problem. I have a USB raspberry certified WiFi adapter and a pi Model 3B with onboard wifi. Using your configuration for wlan1, when I boot up wlan1 has all of the status as it should be (ifconfig), but wlan0 has no IP address. It should be getting an IP from the Wifi unit I am connecting to. Devices can connect to wlan1 via DHCP fine, but there is of course no routing since wlan0 has no address. If I switch wlan0 and wlan1 roles, it follows the error. What is it that is missing?
Thank you in advance for any advice you can give me.
Regards,
Ron
This is kind of misleading:
“after reboot, wlan1 should look like this:
pi@raspberrypi:~ $ ifconfig wlan1
wlan1: flags=4163 mtu 1500
inet 192.168.3.254 netmask 255.255.255.0 broadcast 192.168.3.255
”
If you reboot at this point, you will NOT see this as there are no configuration files yet.
Hi Max,
Thanks for your tutorial. After trying this more than 5 times, I keep getting the same error. I have a connection to my wifi network with wlan0 also I have a connection with my smartphone / tablet or somthing else to wlan1 (wifi dongle (Alfa AWUS036NH)), but there is no connection between wlan0 and wlan1.
What else could I try?
Thank you very much and hope for a soon as possible answer.
There are few things that should be changed/added:
1. make sure that wlan0 is not connected on same subnet (3) as 192.168.3.xxx
2. in /etc/dhcpcd should be this:
interface wlan1
static ip_address=192.168.3.254/24
nohook wpa_supplicant
tabs should be added otherwise if one tries to swap wlan0 and wlan1, wpa_supplicant is off and cant connect to public network.
3. in /etc/hostapd/hostapd.conf
wpa_passphrase= requires minimum 8 letters
4. in /etc/sysctl.conf
enable ipv6 routing otherwise there will be no internet, uncomment
#net.ipv6.conf.all.forwarding=1
5. sudo iptables -t nat -A POSTROUTING -o wlan0 -j MASQUERADE
should be enough, no need for other iptables commands
6. if anything goes wrong, type journalctl -xe to see what is causing it
Following the guide. Really good.
Running a RPI zero w.
I can’t get the static IP to take hold (3-2). This makes the hostapd fail. Any ideas?